
Creating a new Asset type
At some point in your project, you might need to create a new custom Asset class, for example, an Asset to store conversation data in an RPG. To properly integrate these with Content Browser, you’ll need to create a new Asset type.
How to do it…
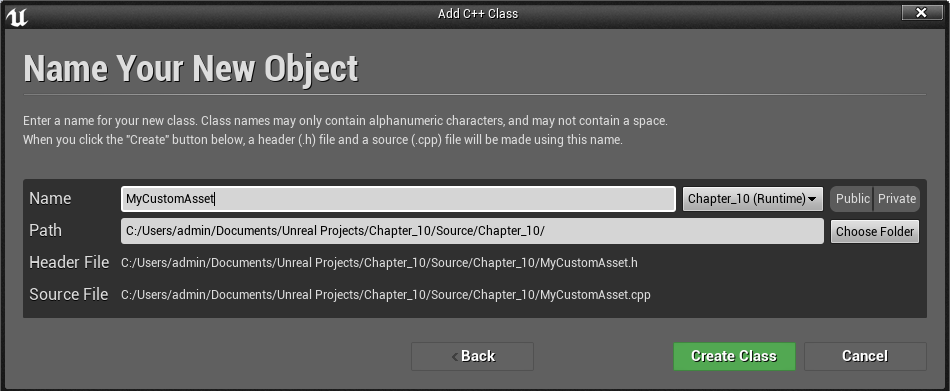
- Create a new C++ class based on UObject called MyCustomAsset:
- Open up the script and update the code of the .h file to the following:
#pragma once

#include "CoreMinimal.h"
#include "UObject/NoExportTypes.h"
#include "MyCustomAsset.generated.h"

/**
 *
 */
UCLASS()
class CHAPTER_10_API UMyCustomAsset : public UObject
{
  GENERATED_BODY()

public:
    UPROPERTY(EditAnywhere, Category = "Custom Asset")
    FString Name;

};
- Next, create a class based on UFactory:
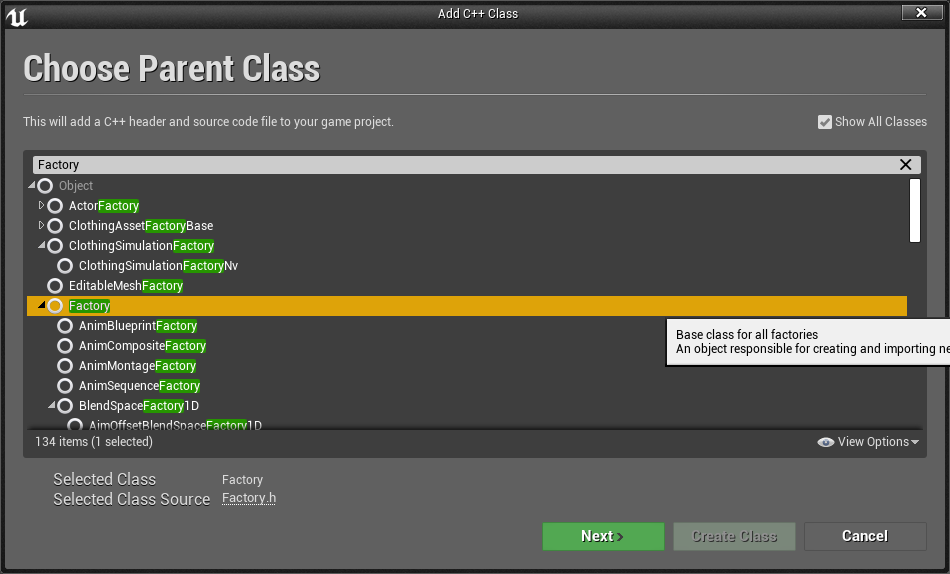
- Give the script a name of CustomAssetFactory and press the Create Class button.
- Open the script in Visual Studio and update the CustomAssetFactory.h file to the following:
#pragma once

#include "CoreMinimal.h"
#include "Factories/Factory.h"
#include "CustomAssetFactory.generated.h"

UCLASS()
class CHAPTER_10_API UCustomAssetFactory : public UFactory
{
    GENERATED_BODY()

public:
    UCustomAssetFactory();

    virtual UObject* FactoryCreateNew(UClass* InClass,
        UObject* InParent, FName InName, EObjectFlags Flags,
        UObject* Context, FFeedbackContext* Warn, FName
        CallingContext) override;
};
- Then, switch over to the CustomAssetFactory.cpp file and implement the class:
#include "CustomAssetFactory.h"
#include "Chapter_10.h"
#include "MyCustomAsset.h"


UCustomAssetFactory::UCustomAssetFactory()
    :Super()
{
    bCreateNew = true;
    bEditAfterNew = true;
    SupportedClass = UMyCustomAsset::StaticClass();
}

UObject* UCustomAssetFactory::FactoryCreateNew(UClass*
    InClass, UObject* InParent, FName InName, EObjectFlags
    Flags, UObject* Context, FFeedbackContext* Warn, FName
    CallingContext)
{
    auto NewObjectAsset = NewObject<UMyCustomAsset>(InParent,
        InClass, InName, Flags);
    return NewObjectAsset;
}
- Compile your code and open the editor.
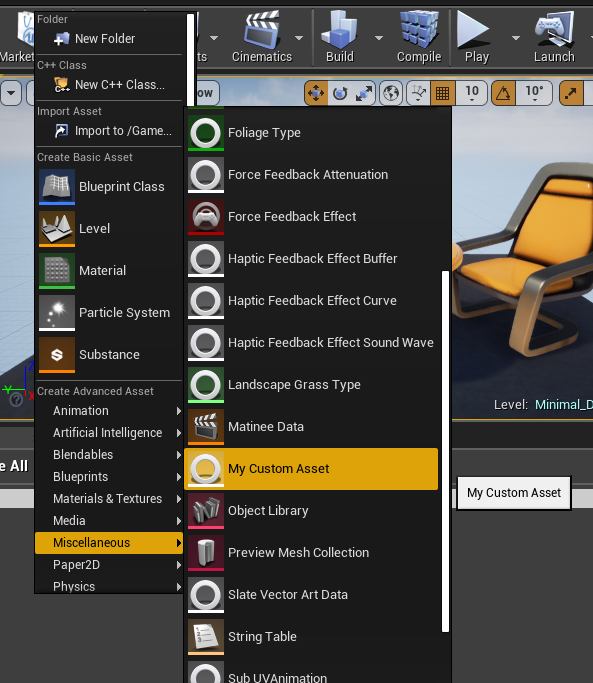
- Right-click in Content Browser, from the Content folder and, under the Miscellaneous tab of the Create Advanced Asset section, you should see your new class and be able to create instances of your new custom type:
How it works…
The first class is the actual object that can exist in the game at runtime. It’s your texture, data file, or curve data – whatever you require.
For the purpose of this recipe, the simplest example is an asset that has an FString property to contain a name.
The property is marked as UPROPERTY so that it remains in memory, and additionally marked as EditAnywhere so that it is editable on both the default object and on instances of it.
The second class is Factory. Unreal uses the Factory design pattern to create instances of assets.
This means that there is a generic base Factory that uses virtual methods to declare the interface of object creation, and then Factory subclasses are responsible for creating the actual object in question.
The advantage of this approach is that the user-created subclass can potentially instantiate one of its own subclasses if required; it hides the implementation details regarding deciding which object to create away from the object requesting the creation.
With UFactory as our base class, we include the appropriate header.
The constructor is overridden, because there are a number of properties that we want to set for our new factory after the default constructor has run.
bCreateNew signifies that the factory is currently able to create a new instance of the object in question from scratch.
bEditAfterNew indicates that we would like to edit the newly created object immediately after creation.
The SupportedClass variable is an instance of UClass containing reflection information about the type of object the factory will create.
The most significant function of our UFactory subclass is the actual factory method – FactoryCreateNew.
FactoryCreateNew is responsible for determining the type of object that should be created, and using NewObject to construct an instance of that type. It passes a number of parameters through to the NewObject call.
InClass is the class of object that will be constructed. InParent is the object that should be containing the new object that will be created. If this isn’t specified, the object is assumed to go into the transient package, which means that it won’t be automatically saved. Name is the name of the object to be created. Flags is a bitmask of creation flags that control things such as making the object visible outside of the package it is contained in.
Within FactoryCreateNew, decisions can be made regarding which subclass should be instantiated. Other initialization can also be performed; for example, if there are sub-objects that require manual instantiation or initialization, they can be added here.
An example from the engine code for this function is as follows:
UObject* UCameraAnimFactory::FactoryCreateNew(UClass*
 Class,UObject* InParent,FName Name,EObjectFlags
 Flags,UObject* Context,FFeedbackContext* Warn)
{
  UCameraAnim* NewCamAnim =
   NewObject<UCameraAnim>(InParent, Class, Name, Flags);  NewCamAnim->CameraInterpGroup =
   NewObject<UInterpGroupCamera>(NewCamAnim);
  NewCamAnim->CameraInterpGroup->GroupName = Name;
  return NewCamAnim;
}
As we can see, there’s a second call to NewObject to populate the CameraInterpGroup member of the NewCamAnim instance.
Post Link: Creating a new Asset type