
[Unity]Anti-aliased Alpha Test: The Esoteric Alpha To Coverage[1]
ref: https://medium.com/@bgolus/anti-aliased-alpha-test-the-esoteric-alpha-to-coverage-8b177335ae4f
AlphaToMask on
Aliasing is the bane of VR. We have several tools we use to try to remove, or at least reduce aliasing in real time graphics today. Tools like super sampling, temporal anti-aliasing (TAA), and multi sample anti-aliasing (MSAA). They all have their pros and cons, but there’s one tool I don’t feel like gets the use and respect it deserves. That tool is a feature of MSAA, Alpha to Coverage.
This article will be assuming you’re using forward rendering with at least 4x MSAA. If you’ve chosen to use deferred rendering this article will be less useful for you. Some techniques are still applicable though. If you’ve chosen to use TAA and forward rendering this may solve one of the reasons you chose that option!
The Problem
Self Inflicted Aliasing
A very common case of aliasing is the use of alpha test, used for things like trees or bushes. Lets look at why it’s used so much even though it causes so much aliasing.
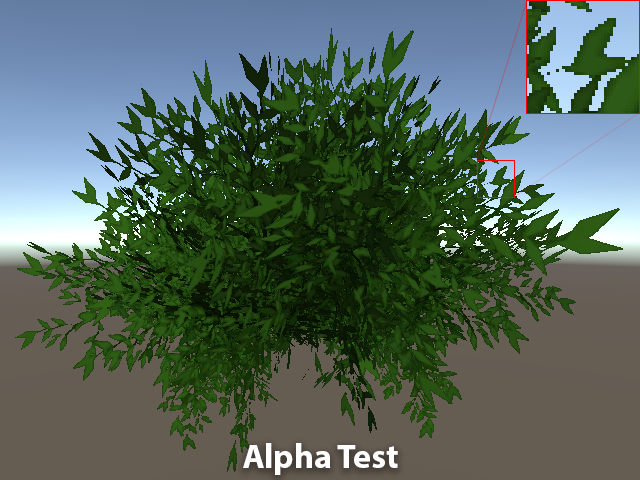
This is a basic plant mesh in Unity with a very basic lit alpha test shader. In Unity these are often called Cutout shaders. I’m using the bush03 mesh and texture from Nature Starter Kit 2 on the asset store if you want to try this yourself. It doesn’t look to bad, but there’s a lot of aliasing there from the alpha testing. Note that the above image is using 4x MSAA. That doesn’t help here since this is shader aliasing which generally MSAA can’t help with. This is something people usually fix with some extra super sampling or they give up on MSAA and use TAA instead. Or they just live with it.
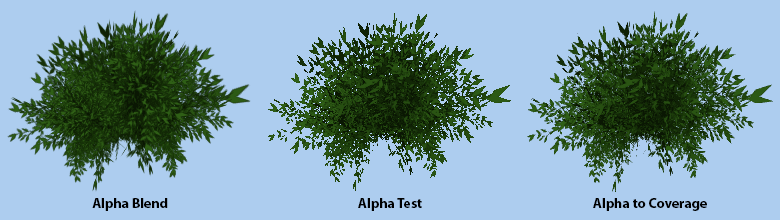
What about traditional alpha blending? Seems like that should be an obvious answer, so why don’t people use that?
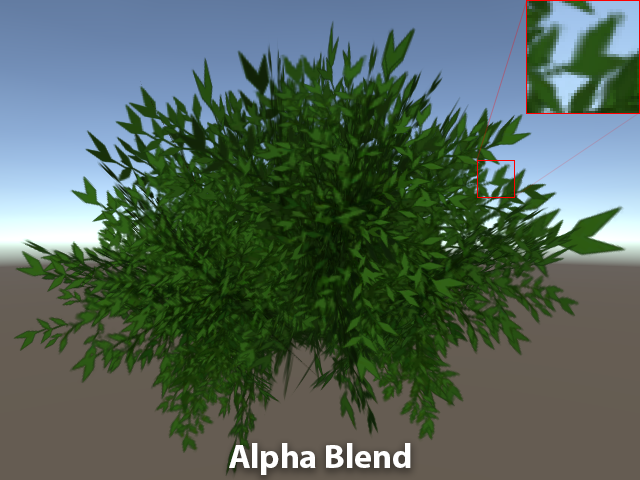
That looks way better, at least in this static shot, maybe a little blurry, but the aliasing is gone! Success, right? Of course it isn’t that easy. In motion using alpha blending for this case looks really wrong.
It almost looks like the bush is inside out! It’s even more obviously wrong in VR, so this isn’t a usable option. So what’s happening here? Alpha blended shaders don’t get to use per pixel depth sorting like opaque and alpha test shaders do. The bush is made from a bunch of intersecting polygons. You could sort the polygons, but they’re still intersecting so that only helps so much. So, that’s why we’re stuck with using alpha test.
But there are ways to have the benefit of both alpha test and alpha blend; a way to get per pixel depth sorting and the smooth edge. There are some two pass techniques¹ that can work well. There are also some order independent transparency approximations, though they are potentially expensive. There’s an even better option if you’re using MSAA. Enter Alpha to Coverage.
The Solution
This One Simple Trick …
Alpha to Coverage (sometimes referred to as A2C or ATOC) is a less commonly mentioned graphics technique. While used by several big games, it is seemingly unknown to the vast majority of smaller devs. It’s a powerful tool that is often overlooked due to the requirement of MSAA. Games often treat MSAA as an expensive option for high end PCs. Or they’ve used rendering techniques that don’t allow for easy use of MSAA to begin with, like deferred rendering. The result is games have overwhelmingly preferred post process anti-aliasing like FXAA. This made Alpha to Coverage even more uncommon for a while. But the rise of VR has lead to the resurgence of forward rendering and of MSAA. This means A2C has become a useful tool again, especially for VR.
Anti-aliased alpha test is one of the most basic use cases for Alpha to Coverage. The basic idea for this has been around for as long as A2C has existed. It may even have been the original intended use for it. The first time I saw this idea was on Emil Persson’s (better known to many as Humus) site here. I believe the method in this article is superior to the one used in his original demo.
Multi Sample Anti-Aliasing
Before we get into that though, I’m going to quickly run down what Alpha to Coverage is and why MSAA is a requirement.
Alpha to Coverage maps the alpha output from a pixel shader to the coverage mask of MSAA. Obvious, right?!
Okay, that’s going to take a little more explanation. Be warned, I’m going to get into some of the gritty details here.
The big trick with MSAA and how it differs from super sampling is what Multi Sample Anti-Aliasing is doing multiple samples of. Super sampling at its most basic is rendering everything at a higher resolution. The final on screen image is a scaled down average of this higher resolution render. MSAA renders the color at the same resolution as the target resolution, but multiple coverage samples per pixel. In simpler terms it’s rendering the depth of the scene at a higher resolution than the target resolution. Each rendered triangle’s depth samples are its coverage. If you’re using 4x MSAA it’s rendering 4 depth / coverage samples within the bounds of each pixel. Each coverage sample can store a unique color. But it’s only getting a color by running the pixel shader once per triangle, per pixel. Most of time all 4 depth samples will be the same triangle. In this case all 4 coverage samples use the same single pixel shader output color. This behaves no different than when having no MSAA enabled at all.
Where MSAA’s strength comes into play is when a triangle doesn’t cover all the depth samples. For example, if a triangle only covers two depth samples the two matching coverage samples are set to the pixel shader ouput. The other coverage samples can store the color of other triangles’s pixel shaders that can be seen.
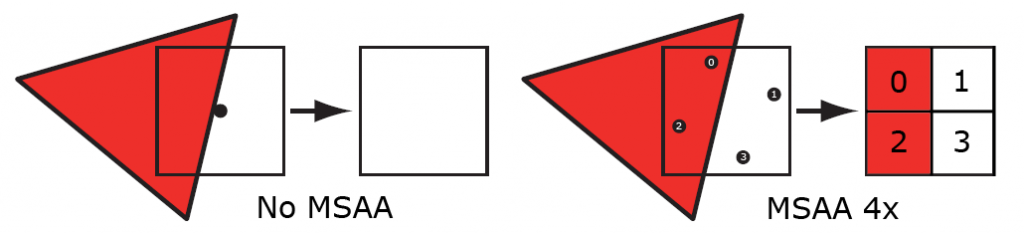
from https://mynameismjp.wordpress.com/2012/10/24/msaa-overview/
More in depth write ups can be found elsewhere, like on Matt Pettineo’s (MJP) site.
I’m glossing over a bunch of details, but the main point is MSAA can store a list of multiple colors per pixel, one color per coverage sample. These get averaged together to make the final on screen pixel color. But it’s not always having to render a pixel shader more than once per pixel resulting in significant savings over super sampling of similar quality.
Alpha to Coverage
This is where Alpha to Coverage comes in. Alpha to Coverage let’s the pixel shader’s output alpha change the fraction of coverage samples rendered to. Hence the name. In the simple case of a triangle covering all 4 depth samples, all 4 coverage samples store the color output. With Alpha to Coverage enabled and an output color alpha of 0.5, only half of the possible coverage samples will store the color. The result will be as if it’s half² as opaque as it’s only contributing color to half the samples!
Okay, so with 4x MSAA and Alpha to Coverage you get 5 levels of opacity you can play with, 4/4 through 0/4 samples. What good is that? With traditional alpha blending you get at least 256 levels, so why would you ever want to use this? Because with Alpha to Coverage those coverage samples are opaque. That means they can be depth sorted! You can have a mesh of polygon soup and have intersecting triangles accurately sort at better than per pixel accuracy. This is no different than opaque objects or even alpha test with MSAA, but you also get soft edges.
Lets just turn Alpha to Coverage on and see how that looks. In Unity’s ShaderLab it’s enabled by just adding AlphaToMask On to an otherwise opaque shader that outputs alpha. So here we go …
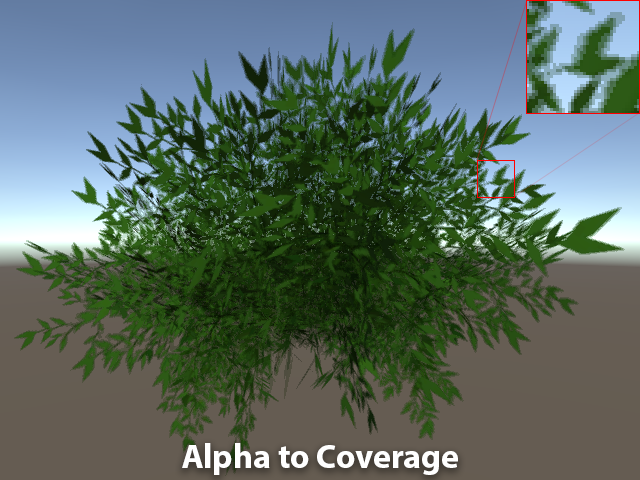
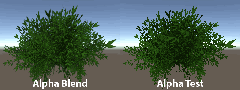
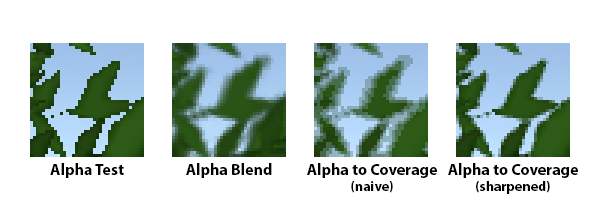
And we’re done, doesn’t that look so much better than before?! Lets compare it to the original alpha test version!


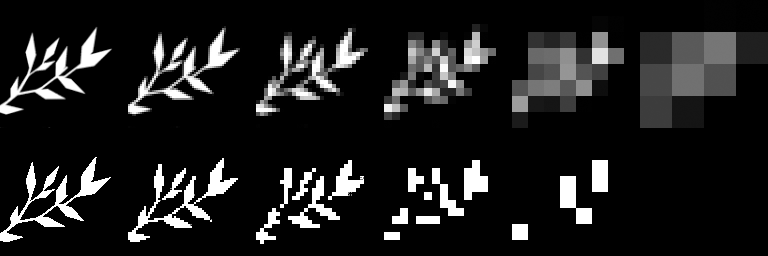
Wait, no, Alpha to Coverage looks terrible! It’s somehow simultaneously fuzzy and aliased, not to mention sort of noisy, and seems like the bush got more transparent through the middle? The story only gets worse when we get close up to those leaves
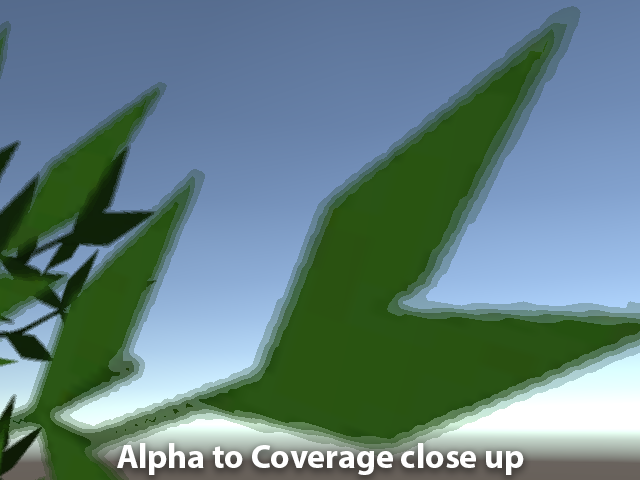
Oy vey, that’s no good at all. The limited number of opacity steps makes for some ugly banding. Clearly there’s a reason why this isn’t used more often, so why would I even suggest doing this if it looks so bad?!
Fixing the Solution
Well, because that’s what happens if you use Alpha to Coverage with the alpha of the texture straight. This is what replacing basic alpha blending using alpha to coverage looks like. Many implementations of Alpha to Coverage I’ve seen in games really do leave it here.
But what’s happening in that first alpha to coverage image to make it so bad? It’s not just the banding, it’s also the interaction between the coverage samples. In short it’s a limitation of using Alpha to Coverage. Essentially when using Alpha to Coverage only “one layer” of a specific coverage can be seen at one time. Two or more overlapping triangles with 50% Alpha to Coverage results in no change in opacity. Only the closest coverage points get rendered. This is unlike alpha blending where they will blend over each other increasing the perceived opacity. If you remember earlier I said the coverage samples are individually opaque. If the output alpha is 50% with 4x MSAA only two coverage samples are written to. But it’s going to be the same two coverage samples for everything that renders to that pixel with 50% A2C! The answer might seem like “well, render to different samples!”. But that’s harder than it sounds to do and be effective. It is an option though. Or you might be thinking “nope, still don’t get it at all”, and that’s okay. Don’t worry about it. It’s unnecessary to understand for this particular case as it’s relatively easy to solve.
So what is the solution here? Alpha to Coverage is great for anti-aliasing alpha test, not so much for replacing an alpha blend! We need to sharpen the alpha so there are fewer overlapping areas of partial opacity. This will simultaneously solve the banding, and interior transparency. Anyone who’s done signed distance field text, or shader based line rendering probably knows whats coming next. For everyone else I’m going to introduce you to one of my favorite functions in shaders:
fwidth()
With out further explanation we get this (I’ll talk about it later)
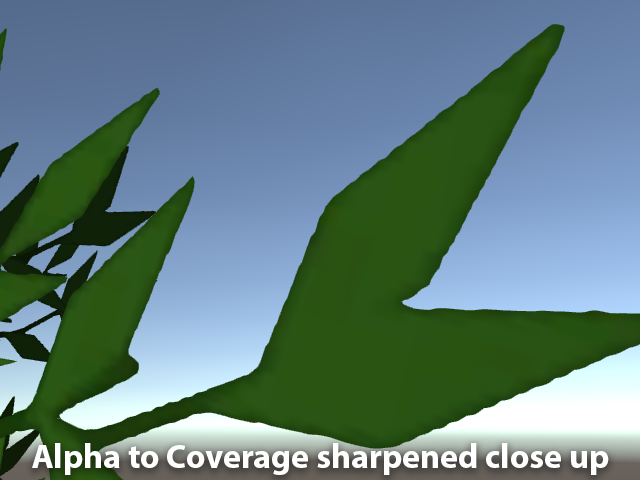
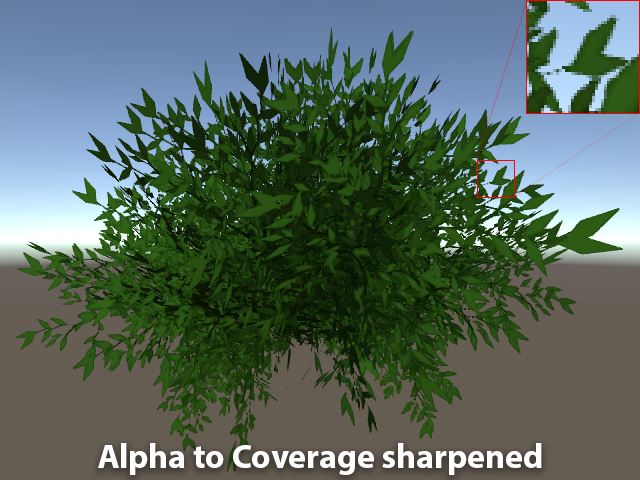
Now that’s better. Looks very similar to the original alpha tested version, but is nicely anti-aliased. And it’s not strangely transparent, noisy, or blurry anymore! Here’s the original alpha tested version one more time for reference


So, what did I do? What was that fwidth() I mentioned earlier? All the magic is in this one line of shader code.
col.a = (col.a - _Cutoff) / max(fwidth(col.a), 0.0001) + 0.5;
What that line does is sharpens the alpha of the texture to the width of a single pixel. The fwidth() function returns the sum of the pixel’s partial derivatives for a value, usually described as the equivalent of abs(ddx(value)) + abs(ddy(value)). Those two functions, ddx() and ddy(), are partial derivative functions. They measure the change of a value between the two pixels either to the side or above³ the pixel that’s currently being processed. Derivatives are wonderful, magical things in shaders. For the moment it’s enough to know fwidth() gives a good approximation of how much a value changes per pixel. If you divide a value by how much it’s changing it’ll rescale it to give you a nice crisp edge. The max() is there because if the texture’s alpha is a flat color at some point, like black or white, fwidth() will be zero. Dividing by zero is bad! The 0.0001 is just an arbitrarily small number, small enough that you have to really get close to a texture before the banding will show up again. The _Cutoff is the same value you would be using for an alpha test shader and helps center the alpha around the edge you want.
We could end here, but another problem that will show up that most people will probably miss initially. It is an issue that plagues alpha test already, so people might just be living with it. As you get far away from an object using alpha test it’ll appear to shrink and eventually vanish. Alpha blending does not suffer from this
We could end here, but another problem that will show up that most people will probably miss initially. It is an issue that plagues alpha test already, so people might just be living with it. As you get far away from an object using alpha test it’ll appear to shrink and eventually vanish. Alpha blending does not suffer from this
The cause is the texture’s mip mapping making the alpha fade out from averaging. Since the alpha is fading out that hard “cutoff” edge is vanishing too
There are several workarounds to this problem. Lowering the cutoff value (a common solution for alpha testing in general). Super sampling in the shader (I do this for font rendering). Or using some kind of noise like stochastic sampling or hashed alpha testing. Probably the best solution is the one proposed by Ignacio Castaño on The Witness blog back in 2010. It requires recalculating each mip maps’ alpha values in a way that’s aware of it’s intended use for alpha testing or Alpha to Coverage. The Witness uses A2C for foliage as well as several other effects too.
Computing Alpha Mipmaps
It has the great advantage of being “free” since all of the work is done before hand and there’s nothing the shader has to do. For Unity it could be implemented with an asset post processor or an editor script.
Edit: Sébastien Lagarde brought to my attention the fact that Ignacio’s technique is now available as an official texture import option in Unity 2017.1! There’s now a Mip Maps Preserve Coverage check box.
But there is another way that works almost as well, scaling the alpha by mip level. Effectively that’s what the above solution is doing, so we can just do an approximation the shader. It’s not “free”, but it’s not that expensive either.
col.a *= 1 + CalcMipLevel(i.uv * _MainTex_TexelSize.zw) * _MipScale;
Post Link: [Unity]Anti-aliased Alpha Test: The Esoteric Alpha To Coverage[1]