
[Unity]Anti-aliased Alpha Test: The Esoteric Alpha To Coverage[2]
We can approximate the loss of density from mip mapping almost perfectly with a _MipScale of 0.25. The CalcMipLevel() function is the magic here. You can see the implementation of the function in the shader code below. Note if you use any kind of LOD bias on your textures you’ll have to account for this manually. If you want more information about the function you can read this Stack Overflow post:
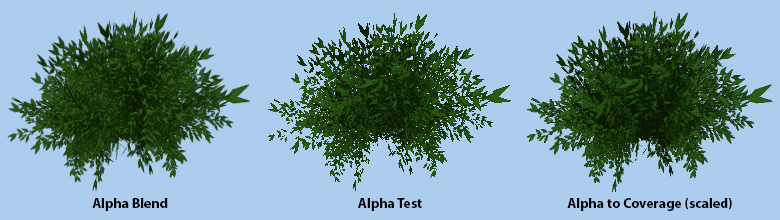
The same scaling trick works for alpha test as well. In fact if MSAA is disabled Alpha to Coverage falls back to alpha test. This means it isn’t only useful for VR or other games where you’re guaranteed to have MSAA enabled. Basically there’s rarely a reason to use straight alpha testing ever!
Conclusion
You don’t need to live with the aliasing of alpha test, the sorting issues of alpha blend, or the cost of a two pass shader. There is a happy middle ground using Alpha to Coverage. If you’re using MSAA you should never need to use alpha test again!
Appendix
The Shader
The Unity ShaderLab file for the final shader used in this article can be found below.
Shader "Custom/Alpha To Coverage"
{
    Properties
    {
        _MainTex ("Texture", 2D) = "white" {}
        _Cutoff ("Alpha cutoff", Range(0.15,0.85)) = 0.4
        _MipScale ("Mip Level Alpha Scale", Range(0,1)) = 0.25
    }
    SubShader
    {
        Tags { "RenderQueue"="AlphaTest" "RenderType"="TransparentCutout" }
        Cull Off

        Pass
        {
            Tags { "LightMode"="ForwardBase" }
            AlphaToMask On

            CGPROGRAM
            #pragma vertex vert
            #pragma fragment frag

            #include "UnityCG.cginc"
            #include "Lighting.cginc"

            struct appdata
            {
                float4 vertex : POSITION;
                float2 uv : TEXCOORD0;
                half3 normal : NORMAL;
            };

            struct v2f
            {
                float4 pos : SV_POSITION;
                float2 uv : TEXCOORD0;
                half3 worldNormal : NORMAL;
            };

            sampler2D _MainTex;
            float4 _MainTex_ST;
            float4 _MainTex_TexelSize;

            fixed _Cutoff;
            half _MipScale;

            float CalcMipLevel(float2 texture_coord)
            {
                float2 dx = ddx(texture_coord);
                float2 dy = ddy(texture_coord);
                float delta_max_sqr = max(dot(dx, dx), dot(dy, dy));

                return max(0.0, 0.5 * log2(delta_max_sqr));
            }

            v2f vert (appdata v)
            {
                v2f o;
                o.pos = UnityObjectToClipPos(v.vertex);
                o.uv = TRANSFORM_TEX(v.uv, _MainTex);
                o.worldNormal = UnityObjectToWorldNormal(v.normal);
                return o;
            }

            fixed4 frag (v2f i, fixed facing : VFACE) : SV_Target
            {
                fixed4 col = tex2D(_MainTex, i.uv);
                // rescale alpha by mip level (if not using preserved coverage mip maps)
                col.a *= 1 + max(0, CalcMipLevel(i.uv * _MainTex_TexelSize.zw)) * _MipScale;
                // rescale alpha by partial derivative
                col.a = (col.a - _Cutoff) / max(fwidth(col.a), 0.0001) + 0.5;

                half3 worldNormal = normalize(i.worldNormal * facing);

                fixed ndotl = saturate(dot(worldNormal, normalize(_WorldSpaceLightPos0.xyz)));
                fixed3 lighting = ndotl * _LightColor0;
                lighting += ShadeSH9(half4(worldNormal, 1.0));

                col.rgb *= lighting;

                return col;
            }
            ENDCG
        }
    }
}
Unity’s Surface Shaders & Directional Shadows
Many peoples’ first inclination is probably going to be to try this technique in Unity with a surface shader by adding AlphaToMask On. This does work, but it breaks shadow casting and receiving if you use the addshadow surface option due to Unity’s default shadow caster passes outputing 0% alpha and AlphaToMask On still being enabled for the generated pass. You can use Fallback “Legacy Shaders/Transparent/Cutout/VertexLit” instead as fallback passes don’t inherent the parent shader file’s render settings, but it won’t do the mip level alpha rescaling so it might look odd in the distance unless you use a custom shadow caster pass. Even then Unity’s directional shadows will sometimes cause bright and dark noise around the edges or seemingly disable anti-aliasing since their directional shadows are rendered with out MSAA. This is one of the reasons why MSAA never seems to work as well as you might expect it to in Unity. You can disable shadow cascades in the Graphics settings, but then the shadows don’t look as nice. It does mean if you’re not using real time directional shadows on the PC or consoles, or you’re working on a mobile project, this technique works great. Upcoming changes to Unity’s forward renderer will also likely solve this.
There is a work around for getting shadow cascades and MSAA working together better, which I used for Wayward Sky and Dino Frontier (both out now for the PSVR). But that is for another article. I posted the basic idea on the Unity forums here for those curious.
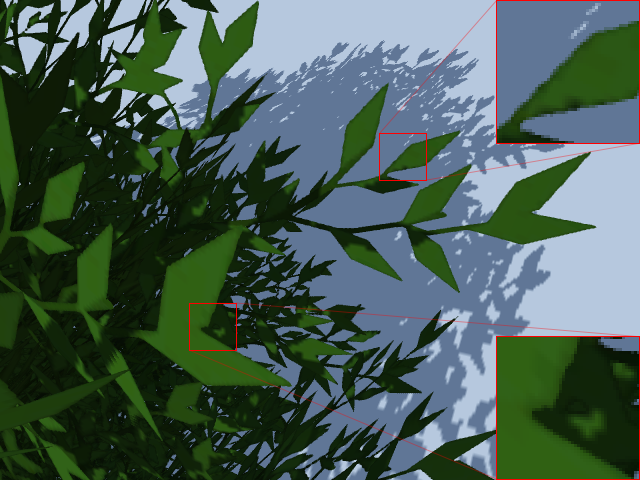
artifacts and apparent loss of anti-aliasing from Unity’s cascaded shadow maps (left); cascades disabled in Graphics settings (center); cascades and MSAA with fix (right)
¹^Rendering an object once using an alpha test pass, and again with an alpha blend pass is a good solution, especially if you don’t have MSAA. There are plenty of places that have discussed this technique, like Wolfire Games’ blog here (which also mentions an Alpha to Coverage like technique) and even Unity’s documentation on Legacy Alpha Testing. Interestingly, Alpha to Coverage can be used leverage the two pass technique for softer blending than is normally possible with Alpha to Coverage alone, so effectively getting the benefits of Alpha to Coverage and alpha blending. It’s mentioned briefly on Luis Antonio’s site in a post about the clouds in The Witness. It’s actually a section written by Ignacio Castaño again.
²^Two coverage samples result in something similar to 50% opaque, but only if using gamma (aka sRGB) color space rendering. Otherwise if you’re using linear color space rendering and not using a custom resolver it’s more like ~74% alpha, or ~188/255, which if you’re familiar with linear to gamma conversions might look familiar.
³^Pixel derivatives work in blocks of 2×2 pixels, so fwidth() might be comparing the pixel above or below, and the pixel to the left or right, depending on which pixel in the 2×2 block the pixel/fragment shader is currently running. The ddx() and ddy() functions individually give the horizontal and vertical partial derivatives. These are always compared in the same order, so the ddx() and ddy() values for each pair of pixels is the same. Depending on the implementation it may even be the same values for all four pixels in the 2×2 grid. Basically 4 instances of a pixel/fragment shader is running in parallel always, even if a triangle is only covering one of those pixels.
Post Link: [Unity]Anti-aliased Alpha Test: The Esoteric Alpha To Coverage[2]