
Working with UE4 APIs
The application programming interface (API) is the way in which you, as the programmer, instruct the engine, and therefore the PC, what to do. Some of the interesting APIs that we’ll explore in the recipes in this chapter are as follows:
- Core/Logging API – defining a custom log category
- Core/Logging API – FMessageLog to write messages to the Message Log
- Core/Math API – rotation using FRotator
- Core/Math API – rotation using FQuat
- Core/Math API – rotation using FRotationMatrix to have one object face another
- Landscape API – landscape generation with Perlin noise
- Foliage API – adding trees procedurally to your level
- Landscape and Foliage APIs – map generation using Landscape and Foliage APIs
- GameplayAbilities API – triggering an actor’s gameplay abilities with game controls
- GameplayAbilities API – implementing stats with AttributeSet
- GameplayAbilities API – implementing buffs with GameplayEffect
- GameplayTags API – attaching GameplayTags to an actor
- GameplayTasks API – making things happen with GameplayTasks
- HTTP API – downloading web pages using web requests
- HTTP API – displaying downloaded progress
Introduction
All of UE4’s functionality is encapsulated in modules, including very basic and core functionality. Each module has an API for it. To use an API, there is a very important linkage step, where you must list all APIs that you will be using in your build in a ProjectName.Build.cs file, which is located in your Solution Explorer window.Do not name any of your UE4 projects with the exact same name as one of the UE4 API names!
There are a variety of APIs inside the UE4 engine that expose functionality to various essential parts of it.
The UE4 engine’s base functionality, which is available in the editor, is quite broad. The functionality from C++ code is actually grouped into little sections called APIs. There is a separate API module for each important functionality in the UE4 codebase. This is done to keep the codebase highly organized and modular.Using different APIs may require special linkage in your Build.cs file! If you are getting build errors, be sure to check that the linkage with the correct APIs is there!
The complete API listing is located in the following documentation: https://docs.unrealengine.com/latest/INT/API/.
Technical requirements
This chapter requires the use of Unreal Engine 4 and uses Visual Studio 2017 as the IDE. Instructions on how to install both pieces of software and the requirements for them can be found in Chapter 1, UE4 Development Tools, of this book.
Core/Logging API – defining a custom log category
UE4 itself defines several logging categories, including categories such as LogActor, which has any log messages to do with the Actor class, and LogAnimation, which logs messages about animations. In general, UE4 defines a separate logging category for each module. This allows developers to output their log messages to different logging streams. Each log stream’s name is prefixed to the outputted message, as shown in the following example log messages from the engine:
LogContentBrowser: Native class hierarchy updated for
 'HierarchicalLODOutliner' in 0.0011 seconds. Added 1 classes and 2
 folders.
LogLoad: Full Startup: 8.88 seconds (BP compile: 0.07 seconds)
LogStreaming:Warning: Failed to read file
 '../../../Engine/Content/Editor/Slate/Common/Selection_16x.png'
 error.
LogExternalProfiler: Found external profiler: VSPerf
These log messages are samples from the engine, each prefixed with their log category. Warning messages appear in yellow and have Warning added to the front as well.
The example code you will find on the internet tends to use LogTemp for a UE4 project’s own messages, as follows:
UE_LOG( LogTemp, Warning, TEXT( "Message %d" ), 1 );
We can actually improve upon this formula by defining our own custom LogCategory.
Getting ready
Have a UE4 project ready in which you’d like to define a custom log. Open a header file that will be included in almost all files using this log.
How to do it…
- Open the main header file for your project; for example, if your project’s name is Chapter_11, you’ll open Chapter_11.h. Add the following line of code:
#pragma once

#include "CoreMinimal.h"

DECLARE_LOG_CATEGORY_EXTERN(LogCh11, Log, All);
As defined in AssertionMacros.h, there are three arguments to this declaration, which are as follows:
- CategoryName: This is the log category name being defined (LogCh11 here)
- DefaultVerbosity: This is the default verbosity to use on log messages
- CompileTimeVerbosity: This is the verbosity to bake into compiled code
- Inside the main .cpp file for your project (Chapter_11.cpp in our case), include the following line of code:
#include "Chapter_11.h"
#include "Modules/ModuleManager.h"

IMPLEMENT_PRIMARY_GAME_MODULE( FDefaultGameModuleImpl, Chapter_11, "Chapter_11" );

DEFINE_LOG_CATEGORY(LogCh11);
- Now, we can use this log category in our own scripts. As an example, open up your project’s GameModeBase file (in this case, Chapter_11GameModeBase.h) and add the following function declaration:
UCLASS()
class CHAPTER_11_API AChapter_11GameModeBase : public AGameModeBase
{
    GENERATED_BODY()

    void BeginPlay();
};
- Then, go to the implementation (Chapter_11GameModeBase.cpp) and use the following code as an example of the various display categories:
#include "Chapter_11GameModeBase.h"
#include "Chapter_11.h"

void AChapter_11GameModeBase::BeginPlay()
{
    // Traditional Logging
    UE_LOG(LogTemp, Warning, TEXT("Message %d"), 1);

    // Our custom log type
    UE_LOG(LogCh11, Display, TEXT("A display message, log is working" ) ); // shows in gray
    UE_LOG(LogCh11, Warning, TEXT("A warning message"));
    UE_LOG(LogCh11, Error, TEXT("An error message "));
}
- Compile your scripts. Afterwards, open the World Settings menu and set the GameMode Override property to Chapter_11GameModeBase and then run the game:

The location of the logged messages from the Output Log window
As you can see, we can see our custom log messages being displayed!
How it works…
Logging works by outputting messages to the Output Log (Window | Developer Tools | Output Log) as well as a file. All information outputted to the Output Log is also mirrored to a simple text file that is located in your project’s /Saved/Logs folder. The extension of the log files is .log, with the most recent one being named YourProjectName.log.
There’s more…
You can enable or suppress log messages for a particular log channel from within the editor using the following console commands:
Log LogName off // Stop LogName from displaying at the output
Log LogName Log // Turn LogName's output on again
If you’d like to edit the initial values of the output levels of some of the built-in log types, you can use a C++ class to create changes for the engine.ini config file. You can change the initial values in the engine.ini configuration file.See https://wiki.unrealengine.com/Logs,_Printing_Messages_To_Yourself_During_Runtime for more details.
UE_LOG sends its output to Output Window. If you’d like to use the more specialized Message Log window in addition to this, you can use the FMessageLog object to write your output messages. FMessageLog writes to both the Message Log and the Output Window. See the next recipe for details.
Core/Logging API – FMessageLog to write messages to the Message Log
FMessageLog is an object that allows you to write output messages to the Message Log (Window | Developer Tools | Message Log) and Output Log (Window | Developer Tools | Output Log) simultaneously.
Getting ready
Have your project ready and some information to log to Message Log. Display the Message Log (Window | Developer Tools | Message Log) in your UE4 Editor.
How to do it…
- Add #define to your main header file (ProjectName.h), defining LOCTEXT_NAMESPACE as something unique to your codebase:
#define LOCTEXT_NAMESPACE "Chapter11Namespace"
This #define is used by the LOCTEXT() macro, which we use to generate FText objects, but is not seen in output messages.
- Declare your FMessageLog by constructing it somewhere very global. You can use extern in your ProjectName.h file. Consider the following piece of code as an example:
#define LOCTEXT_NAMESPACE "Chapter11Namespace"
#define FTEXT(x) LOCTEXT(x, x)

extern FName LoggerName;

void CreateLog(FName logName);
- Then, create your FMessageLog by defining it in a .cpp file and registering it with MessageLogModule. Be sure to give your logger a clear and unique name on construction. It’s the category of your log that will appear to the left of your log messages in Output Log. For example, ProjectName.cpp:
#include "Chapter_11.h"
#include "Modules/ModuleManager.h"
#include "MessageLog/Public/MessageLogModule.h"
#include "MessageLog.h"

// ...

FName LoggerName("MessageLogChapter11");

void CreateLog(FName logName)
{
    FMessageLogModule& MessageLogModule = FModuleManager::LoadModuleChecked<FMessageLogModule>("MessageLog");
    FMessageLogInitializationOptions InitOptions;
    InitOptions.bShowPages = true;
    InitOptions.bShowFilters = true;
    FText LogListingName = FTEXT("Chapter 11's Log Listing");
    MessageLogModule.RegisterLogListing(logName, LogListingName, InitOptions);
}
- Then, head back to somewhere in your code to actually create the log and use it. For example, we can add the following GameModeBase class’s BeginPlay method:
void AChapter_11GameModeBase::BeginPlay()
{
    // 11-01 - Core/Logging API - Defining a custom log
    // category
    // Traditional Logging
    UE_LOG(LogTemp, Warning, TEXT("Message %d"), 1);

    // Our custom log type
    UE_LOG(LogCh11, Display, TEXT("A display message, log is working" ) ); // shows in gray
    UE_LOG(LogCh11, Warning, TEXT("A warning message"));
    UE_LOG(LogCh11, Error, TEXT("An error message "));

    // 11-02 - Core/Logging API - FMessageLog to write
    // messages to the Message Log
    CreateLog(LoggerName);
    // Retrieve the Log by using the LoggerName.
    FMessageLog logger(LoggerName);
    logger.Warning(FTEXT("A warning message from gamemode"));
}
The KEY to LOCTEXT (first argument) must be unique or you will get a previously hashed string back. If you’d like, you can include a #define that repeats the argument to LOCTEXT twice, as we did earlier:
#define FTEXT(x) LOCTEXT(x, x)
- Log your messages using the following code:
logger.Info( FTEXT( "Info to log" ) );
logger.Warning( FTEXT( "Warning text to log" ) );
logger.Error( FTEXT( "Error text to log" ) );
This code utilizes the FTEXT() macro we defined earlier. Ensure it is in your codebase.
How it works…
This recipe displays a message to the Message Log. As we discussed previously, you can see logged information at the Message Log (Window | Developer Tools | Message Log) and Output Log (Window | Developer Tools | Output Log) .Constructing your message log again after initialization retrieves a copy of the original message log. For example, at any place in the code, you can write the following code:
FMessageLog( LoggerName ).Info(FTEXT( “An info message”));
Core/Math API – rotation using FRotator
Rotation in UE4 has such a complete implementation that it can be hard to choose how to rotate your objects. There are three main methods: FRotator, FQuat, and FRotationMatrix. This recipe outlines the construction and use of the first of the three different methods for the rotation of objects—the FRotator. Using this, and the following two recipes, you can select a method to use to rotate your objects.
Getting ready
Open a UE4 project that has an object you can get a C++ interface with. For example, you can construct a C++ class Coin that derives from Actor to test out rotations. Override the Coin::Tick() method to apply your rotations from the C++ code. Alternatively, you can call these rotation functions in the Tick event from Blueprints.
In this example, we will rotate an object at a rate of one degree per second by making use of an Actor component. The actual rotation will be the accumulated time since the object was created. To get this value, we’ll just call GetWorld()->TimeSeconds.
Core/Math API – rotation using FQuat
Quaternions sound intimidating, but they are extremely easy to use. You may want to review the theoretical math behind them by viewing the following videos:
- Fantastic Quaternions by Numberphile: https://www.youtube.com/watch?v=3BR8tK-LuB0
- Understanding Quaternions by Jim Van Verth: http://gdcvault.com/play/1017653/Math-for-Game-Programmers-Understanding
However, we won’t cover the math background here! In fact, you don’t need to understand much about the math background of quaternions to use them effectively.
Getting ready
Have a project ready and an Actor with an override ::Tick() function that we can enter the C++ code into.
How to do it…
- To construct a quaternion, the best constructor to use is as follows:
FQuat( FVector Axis, float AngleRad );
Quaternions have quaternion addition, quaternion subtraction, multiplication by a scalar, and division by a scalar defined for them, among other functions. They are extremely useful to rotate things at arbitrary angles, and point objects at one another.
- For example, if you wanted to use an FQuat inside of the RotateActorComponent.cpp file, it would look similar to this:
void URotateActorComponent::TickComponent(float DeltaTime, ELevelTick TickType, FActorComponentTickFunction* ThisTickFunction)
{
    Super::TickComponent(DeltaTime, TickType, ThisTickFunction);

    // 11-04 - Rotation using FQuat
    FQuat quat = FQuat(FVector(0, 1, 0), GetWorld()->TimeSeconds * PI / 4.f);
    GetOwner()->SetActorRotation(quat);

}
Upon compiling your code and returning to the game, you should notice the cube moving at a constant rate:

How it works…

Quaternions are a bit strange, but using them is quite simple. If v is the axis around which to rotate, and is the magnitude of the angle of rotation, then we get the following equations for the components of a quaternion:
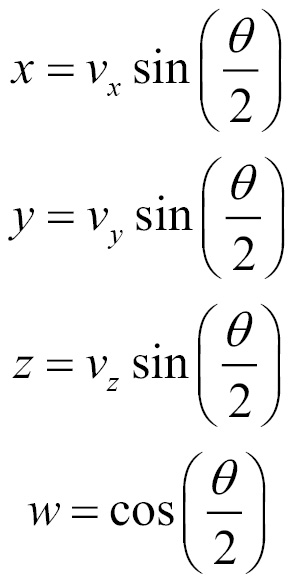
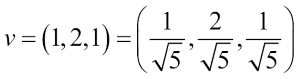

So, for example, rotation about by an angle of will have the following quaternion components:
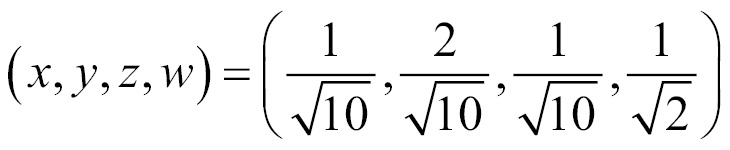
Three of the four components of the quaternion (x, y, and z) define the axis around which to rotate (scaled by the sine of half the angle of rotation), while the fourth component (w) has only the cosine of half the angle to rotate with.
There’s more…
Quaternions, being vectors themselves, can be rotated. Simply extract the (x, y, z) components of the quaternion, normalize, and then rotate that vector. Construct a new quaternion from that new unit vector with the desired angle of rotation.
Multiplying quaternions together represents a series of rotations that happen subsequently. For example, a rotation of 45º about the X-axis, followed by a rotation of 45º about the Y-axis will be composed by the following:
FQuat( FVector( 1, 0, 0 ), PI/4.f ) *
FQuat( FVector( 0, 1, 0 ), PI/4.f );
This would give you a result that would look similar to this:

Post Link: Working with UE4 APIs