
API – rotation using FRotationMatrix to have one object face another
FRotationMatrix offers matrix construction using a series of ::Make* routines. They are easy to use and useful to get one object to face another. Say you have two objects, one of which is following the other. We want the rotation of the follower to always be facing what it is following. The construction methods of FRotationMatrix make this easy to do.
Getting ready
Have two actors in a scene, one of which should face the other.
How to do it…
- Add a new C++ Actor Component for the follower called FollowActorComponent (see the Core/Math API – rotation using FRotator recipe if you need help with this).
- From the FollowActorComponent.h file, we need to have a reference to the object we want to follow, so add the following:
UCLASS( ClassGroup=(Custom), meta=(BlueprintSpawnableComponent) )
class CHAPTER_11_API UFollowActorComponent : public UActorComponent
{
    GENERATED_BODY()

public:
    // Sets default values for this component's properties
    UFollowActorComponent();

protected:
    // Called when the game starts
    virtual void BeginPlay() override;

public:
    // Called every frame
    virtual void TickComponent(float DeltaTime, ELevelTick TickType, FActorComponentTickFunction* ThisTickFunction) override;

    UPROPERTY(EditAnywhere)
    AActor * target;
};
- Then, in the FollowActorComponent.cpp file, in the TickComponent function, look into the available constructors under the FRotationMatrix class. A bunch of constructors are available that will let you specify a rotation for an object (from stock position) by reorienting one or more of the X-, Y-, or Z-axes, named with the FRotationMatrix::Make*() pattern.
- Assuming you have a default stock orientation for your actor (with Forward facing down the +X-axis, and up facing up the +Z-axis), find the vector from the follower to the object they want to follow, as shown in this piece of code:
// Called every frame
void UFollowActorComponent::TickComponent(float DeltaTime, ELevelTick TickType, FActorComponentTickFunction* ThisTickFunction)
{
    Super::TickComponent(DeltaTime, TickType, ThisTickFunction);

    FVector toFollow = target->GetActorLocation() - GetOwner()->GetActorLocation();

    FMatrix rotationMatrix = FRotationMatrix::MakeFromXZ(toFollow, GetOwner()->GetActorUpVector());

    GetOwner()->SetActorRotation(rotationMatrix.Rotator());

}
- Compile your script and assign the Target property inside of the Follow Actor Component from the Details tab. This can be done using the eyedropper button to the right of the property or by using the drop-down list:
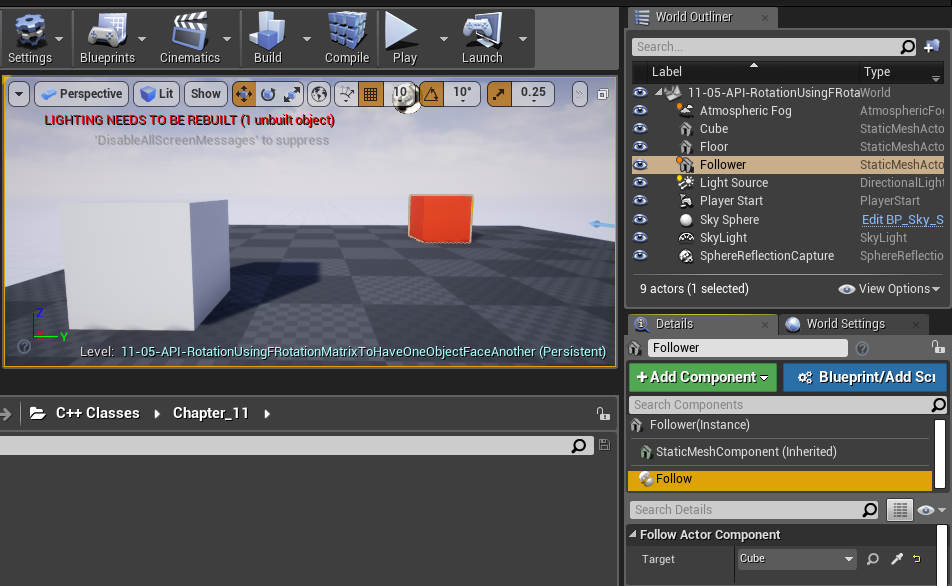
If all went well, you should see the actor rotate correctly to face the target:

How it works…
Getting one object to look at another, with a desired up vector, can be done by calling the correct function, depending on your object’s stock orientation. Usually, you want to reorient the X-axis (Forward), while specifying either the Y-axis (Right) or Z-axis (Up) vectors (FRotationMatrix::MakeFromXY()). For example, to make an actor look along a lookAlong vector, with its right side facing right, we’d construct and set FRotationMatrix for it, as follows:
FRotationMatrix rotationMatrix = FRotationMatrix::MakeFromXY(
 lookAlong, right );
actor->SetActorRotation( rotationMatrix.Rotator() );
GameplayAbilities API – triggering an actor’s gameplay abilities with game controls
The GameplayAbilities API can be used to attach C++ functions to invoke on certain button pushes, triggering the game unit to exhibit its abilities during play in response to keystroke events. In this recipe, we will show you how to do that.
Getting ready
Enumerate and describe your game character’s abilities. You will need to know what your character does in response to key events to code in this recipe.
There are several objects that we need to use here; they are as follows:
- The UGameplayAbility class—this is needed to derive the C++ class instances of the UGameplayAbility class, with one derivative class for each ability:
- Define what each ability does in .h and .cpp by overriding the available functions, such as UGameplayAbility::ActivateAbility, UGameplayAbility::InputPressed, UGameplayAbility::CheckCost, UGameplayAbility::ApplyCost, UGameplayAbility::ApplyCooldown, and so on
- GameplayAbilitiesSet is a DataAsset derivative object that contains a series of enum’d command values, and blueprints of the corresponding UGameplayAbility derivative classes that define the behavior for that particular input command. Each GameplayAbility is kicked off by a keystroke or mouse-click, which is set in DefaultInput.ini.
How to do it…
In the following code, we’ll implement a UGameplayAbility derivative called UGameplayAbility_Attack for a Warrior class object. We’ll attach this gameplay functionality to the input command string Ability1, which we’ll activate on the left-mouse button-click:
- Open up your .Build.cs file (in our case, Chapter_11.Build.cs) and add the following dependencies:
using UnrealBuildTool;

public class Chapter_11 : ModuleRules
{
    public Chapter_11(ReadOnlyTargetRules Target) :
    base(Target)
    {
        PCHUsage = PCHUsageMode.UseExplicitOrSharedPCHs;

        PublicDependencyModuleNames.AddRange(new string[] {
        "Core", "CoreUObject", "Engine", "InputCore" });
        PublicDependencyModuleNames.AddRange(new string[] {
        "GameplayAbilities", "GameplayTags", "GameplayTasks" });

        PrivateDependencyModuleNames.AddRange(new string[] { });
    }
}
- Compile your code.
- From the Unreal Editor, go to Settings | Plugins.
- From the menu that pops up, search for GameplayAbilities and check it. You’ll get a message asking if you are sure. Click on the Yes button:
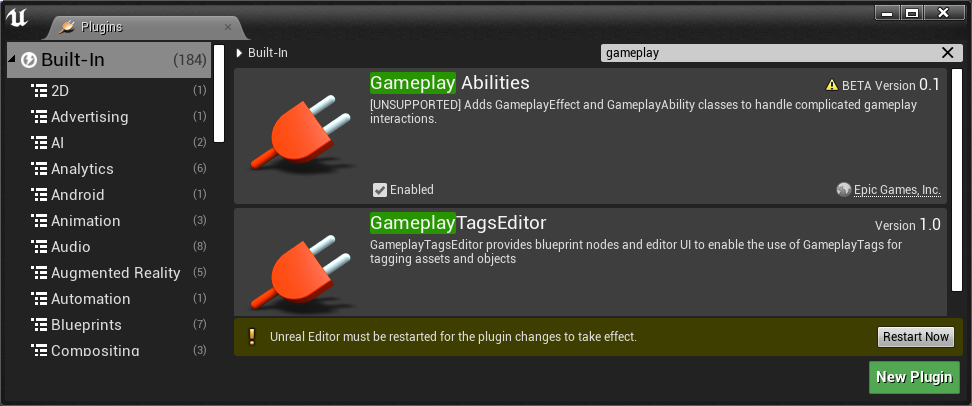
- Afterwards, click on the Restart Now button. The classes should be added to your project correctly.
- Now, access the Add C++ Class wizard by selecting from the Content Browser Add New | New C++ Class… and check the Show All Classes option. From there, type in gameplayability and select the base GameplayAbility class to base our new class on:
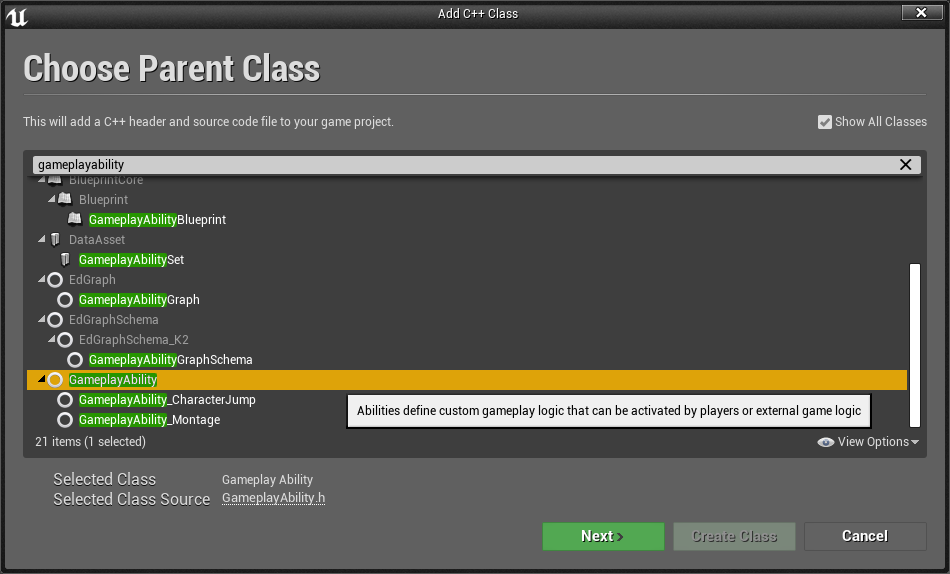
- Give the new gameplay ability a name of GameplayAbility_Attack and press Create Class.
- At the very least, you want to override the following:
- The UGameplayAbility_Attack::CanActivateAbility member function to indicate when the actor is allowed to invoke the ability.
- The UGameplayAbility_Attack::CheckCost function to indicate whether the player can afford to use an ability or not. This is extremely important because if this returns false, ability invocation should fail.
- The UGameplayAbility_Attack::ActivateAbility member function to write the code that the Warrior is to execute when their Attack ability is activated.
- The UGameplayAbility_Attack::InputPressed member function and to respond to the key input event assigned to the ability:
#pragma once

#include "CoreMinimal.h"
#include "Abilities/GameplayAbility.h"
#include "GameplayAbility_Attack.generated.h"

UCLASS()
class CHAPTER_11_API UGameplayAbility_Attack : public UGameplayAbility
{
  GENERATED_BODY()

        /** Returns true if this ability can be activated
        right now. Has no side effects */
        virtual bool CanActivateAbility(const FGameplayAbilitySpecHandle Handle, const FGameplayAbilityActorInfo* ActorInfo, const FGameplayTagContainer* SourceTags = nullptr, const FGameplayTagContainer* TargetTags = nullptr, OUT FGameplayTagContainer* OptionalRelevantTags = nullptr) const {
        UE_LOG(LogTemp, Warning, TEXT("ability_attack
        CanActivateAbility!"));
        return true;
    }

    /** Checks cost. returns true if we can pay for the
    ability. False if not */
    virtual bool CheckCost(const FGameplayAbilitySpecHandle Handle,
    const FGameplayAbilityActorInfo* ActorInfo, OUT
    FGameplayTagContainer* OptionalRelevantTags = nullptr) const {
        UE_LOG(LogTemp, Warning, TEXT("ability_attack CheckCost!"));
        return true;
        //return Super::CheckCost( Handle, ActorInfo,
        //OptionalRelevantTags );
    }

    virtual void ActivateAbility(const FGameplayAbilitySpecHandle
    Handle,
        const FGameplayAbilityActorInfo* ActorInfo, const
        FGameplayAbilityActivationInfo ActivationInfo,
        const FGameplayEventData* TriggerEventData)
    {
        UE_LOG(LogTemp, Warning, TEXT("Activating
        ugameplayability_attack().. swings weapon!"));
        Super::ActivateAbility(Handle, ActorInfo, ActivationInfo,
        TriggerEventData);
    }

    /** Input binding stub. */
    virtual void InputPressed(const FGameplayAbilitySpecHandle
    Handle, const FGameplayAbilityActorInfo* ActorInfo, const
    FGameplayAbilityActivationInfo ActivationInfo) {
        UE_LOG(LogTemp, Warning, TEXT("ability_attack
        inputpressed!"));
        Super::InputPressed(Handle, ActorInfo, ActivationInfo);
    }

};
- Derive a Blueprint class from your UGameplayAbility_Attack object inside the UE4 Editor.
- Inside the Editor, navigate to Content Browser and create a GameplayAbilitiesSet object by doing the following:
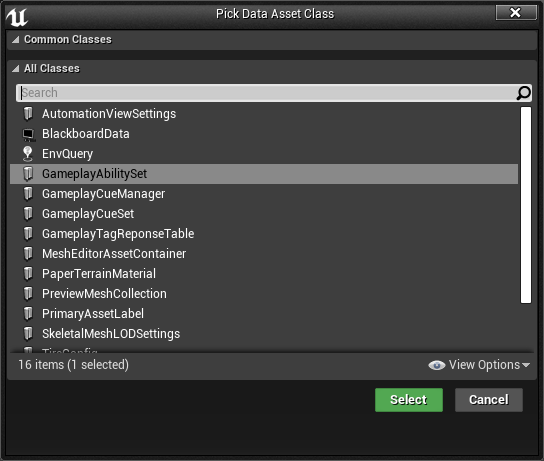
- Right-clicking on Content Browser and selecting Miscellaneous | Data Asset:
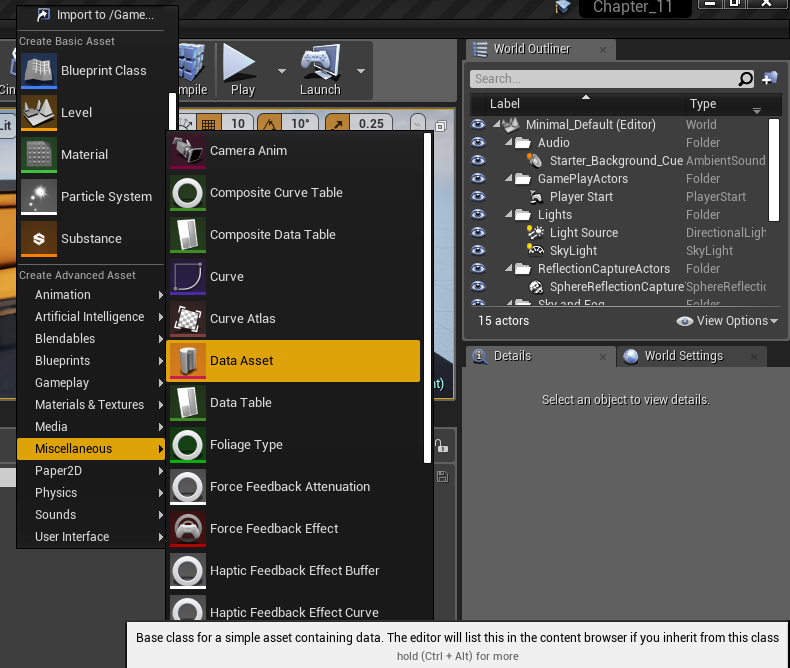
- In the dialog box that follows, select GameplayAbilitySet for the Data Asset Class:
In fact, the GameplayAbilitySet object is a UDataAsset derivative. It is located in GameplayAbilitySet.h and contains a single member function, GameplayAbilitySet::GiveAbilities(), which I strongly recommend you not to use for reasons listed in a later step.
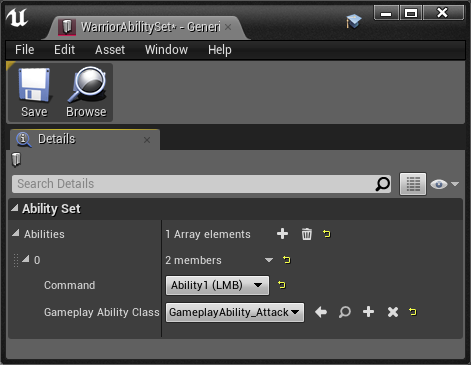
- Name your GameplayAbilitySet data asset something related to the WarriorAbilitySet object so that we know to put it into the Warrior class (for example, WarriorAbilitySet).
- Double-click to open and edit the new WarriorAbilitySet Data Asset. Stack in a list of GameplayAbility class derivative Blueprints by clicking + on the TArray object inside of it. Your UGameplayAbility_Attack object must appear in the dropdown:
- We now need to create a Character class-derived object so that we can contain this ability set. In this example, we will call this class Warrior.
- Add a UPROPERTY UGameplayAbilitySet* gameplayAbilitySet member to your Warrior class:
#pragma once

#include "CoreMinimal.h"
#include "GameFramework/Character.h"
#include "GameplayAbilitySet.h"
#include "AbilitySystemInterface.h"
#include "Warrior.generated.h"

#define FS(x,...) FString::Printf( TEXT( x ), __VA_ARGS__ )

UCLASS()
class CHAPTER_11_API AWarrior : public ACharacter, public IAbilitySystemInterface
{
    GENERATED_BODY()

public:
    // Sets default values for this character's properties
    AWarrior();

protected:
    // Called when the game starts or when spawned
    virtual void BeginPlay() override;

public:
    // Called every frame
    virtual void Tick(float DeltaTime) override;

    // Called to bind functionality to input
    virtual void SetupPlayerInputComponent(class UInputComponent* PlayerInputComponent) override;

    // Lists key triggers for various abilities for the
    // player.
    // Selects an instance of UGameplayAbilitySet (which is a      //    \
    UDataAsset derivative
    // that you construct in the Content Browser).
    UPROPERTY(EditAnywhere, BlueprintReadWrite, Category =
    Stats)
    UGameplayAbilitySet* gameplayAbilitySet;

    // The AbilitySystemComponent itself
    UPROPERTY(EditAnywhere, BlueprintReadWrite, Category =
    Stats)
    UAbilitySystemComponent* AbilitySystemComponent;

    // IAbilitySystemInterface implementation:
    virtual UAbilitySystemComponent* GetAbilitySystemComponent() const { return AbilitySystemComponent; }

};
Ensure that your Actor class derivative also derives from the UAbilitySystemInterface interface. This is extremely important so that calls to (Cast<IAbilitySystemInterface>(yourActor))->GetAbilitySystemComponent() succeed.
- Create a Blueprint of the Warrior class and set the Gameplay Ability Set to the Warrior Ability Set we created earlier, and set the Ability System Component to the Ability System Component:

If you are unable to see the Ability System Component, close and reopen the Blueprint.
- Once finished, assign MyWarrior as the Default Pawn Class of your Game Mode.
- Compile, run, and select-in WarriorAbilitySet as it sits in Content Browser (created in Steps 5 to 7) of the abilities of which this Warrior is capable.
- Some time after the construction of your actor, call gameplayAbilitySet->GiveAbilities( abilitySystemComponent ); or enter a loop, as shown in the following step where you invoke abilitySystemComponent->GiveAbility() for each ability listed in your gameplayAbilitySet.
- Write an override for AWarrior::SetupPlayerInputComponent( UInputComponent* Input ) to connect the input controller to the Warrior’s GameplayAbility activations. After doing so, iterate over each GameplayAbility listed in your GameplayAbilitySet’s Abilities group:
#include "AbilitySystemComponent.h"

// ...

// Called to bind functionality to input
void AWarrior::SetupPlayerInputComponent(UInputComponent* Input)
{
    Super::SetupPlayerInputComponent(Input);

    // Connect the class's AbilitySystemComponent
    // to the actor's input component
    AbilitySystemComponent->BindToInputComponent(Input);

    // Go thru each BindInfo in the gameplayAbilitySet.
    // Give & try and activate each on the
    // AbilitySystemComponent.
    for (const FGameplayAbilityBindInfo& BindInfo :
        gameplayAbilitySet->Abilities)
    {

        FGameplayAbilitySpec spec(
            // Gets you an instance of the UClass
            BindInfo.GameplayAbilityClass->
            GetDefaultObject<UGameplayAbility>(),
            1, (int32)BindInfo.Command);

        // STORE THE ABILITY HANDLE FOR LATER INVOKATION
        // OF THE ABILITY
        FGameplayAbilitySpecHandle abilityHandle =
            AbilitySystemComponent->GiveAbility(spec);

        // The integer id that invokes the ability
        // (ith value in enum listing)
        int32 AbilityID = (int32)BindInfo.Command;

        // CONSTRUCT the inputBinds object, which will
        // allow us to wire-up an input event to the
        // InputPressed() / InputReleased() events of
        // the GameplayAbility.
        FGameplayAbilityInputBinds inputBinds(
            // These are supposed to be unique strings that
            // define what kicks off the ability for the actor
            // instance.
            // Using strings of the format
            // "ConfirmTargetting_Player0_AbilityClass"
            FS("ConfirmTargetting_%s_%s", *GetName(),
                *BindInfo.GameplayAbilityClass->GetName()),
            FS("CancelTargetting_%s_%s", *GetName(),
                *BindInfo.GameplayAbilityClass->GetName()),
            "EGameplayAbilityInputBinds", // The name of the
            // ENUM that has the abilities listing
            // (GameplayAbilitySet.h).
            AbilityID, AbilityID
        );
        // MUST BIND EACH ABILITY TO THE INPUTCOMPONENT,
        // OTHERWISE THE ABILITY CANNOT "HEAR" INPUT EVENTS.
        // Enables triggering of InputPressed() /
        // InputReleased() events, which you can in-turn use
        // to call
        // TryActivateAbility() if you so choose.
        AbilitySystemComponent->BindAbilityActivationToInputComponent(
            Input, inputBinds
        );

        // Test-kicks the ability to active state.
        // You can try invoking this manually via your
        // own hookups to keypresses in this Warrior class
        // TryActivateAbility() calls ActivateAbility() if
        // the ability is indeed invokable at this time
        // according to rules internal to the Ability's class
        // (such as cooldown is ready and cost is met)
        AbilitySystemComponent->TryActivateAbility(
            abilityHandle, 1);
    }
}
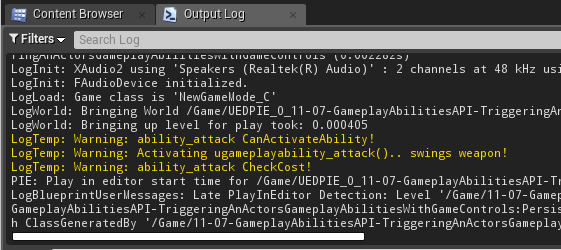
- Compile your code and then play the game:
How it works…
You must subclass and link in a set of UGameplayAbility objects to your actor’s UAbilitySystemComponent object through a series of calls to UAbilitySystemComponent::GiveAbility( spec ) with appropriately constructed FGameplayAbilitySpec objects. What this does is deck out your actor with this bunch of GameplayAbilities. The functionality of each UGameplayAbility, as well as its cost, cooldown, and activation, is all neatly contained within the UGameplayAbility class derivative that you will construct.
Do not use the GameplayAbilitySet::GiveAbilities() member function because it doesn’t give you access to the set of FGameplayAbilitySpecHandle objects that you actually need later to bind and invoke the ability to an input component.
There’s more…
You’ll want to carefully code in a bunch of the other functions that are available in the GameplayAbility.h header file, including implementations for the following:
- SendGameplayEvent: This is a function to notify GameplayAbility that some general gameplay event has happened.
- CancelAbility: This is a function to stop an ability’s usage midway through, and to give the ability an interrupted state.
- Keep in mind that there are a bunch of existing UPROPERTY specifiers near the bottom of the UGameplayAbility class declaration that either activate or cancel the ability upon addition or removal of certain GameplayTags. See the following GameplayTags API – attaching GameplayTags to an actor recipe for more details.
- There are a bunch more! Explore the API and implement those functions you find to be useful in your code.
See also
- The GameplayAbilities API is a rich and nicely interwoven series of objects and functions. Explore GameplayEffects, GameplayTags, and GameplayTasks and how they integrate with the UGameplayAbility class to fully explore the functionality the library has to offer. You can read more about the API here: https://api.unrealengine.com/INT/API/Plugins/GameplayAbilities/index.html
Post Link: API – rotation using FRotationMatrix to have one object face another