
Multiplayer Networking in UE4
In this chapter, we are going to cover the following topics:
- Testing your game as a client and a server simultaneously
- Replicating properties over the network
- Replicating functions over the network
- Handling UI network events
Introduction
Networking is one of the more complex things you can do as a programmer. Thankfully, Unreal Engine has been designed with networking in mind since the original Unreal Engine released in 1998. Unreal uses a client-server model for communication between multiple computers. In this case, the server is the person who started the game and the clients are those who are playing the game with the first person. For things that are happening in everyone’s game to work correctly, we need to call certain code at certain times for certain people.
For example, when a client wants to shoot his/her gun, they send a message to the server, which will then determine whether they hit anything and then tells all the clients what happened using replication. This can be important because some things, such as the game mode, only exist on the server.For more information on the client-server model, check out https://en.wikipedia.org/wiki/Client%E2%80%93server_model.
Since we are going to want to see multiple characters on the screen, in this chapter, we will be using a base project based on the Third Person C++ template:
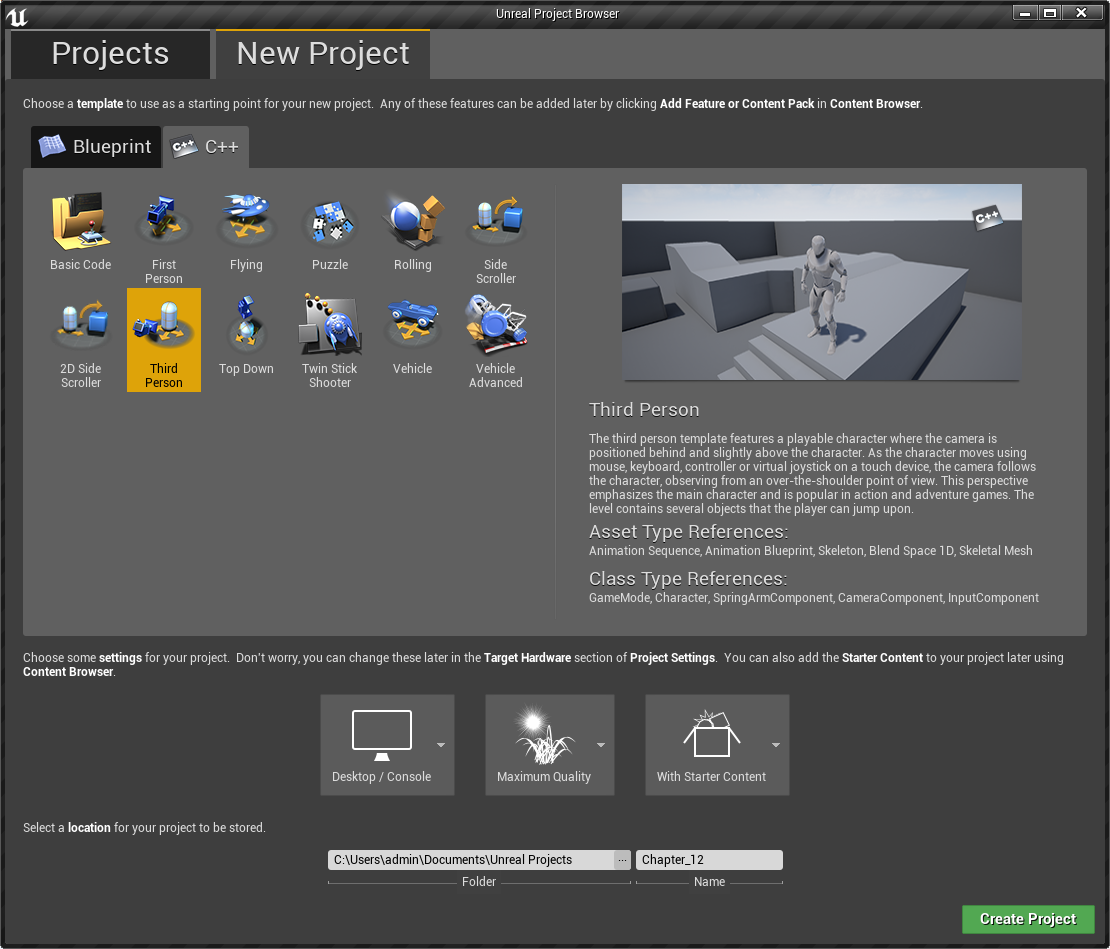
Technical requirements
This chapter requires the use of Unreal Engine 4 and uses Visual Studio 2017 as the IDE. Instructions on how to install both pieces of software and the requirements for them can be found in Chapter 1, UE4 Development Tools, of this book.
Testing your game as a client and a server simultaneously
When working on networked games, it’s always a good idea to test your project often. Instead of having to use two separate computers, Unreal comes with an easy way to play a game with multiple players at the same time built in.
How to do it…
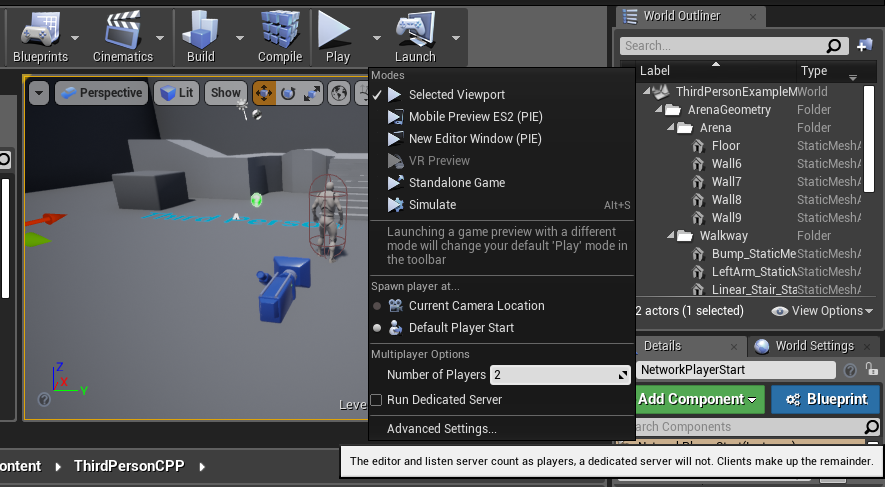
Generally, when we play the game, we only have one player on the screen. We can modify this with the Play settings:
- From the Unreal Editor, with the ThirdPersonExampleMap open, click on the arrow drop-down next to the Play button. Under there, set the Number of Players property to 2:
- Afterwards, click on the Play button:
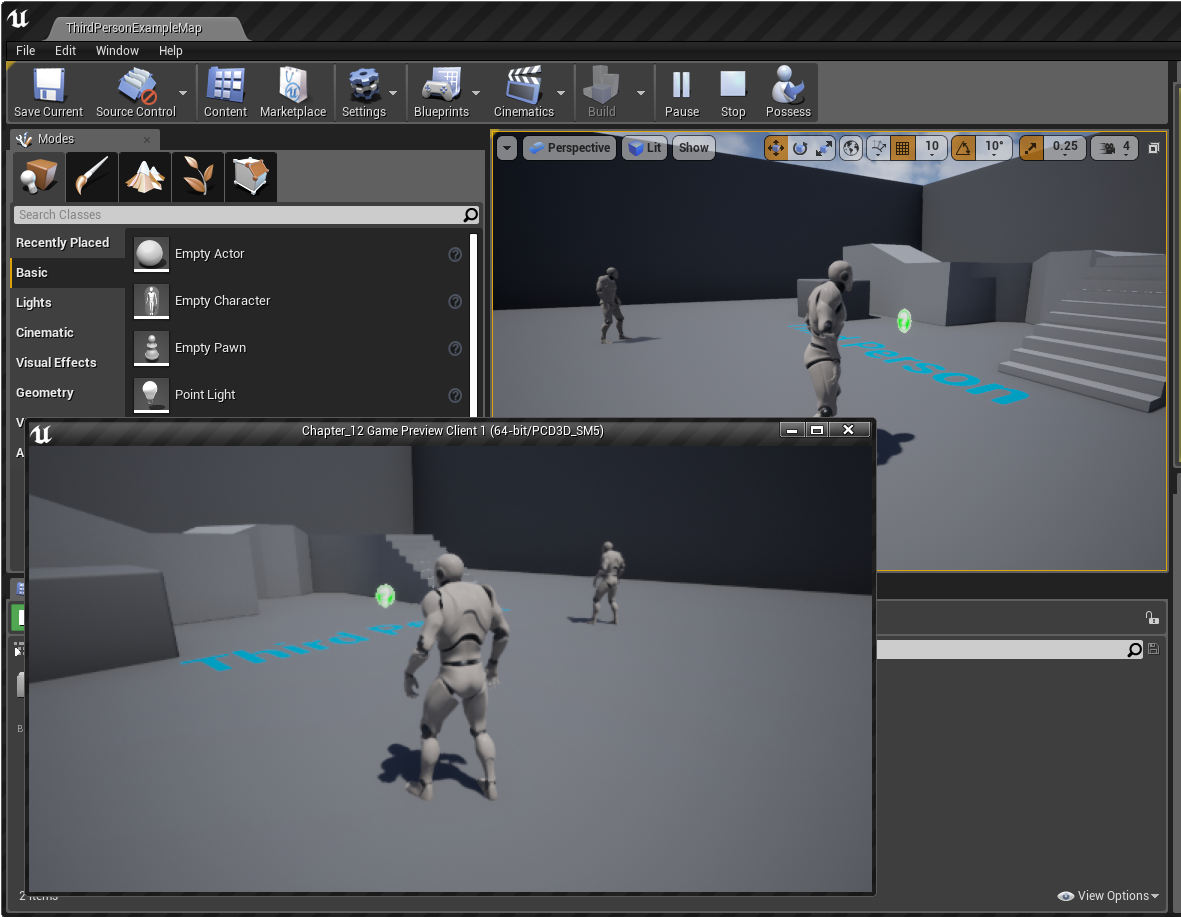
As you can see, you now have two windows added to the screen!Remember that you can return mouse control from a window by pressing Shift + F1.
How it works…
In addition to the character that is also placed in the scene, there is another object within the world called NetworkPlayerStart, which is where networked players will be spawned:
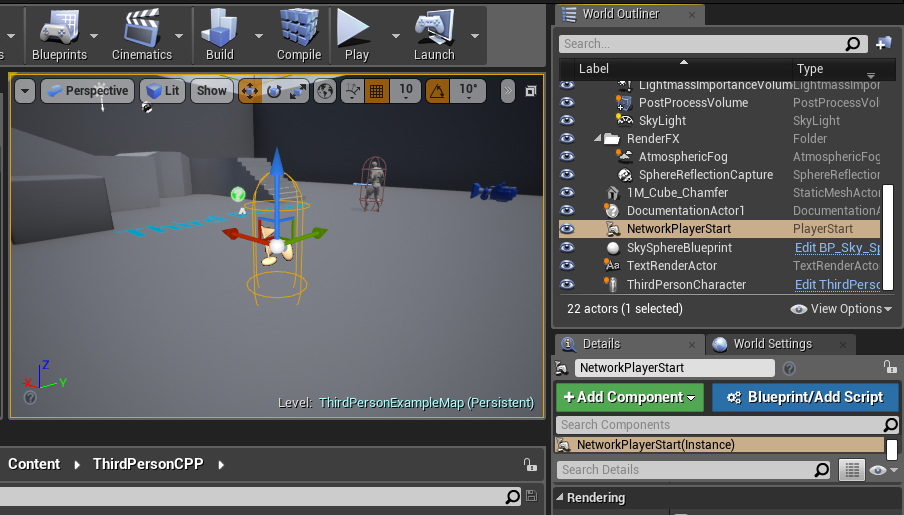
If you add more Player Start objects into the scene, by default, objects will pick a Player Start randomly from the ones available. You can quickly create new ones by holding the Alt key down and dragging an object in the new direction.
Replicating properties over the network
To ensure that the values are the same on both clients and servers, we use the process of replication. In this recipe, we will see just how easy it is to do so.
How to do it…
For this simple example, let’s create a variable to store how many times each player jumps within the game:
- Open up Visual Studio and open the definition for your character for your project (in my case, it is Chapter_12Character.h). Add the following property and function declaration to the file:
UPROPERTY(Replicated, EditAnywhere)
uint32 JumpCount;

void Jump() override;
- Then, go to the implementation file and add the following #include:
#include "UnrealNetwork.h" // DOREPLIFETIME
- Afterwards, we need to tell the SetupPlayerInputComponent method to use our version of Jump instead of the parent class’s:
void AChapter_12Character::SetupPlayerInputComponent(class UInputComponent* PlayerInputComponent)
{
  // Set up gameplay key bindings
  check(PlayerInputComponent);
  PlayerInputComponent->BindAction("Jump", IE_Pressed, this, &AChapter_12Character::Jump);
  PlayerInputComponent->BindAction("Jump", IE_Released, this, &ACharacter::StopJumping);

  ...
- Then, we need to add the following functions:
void AChapter_12Character::Jump()
{
    Super::Jump();

    JumpCount++;

    if (Role == ROLE_Authority)
    {
        // Only print function once
        GEngine->AddOnScreenDebugMessage(-1, 5.0f,
            FColor::Green,
            FString::Printf(TEXT("%s called Jump %d times!"),
            *GetName(), JumpCount)
        );
    }


}

void AChapter_12Character::GetLifetimeReplicatedProps(TArray<FLifetimeProperty>&
    OutLifetimeProps) const
{
    Super::GetLifetimeReplicatedProps(OutLifetimeProps);

    // Replicate to every client
    //DOREPLIFETIME(AChapter_12Character, JumpCount);
}
- Save your script and return to the Unreal Editor. Compile your script and play your game:
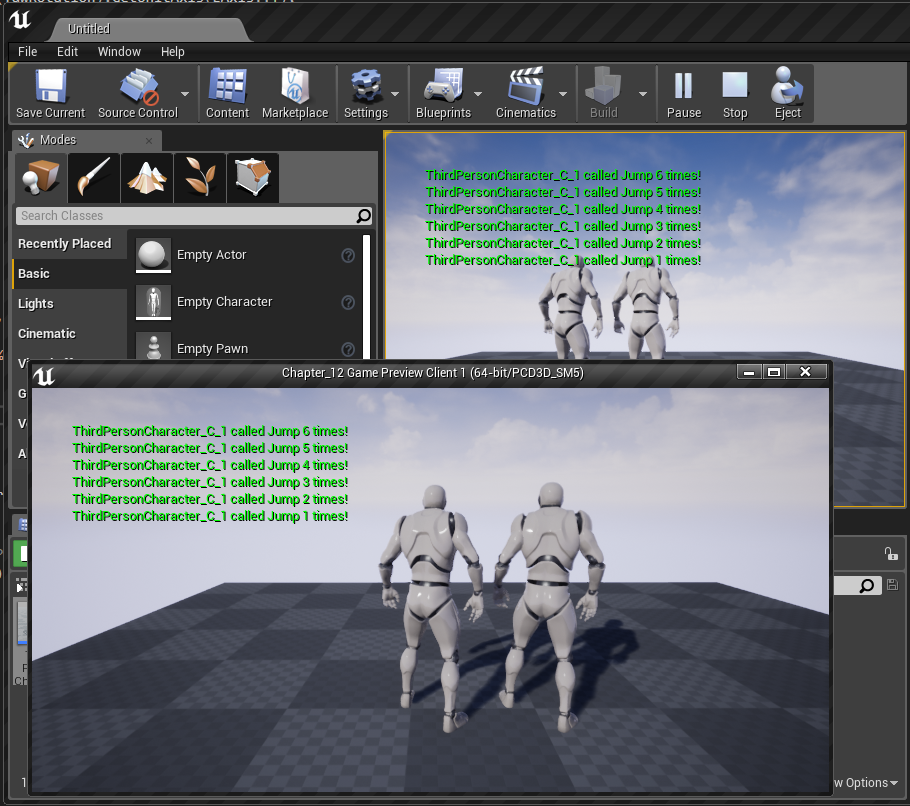
Now, whenever either player presses the spacebar, you’ll see a message displaying their name and the value that it will have.
How it works…
Property replication is simple in theory. Whenever a variable changes its value, the network should notify all clients of the change and then update the variable. This is often used for things like health, where the value is extremely important to know.
When you register a variable like this, this variable should only be modified by the server and then replicated to the other clients. To mark something to be replicated, we use the Replicated specifier inside of the UPROPERTY.
After marking something as replicated, we have to define a new function called GetLifetimeReplicatedProps, which does not need to be declared in the header file. Inside of this function, we use the DOREPLIFETIME macro to state that whenever the JumpCount variable changes on the server, all clients need to modify the value as well.
Inside of the Jump function, we added in some new functionality, but we first check the Role variable to determine if something should happen or not. ROLE_Authority is the highest level, which means that you’re the server. This ensures that our functionality will only happen once rather than multiple times.For replication to work, make sure that the bReplicates variable is set to true. This should be done in the constructor of the class.
There’s more…
For those that want to add a bit of optimization to their code, instead of our current DOREPLIFETIME macro, you could use the following instead:
void AChapter_12Character::GetLifetimeReplicatedProps(TArray<FLifetimeProperty>&
    OutLifetimeProps) const
{
    Super::GetLifetimeReplicatedProps(OutLifetimeProps);

    // Replicate to every client
    //DOREPLIFETIME(AChapter_12Character, JumpCount);

    // Value is already updated locally, so we can skip replicating
    // the value for the owner
    DOREPLIFETIME_CONDITION(AChapter_12Character, JumpCount, COND_SkipOwner);
}
This makes it so that the value is only replicated on other clients and not the original value.For more information on DOREPLIFETIME_CONDITION and some other tips and tricks for networking, check out https://www.unrealengine.com/en-US/blog/network-tips-and-tricks.
Replicating functions over the network
In this recipe, we will see a nontrivial example of replication in use with a simple pickup object that we may want a player to keep track of.
How to do it…
The first step in creating our collectible would be to actually create the class we are going to use:
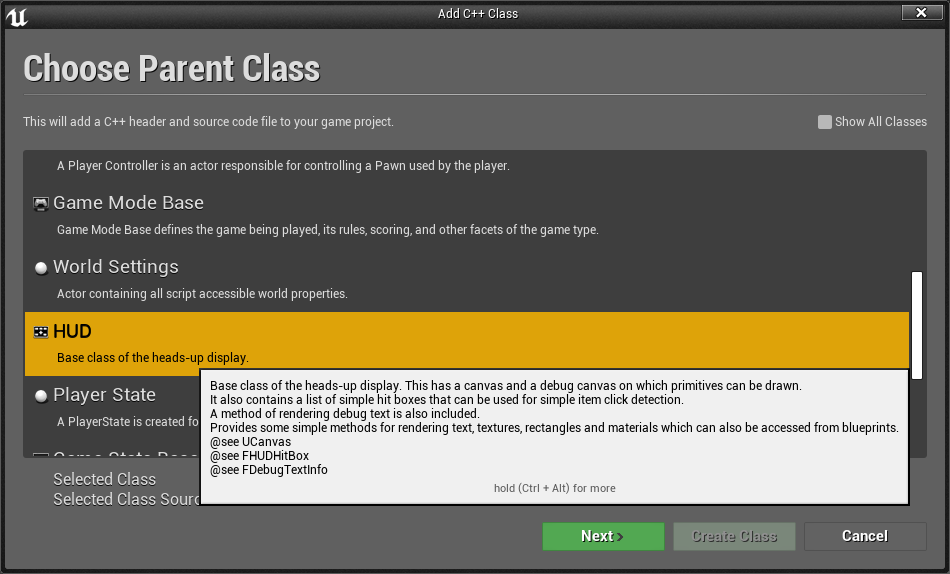
- Navigate to File | New C++ Class and from there, in the Choose Parent Class window, select Actor and then click on Next:

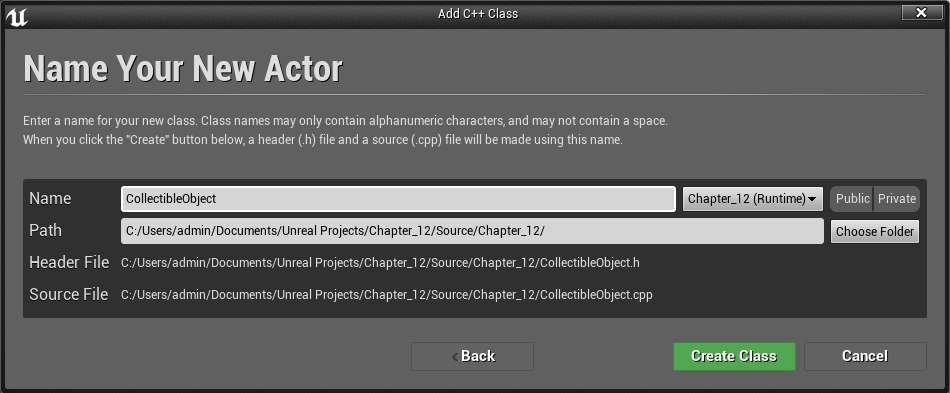
- From the next window, set the Name property to CollectibleObject and click on the Create Class button to add it to the project and compile the base code:
- Once Visual Studio opens up, update CollectibleObject.h to the following:
#pragma once

#include "CoreMinimal.h"
#include "GameFramework/Actor.h"
#include "CollectibleObject.generated.h"

UCLASS()
class CHAPTER_12_API ACollectibleObject : public AActor
{
    GENERATED_BODY()

public:
    // Sets default values for this actor's properties
    ACollectibleObject();

    // Event called when something starts to overlaps the
    // sphere collider
    // Note: UFUNCTION required for replication callbacks
    UFUNCTION()
    void OnBeginOverlap(class UPrimitiveComponent*
        HitComp,
        class AActor* OtherActor,
        class UPrimitiveComponent*
        OtherComp,
        int32 OtherBodyIndex, bool
        bFromSweep,
        const FHitResult& SweepResult);

    // Our server function to update the score.
    UFUNCTION(Reliable, Server, WithValidation)
    void UpdateScore(int32 Amount);

    void UpdateScore_Implementation(int32 Amount);
    bool UpdateScore_Validate(int32 Amount);

protected:
    // Called when the game starts or when spawned
    virtual void BeginPlay() override;

public:
    // Called every frame
    virtual void Tick(float DeltaTime) override;

};
- Then, inside of CollectibleObject.cpp, update the constructor of the class to the following:
#include "ConstructorHelpers.h"
#include "Components/SphereComponent.h"

// ...

// Sets default values
ACollectibleObject::ACollectibleObject()
{
   // Set this actor to call Tick() every frame. You can turn this off to improve performance if you don't need it.
  PrimaryActorTick.bCanEverTick = true;

    // Must be true for an Actor to replicate anything
    bReplicates = true;

    // Create a sphere collider for players to hit
    USphereComponent * SphereCollider = CreateDefaultSubobject<USphereComponent>(TEXT("SphereComponent"));

    // Sets the root of our object to be the sphere collider
    RootComponent = SphereCollider;

    // Sets the size of our collider to have a radius of
    // 64 units
    SphereCollider->InitSphereRadius(64.0f);

    // Makes it so that OnBeginOverlap will be called
    // whenever something hits this.
    SphereCollider->OnComponentBeginOverlap.AddDynamic(this, &ACollectibleObject::OnBeginOverlap);

    // Create a visual to make it easier to see
    UStaticMeshComponent * SphereVisual = CreateDefaultSubobject<UStaticMeshComponent>(TEXT("Static Mesh"));

    // Attach the static mesh to the root
    SphereVisual->SetupAttachment(RootComponent);

    // Get a reference to a sphere mesh
    auto MeshAsset = ConstructorHelpers::FObjectFinder<UStaticMesh>(TEXT("StaticMesh'/Engine/BasicShapes/Sphere.Sphere'"));

    // Assign the mesh if valid
    if (MeshAsset.Object != nullptr)
    {
        SphereVisual->SetStaticMesh(MeshAsset.Object);
    }

    // Resize to be smaller than the larger sphere collider
    SphereVisual->SetWorldScale3D(FVector(0.5f));


}
- Afterwards, implement the OnBeginOverlap function:
// Event called when something starts to overlaps the
// sphere collider
void ACollectibleObject::OnBeginOverlap(
    class UPrimitiveComponent* HitComp,
    class AActor* OtherActor,
    class UPrimitiveComponent* OtherComp,
    int32 OtherBodyIndex,
    bool bFromSweep,
    const FHitResult& SweepResult)
{
    // If I am the server
    if (Role == ROLE_Authority)
    {
        // Then a coin will be gained!
        UpdateScore(1);
        Destroy();
    }
}
- Then, implement the UpdateScore_Implementation and UpdateScore_Validate methods:
// Do something here that modifies game state.
void ACollectibleObject::UpdateScore_Implementation(int32
    Amount)
{
    if (GEngine)
    {
        GEngine->AddOnScreenDebugMessage(-1, 5.0f,
            FColor::Green,
            "Collected!");
    }
}

// Optionally validate the request and return false if the
// function should not be run.
bool ACollectibleObject::UpdateScore_Validate(int32 Amount)
{
    return true;
}
- Save the scripts and then return to the Unity Editor. Compile your scripts and then drag an instance of the Collectible Object class into a scene. Save your level and play the game using two players, as shown in the previous recipe.
- Upon collecting the object, you should see a message displayed on the screen:
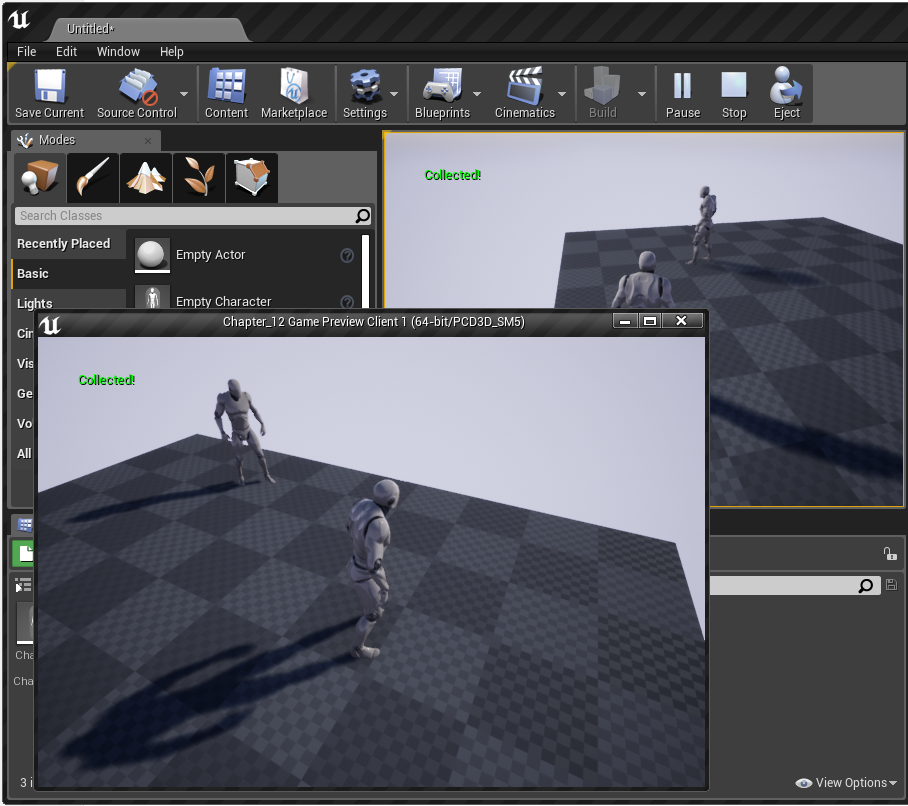
With this, you can see how we can have a message replicated from a server to the client!
How it works…
In the CollectibleObject class’s constructor, we make sure that our object is going to be replicated. After that, we create a sphere collider that we tell (via a listener) to call the OnBeginOverlap function when it collides with another object. To do that, we use the OnComponentBeginOverlap function.For more information on the OnComponentBeginOverlap function and the function that needs to be given to it, refer to https://docs.unrealengine.com/latest/INT/API/ Runtime/Engine/Components/UPrimitiveComponent/ OnComponentBeginOverlap/index.html.
After this, inside our OnBeginOverlap function, we first check if we are currently on the server. We don’t want things to get called multiple times, and we want the server to be the one that tells the other clients that we’ve increased our score.
We also call the UpdateScore function. This function has had the following function specifiers added to it:
- Reliable: The function will be replicated over the network and make it so that it is guaranteed to arrive, regardless of network errors or bandwidth issues. It requires us to select either Client or Server as an additional specifier.
- Server: Specifies that the function should only be called on the server. Adds an additional function that has _Implementation at the end of it, which is where the implementation should happen. The automatically generated code will use this function as needed.
- WithValidation: Adds an additional function that needs to be implemented with _Validate at the end. This function will take in the same parameters as the function given, but will return a bool that indicates whether the call to the main function should happen or not.
For more information on the other function specifiers, such as Unreliable, check out https://docs.unrealengine.com/en-US/Programming/UnrealArchitecture/Reference/Functions#functionspecifiers.
Calling UpdateScore will, in turn, call the UpdateScore_Implementation function that we created and it will display a message, saying that we’ve collected the object by printing out some text like we used earlier.
Finally, the UpdateScore_Validate function is required and just tells the game that we should always run the implementation for the UpdateScore function.For some recommendations on performance and bandwidth settings that may be useful for working with levels with a lot of replication, check out the following link: https://docs.unrealengine.com/en-US/Gameplay/Networking/Actors/ReplicationPerformance.
See also…
If you’re interested in seeing another example of using networking and replication, refer to https://wiki.unrealengine.com/ Networking/Replication.
In addition, you can also check out the Shooter Game example project included with Unreal Engine 4 and read the files to get a feeling for how it’s used in a complete example. To read more about that, check out https://docs.unrealengine.com/en-us/Resources/SampleGames/ShooterGame.
Handling UI network events
Since each player has their own screen, it makes sense that their UI will only display information that is relevant to them. In this recipe, we will see how to handle UI network events.
Getting ready…
You should complete the Replication properties over the network recipe in this chapter, as well as be familiar with creating HUDs, which you can learn more about in Chapter 14, User Interfaces – UI and UMG.
How to do it…
- From your Visual Studio project (File | Open Visual Studio), open the Source\<Module> folder and from there, open the <Module>.build.cs file (in my case, it would be Source\Chapter_12\Chapter_12.build.cs) and uncomment/add the following line of code:
using UnrealBuildTool;

public class Chapter_12 : ModuleRules
{
  public Chapter_12(ReadOnlyTargetRules Target) : base(Target)
  {
    PCHUsage = PCHUsageMode.UseExplicitOrSharedPCHs;

    PublicDependencyModuleNames.AddRange(new string[] { "Core", "CoreUObject", "Engine", "InputCore", "HeadMountedDisplay" });

        PrivateDependencyModuleNames.AddRange(new string[] { "Slate", "SlateCore" });
    }
}
- Create a new HUD subclass using the Add C++ Class wizard:
- When asked for the name, put in NetworkHUD, and click on the Create Class button:

- Once created, open up a GameMode that you are planning on using (I’m using the Chapter_12GameMode.cpp file) and add the following to the constructor implementation:
#include "Chapter_12GameMode.h"
#include "Chapter_12Character.h"
#include "NetworkHUD.h"
#include "UObject/ConstructorHelpers.h"

AChapter_12GameMode::AChapter_12GameMode()
{
  // set default pawn class to our Blueprinted character
  static ConstructorHelpers::FClassFinder<APawn> PlayerPawnBPClass(TEXT("/Game/ThirdPersonCPP/Blueprints/ThirdPersonCharacter"));
  if (PlayerPawnBPClass.Class != NULL)
  {
    DefaultPawnClass = PlayerPawnBPClass.Class;
  }

    HUDClass = ANetworkHUD::StaticClass();
}
- Inside NetworkHUD.h, add the following function with the override keyword to the class:
#pragma once

#include "CoreMinimal.h"
#include "GameFramework/HUD.h"
#include "NetworkHUD.generated.h"

/**
 *
 */
UCLASS()
class CHAPTER_12_API ANetworkHUD : public AHUD
{
    GENERATED_BODY()

public:
    virtual void DrawHUD() override;
};
- Now, implement the function:
#include "NetworkHUD.h"
#include "Engine/Canvas.h"
#include "Chapter_12Character.h"

void ANetworkHUD::DrawHUD()
{
    Super::DrawHUD();

    AChapter_12Character* PlayerCharacter = Cast<AChapter_12Character>(GetOwningPawn());

    if(PlayerCharacter)
    {
        Canvas->DrawText(GEngine->GetMediumFont(), FString::Printf(TEXT("Called Jump %d times!"), PlayerCharacter->JumpCount), 10, 10);
    }
}
- Finally, we can comment out the original debug message since our HUD will handle it for us:
void AChapter_12Character::Jump()
{
    Super::Jump();

    JumpCount++;

    //if (Role == ROLE_Authority)
    //{
    // // Only print function once
    // GEngine->AddOnScreenDebugMessage(-1, 5.0f,
    // FColor::Green,
    // FString::Printf(TEXT("%s called Jump %d times!"), *GetName(), JumpCount));
    //}
}
- Compile your code and launch the editor.
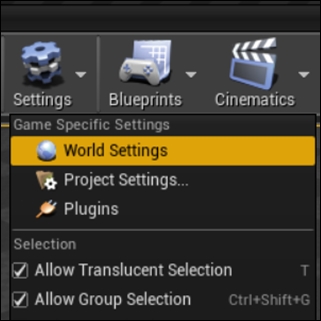
- Within the editor, open the World Settings panel from the Settings drop-down menu:
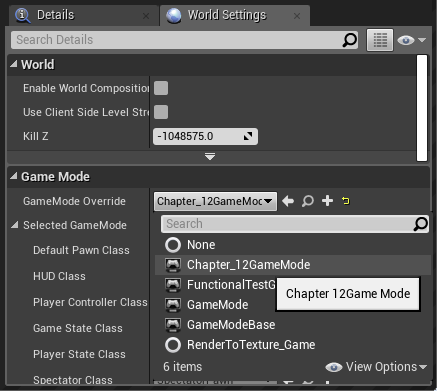
- In the World Settings dialog, select Chapter_12GameMode from the list under GameMode Override:
- Play and verify that your custom HUD is drawing to the screen and that each character has their own jump value:
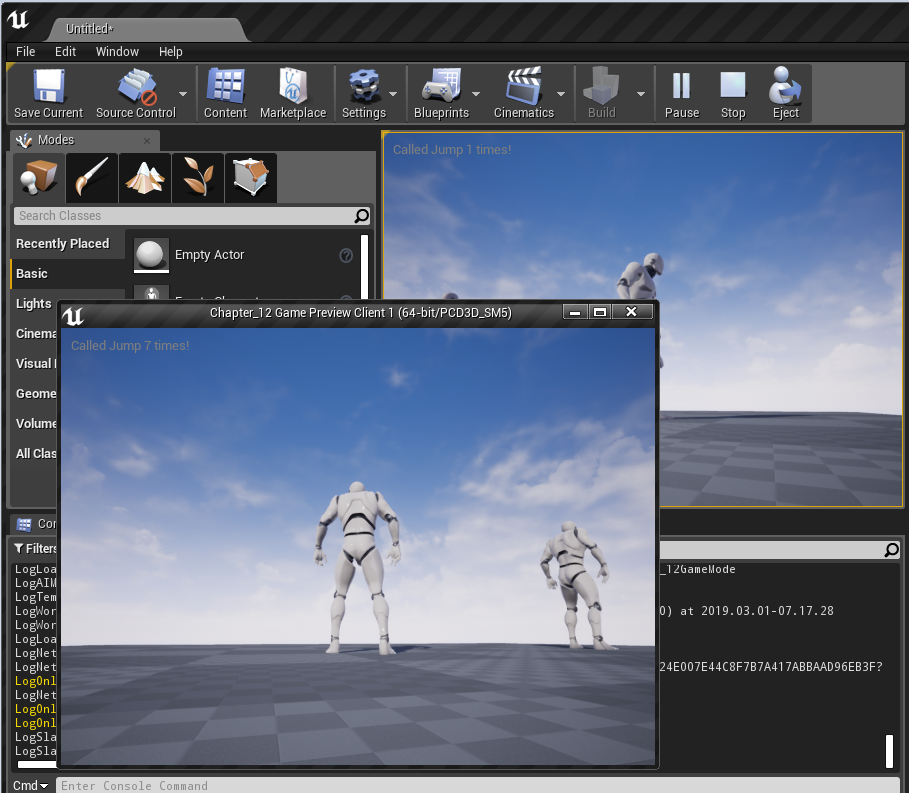
And with that, we can take these concepts to display any property that is being replicated!
How it works…
The GetOwningPawn method will return a pointer to the Pawn class the HUD is attached to. We cast that to our custom character-derived class and then can access the properties that the class has. In our case, we are using the variable that we previously added a Replicated tag to, which allows the HUD to update properly, depending on which screen we are using.For more information and additional examples of replication in use, check out https://wiki.unrealengine.com/Replication.
See also…
For those that would like to learn more about networking with Unreal Engine 4, Cedric ‘eXi’ Neukirchen has created a great guide that I recommend reading. You can find that at http://cedric-neukirchen.net/Downloads/Compendium/UE4_Network_Compendium_by_Cedric_eXi_Neukirchen.pdf.
Post Link: Multiplayer Networking in UE4