AI for Controlling NPCs
In this chapter, we will cover the following recipes:
- Implementing a simple following behavior
- Laying down a Navigation Mesh
- Creating a Blackboard
- Creating a Behavior Tree
- Connecting a Behavior Tree to a Character
- Creating a BTService
- Creating a BTTask
Introduction
AI includes many aspects of a game’s NPC, as well as player behavior. The general topic of AI includes pathfinding and NPC behavior. Generally, we term the selection of what the NPC does for a period of time within the game as behavior.
AI in UE4 is well supported. A number of constructs exist to allow basic AI programming from within the editor, but we will be focusing on using C++ to program elements while touching on engine aspects when needed.
To make it easier to visualize our AI character and the interactions with the player, in this chapter, I will be using the C++ Third Person template:
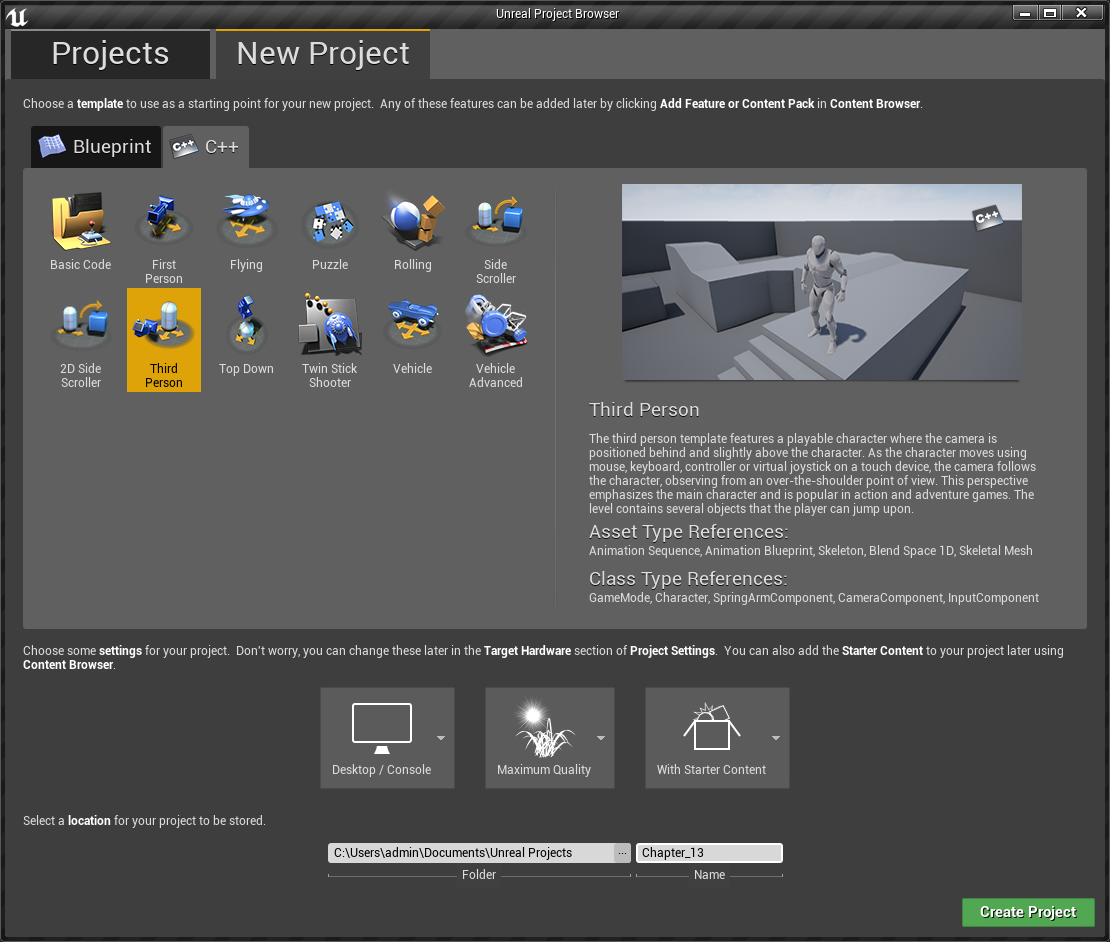
While I would love to cover all aspects of working with AI in Unreal Engine 4, that could take a whole book of its own. If you are interested in exploring AI even more after reading this chapter, I suggest that you check out Unreal Engine 4 AI Programming Essentials, also available from Packt Publishing.
Technical requirements
This chapter requires the use of Unreal Engine 4 and uses Visual Studio 2017 as the IDE. Instructions on how to install both pieces of software and the requirements for them can be found in Chapter 1, UE4 Development Tools.
Implementing a simple following behavior
The most simple way to implement any kind of AI is to just write it out by hand. This allows you to get something up-and-running quickly, but lacks the elegance and finesse that using Unreal’s built-in systems gives us. This recipe gives us a super-simple implementation of making an object follow another one.
Getting ready
Have a UE4 project ready with a simple landscape or set of geometry on the ground, ideally with a cul-de-sac somewhere in the geometry to test AI movement functions. The ThirdPersonExampleMap that comes with the C++ Third Person template should work just fine.
How to do it…
- Create a new C++ class that derives from Character by going to Add New | New C++ Class. Under the Add C++ Class menu, select Character and hit the Next button:
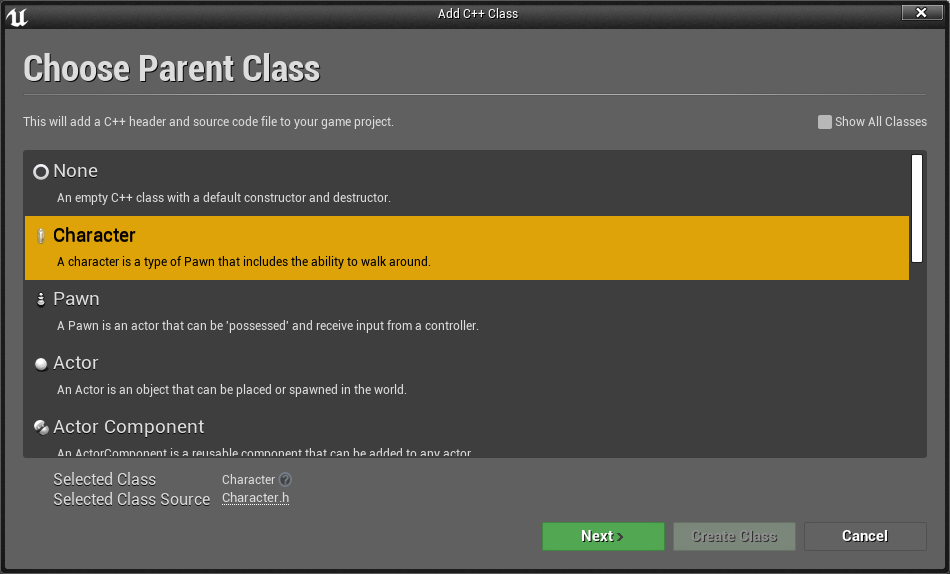
- From the next screen, Name the class FollowingCharacter and click on the Create Class button:

- From the FollowingCharacter.cpp file, update the Tick function to the following:
void AFollowingCharacter::Tick(float DeltaTime)
{
    Super::Tick(DeltaTime);

    // Get current location
    auto startPos = GetActorLocation();

    // Get player's location
    FVector playerPos = GetWorld()->GetFirstPlayerController()->GetPawn()->GetActorLocation();

    // Get the direction to move in
    FVector direction = playerPos - startPos;
    direction.Normalize();

    // Move the player in that direction
    SetActorLocation(startPos + direction);
}
The auto keyword can be used for variable declarations if the compiler can deduce what the type of an object is from the assignment given to it.
- Save your script and compile your code.
- Drag and drop the Following Character into your scene. There is currently no visualization of the character, so go ahead and select the object. Then, from the Details tab, click the Add Component button. From there, select the Cylinder shape:
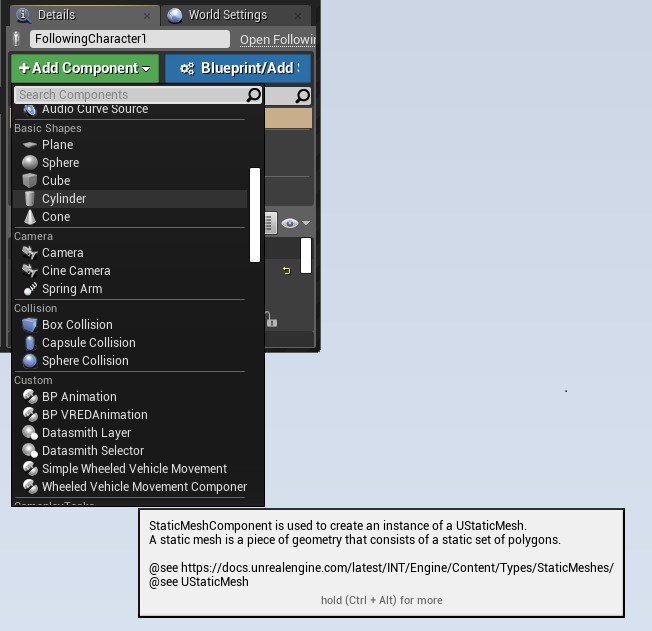
If all goes well, you should see the object on the screen.
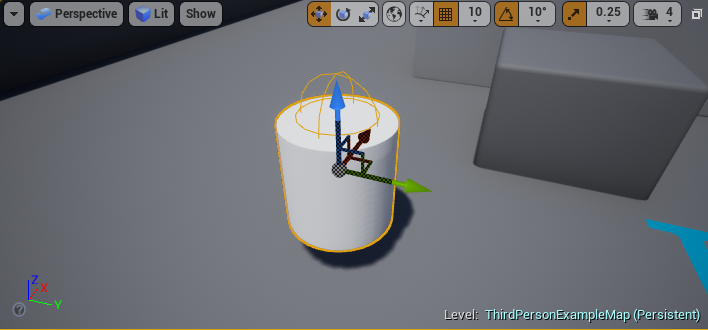
The Following Character with a Cylinder shape added
- Run the game and move around. You should notice that the cylinder will follow the player, no matter where they go!
How it works…
In this example, we are effectively hard-coding this enemy to follow the player character by doing simple vector math ourselves. While this technically works, it doesn’t make use of Unreal’s built-in AI functionality. It will also stop the AI at walls since there is no actual path-finding going on, and it will break the player character if you let the AI catch up. The player won’t be able to move anymore due to collisions.
The rest of this chapter will be working with Unreal’s actual built-in systems, which create a much more robust implementation.
Laying down a Navigation Mesh
A Navigation Mesh (also known as a Nav Mesh) is basically a definition of areas that an AI-controlled unit considers passable (that is, areas that the “AI-controlled” unit is allowed to move into or across). A Nav Mesh does not include geometry that would block the player if the player tried to move through it.
Getting ready
Constructing a Nav Mesh based on your scene’s geometry is fairly easy in UE4. Start with a project that has some obstacles around it, or one that uses terrain. The ThirdPersonExampleMap included with the C++ Third Person template works well for this purpose.
How to do it…
To construct your Nav Mesh, simply perform the following steps:
- Go to Modes | Volumes.
- Drag the Nav Mesh Bounds Volume option onto your viewport.
- Use the Scale tool to increase the size of the Nav Mesh so that it covers the area the actors that use the Nav Mesh should be allowed to navigate and pathfind in. To toggle the visibility of the completed Nav Mesh, press the P key:
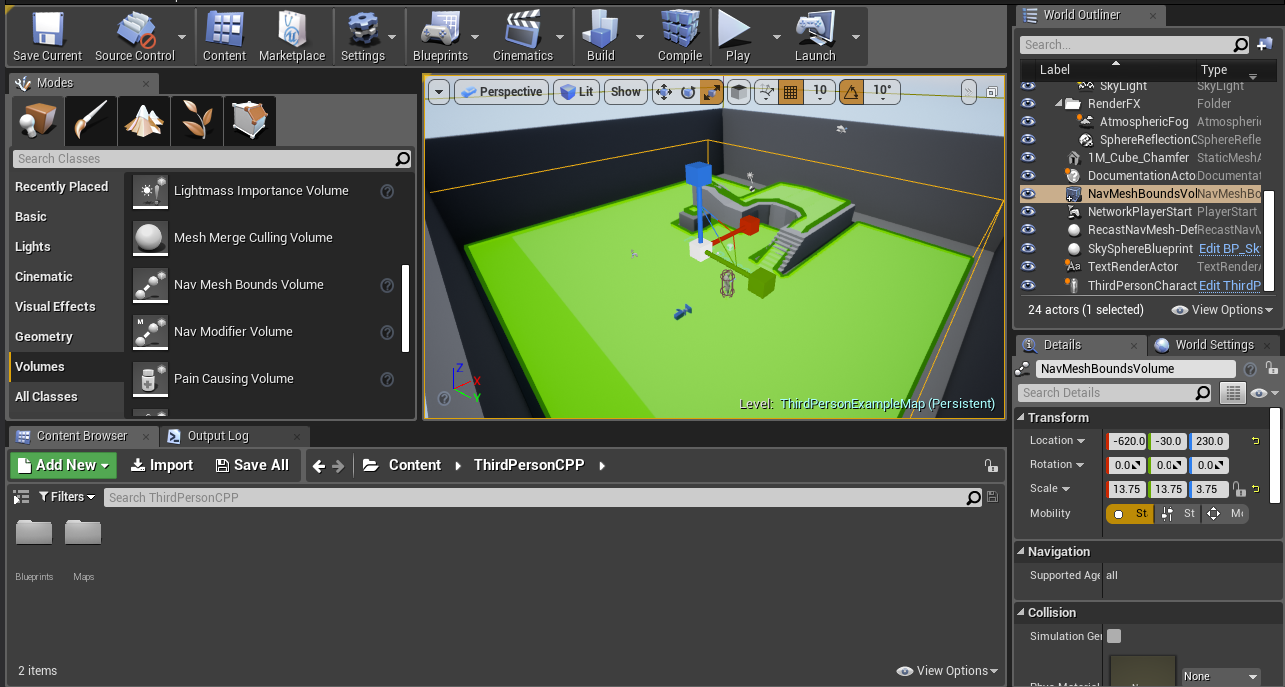
A Nav Mesh drawn within the bounds of the Nav Mesh Bounds Volume
How it works…
A Nav Mesh doesn’t block the player pawn (or other entities) from stepping on a certain geometry, but it serves to guide AI-controlled entities as to where they can and cannot go.
For more information on scaling objects in UE4, check out the following link: https://docs.unrealengine.com/en-us/Engine/Actors/Transform.
Creating a Blackboard
A Blackboard is a container for variables that are often used with Behavior Trees. This data is used for decision-making purposes, either by a single AI or a whole group of others. We will be creating a Blackboard here that we will then use in future recipes.
How to do it…
- From the Content Browser under the Content folder, select Add New | Artificial Intelligence | Blackboard:
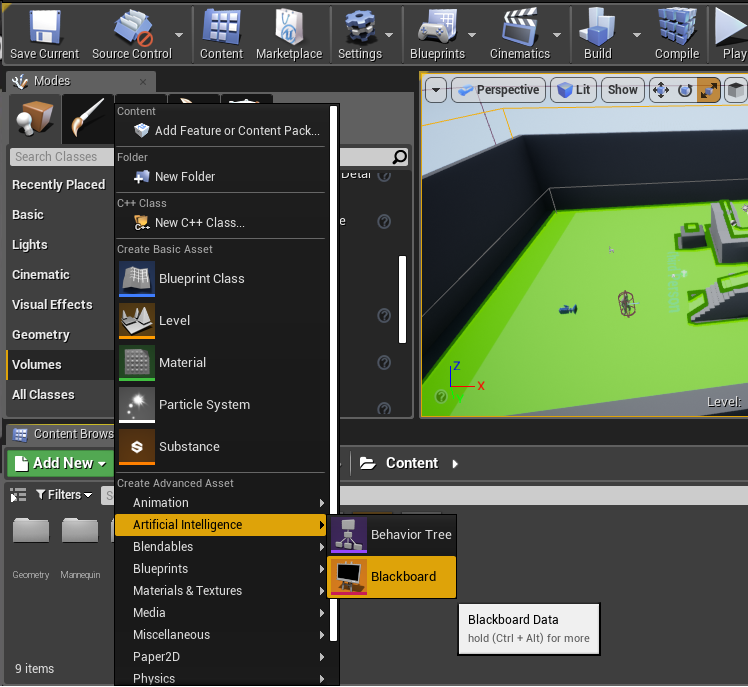
- When asked for a name, provide EnemyBlackboard. Double-click on the file to open the Blackboard Editor.
- From the Blackboard tab, click New Key | Object:
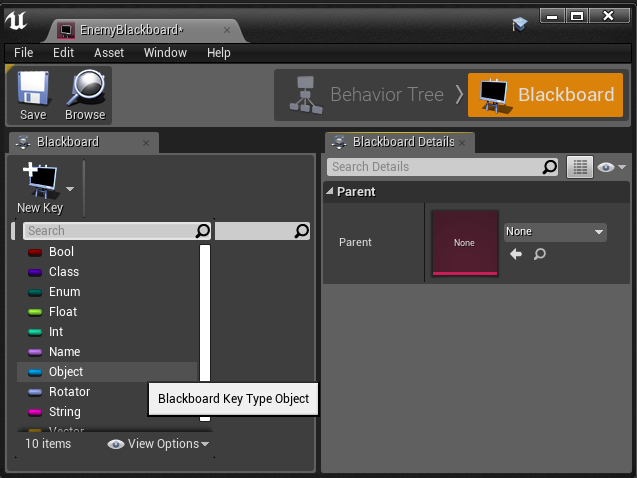
- When asked for the name of the object, insert Target. Then, open the Key Type property by clicking the arrow to the left of the name and set the Base Class property to Actor:
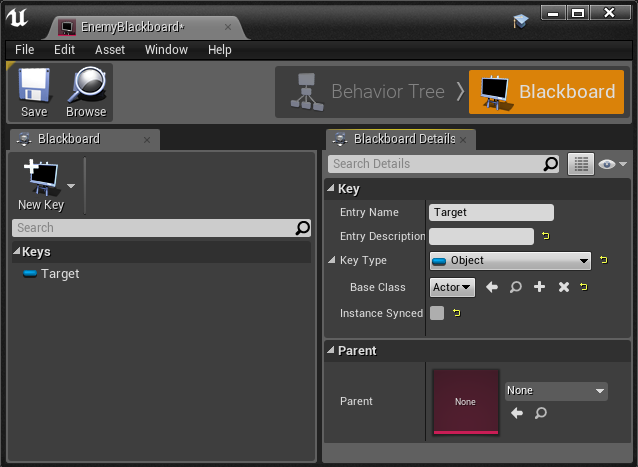
- Add any other properties you wish to have access to and then click on the Save button.
How it works…
In this recipe, we created a blackboard that we will later use in code to set and get the value of the player that we will use in our behavior tree.
Creating a Behavior Tree
If a Blackboard is the shared memory of an AI, the Behavior Tree is the AI’s processor, which will contain the logic of the AI. It makes decisions, and then acts on those decisions to enable an AI to actually do something when the game is running. In this recipe, we will create a Behavior Tree and then assign its Blackboard.
How to do it…
- From the Content Browser under the Content folder, select Add New | Artificial Intelligence | Behavior Tree:
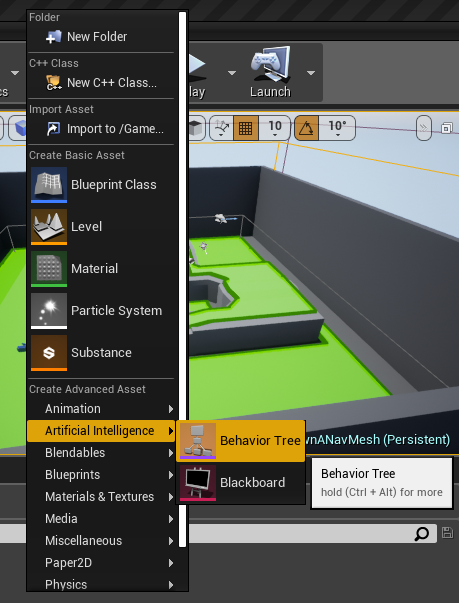
- When asked for a name, provide EnemyBehaviorTree. Double-click on the file to open the Behavior Tree Editor.
- Once opened, under the Details tab, open the AI | Behavior Tree section and verify that the Blackboard Asset property is set to EnemyBlackboard. You should notice the Target property we created listed under Keys. If not, close the editor and open it again:
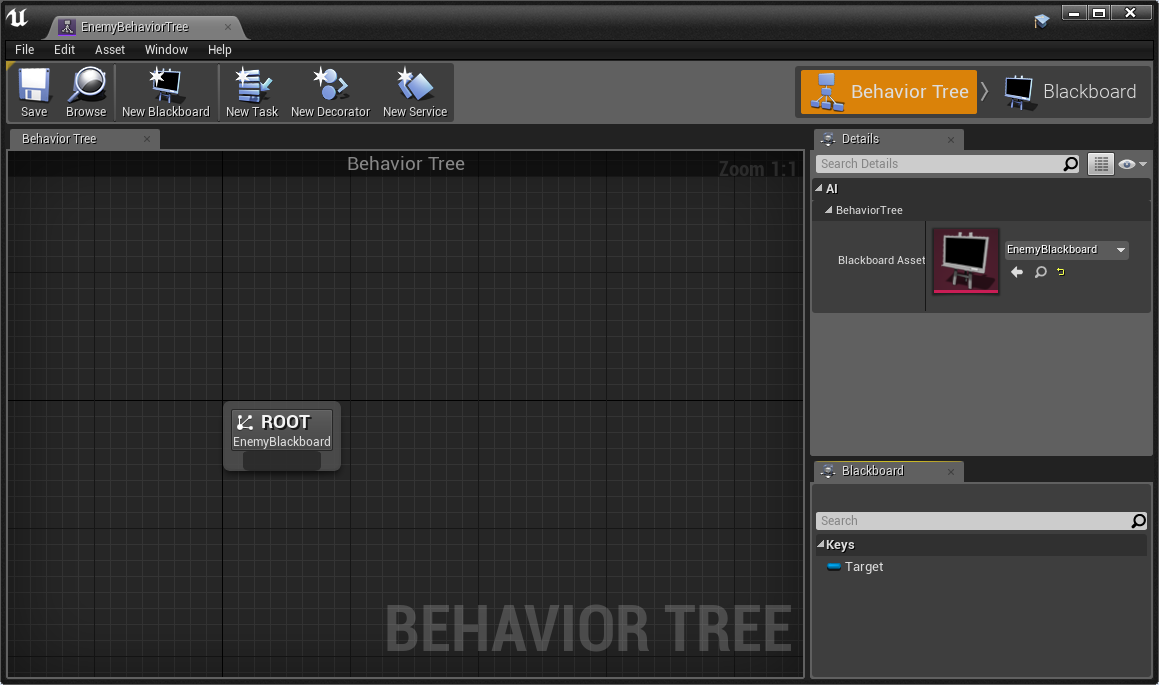
A view of the Behavior Tree Editor
- Once finished, click on the Save button.
How it works…
In this recipe, we created a Behavior Tree, which is required by the AI system so that it can fulfill tasks and other assorted features. In future recipes, we will use this to create our own custom Character classes.
Connecting a Behavior Tree to a Character
A BehaviorTree chooses a behavior to be exhibited by an AI-controlled unit at any given moment. Behavior Trees are relatively simple to construct, but there is a lot of setting up to do to get one running. You also have to be familiar with the components that are available for constructing your Behavior Tree to do so effectively.
A Behavior Tree is extremely useful for defining NPC behavior that is more varied than simply moving toward an opponent (as shown in the previous recipe with AIMoveTo).
Getting ready
Before starting this recipe, verify that you have completed the following recipes:
- Laying down a Navigation Mesh
- Creating a Blackboard
- Creating a Behavior Tree
How to do it…
- Open up your .Build.cs file (in our case, Chapter_13.Build.cs) and add the following dependencies:
using UnrealBuildTool;

public class Chapter_13 : ModuleRules
{
  public Chapter_13(ReadOnlyTargetRules Target) : base(Target)
  {
    PCHUsage = PCHUsageMode.UseExplicitOrSharedPCHs;

    PublicDependencyModuleNames.AddRange(new string[] { "Core", "CoreUObject", "Engine", "InputCore", "HeadMountedDisplay" });
        PublicDependencyModuleNames.AddRange(new string[] { "AIModule", "GameplayTasks" });

    }
}
- Compile your code.
- From the Content Browser, select Add New | New C++ Class. At the Add C++ Class menu, check the Show All Classes option type in AIController, and then select the AIController class. Then, click on Next:
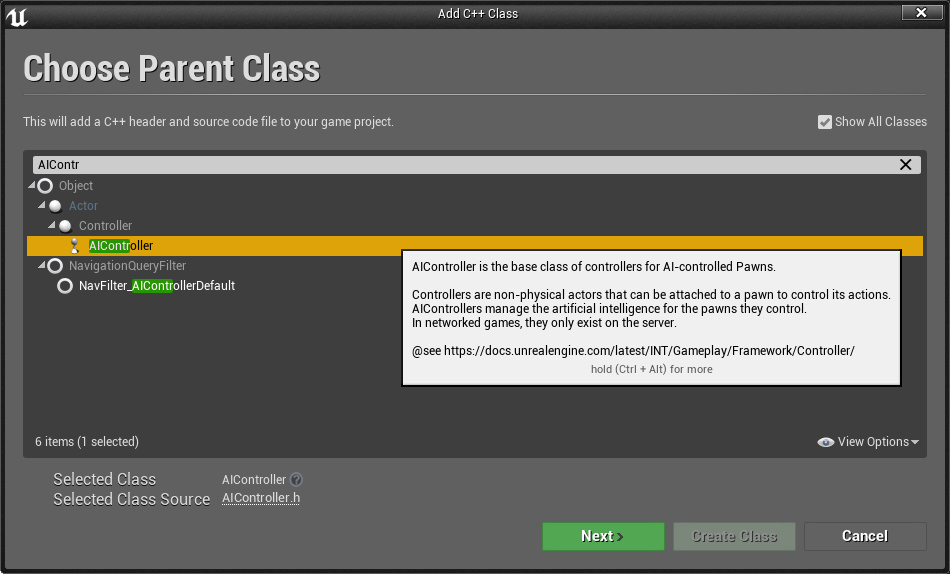
- When asked for a name for the class, name it EnemyAIController and click on the Create Class button.
- Open up Visual Studio and update the EnemyAIController.h file to the following:
#pragma once

#include "CoreMinimal.h"
#include "AIController.h"
#include "BehaviorTree/BehaviorTreeComponent.h"
#include "BehaviorTree/BlackboardComponent.h"
#include "EnemyAIController.generated.h"

/**
 *
 */
UCLASS()
class CHAPTER_13_API AEnemyAIController : public AAIController
{
    GENERATED_BODY()

private:
    // AI Component references
    UBehaviorTreeComponent* BehaviorComp;
    UBlackboardComponent* BlackboardComp;

public:
    AEnemyAIController();

    // Called when the controller possesses a Pawn/Character
    virtual void Possess(APawn* InPawn) override;

    FBlackboard::FKey TargetKeyID;

};
- After creating the function declarations, we need to define them in the EnemyAIController.cpp file:
#include "EnemyAIController.h"

AEnemyAIController::AEnemyAIController()
{
    //Initialize components
    BehaviorComp = CreateDefaultSubobject<UBehaviorTreeComponent>(TEXT("BehaviorComp"));
    BlackboardComp = CreateDefaultSubobject<UBlackboardComponent>(TEXT("BlackboardComp"));
}

// Called when the controller possesses a Pawn/Character
void AEnemyAIController::Possess(APawn* InPawn)
{
    Super::Possess(InPawn);
}
In addition to an AI Controller, we also need to have a Character.
- Create a new C++ class that derives from Character by going to Add New | New C++ Class. Under the Add C++ Class menu, select Character and hit the Next button:
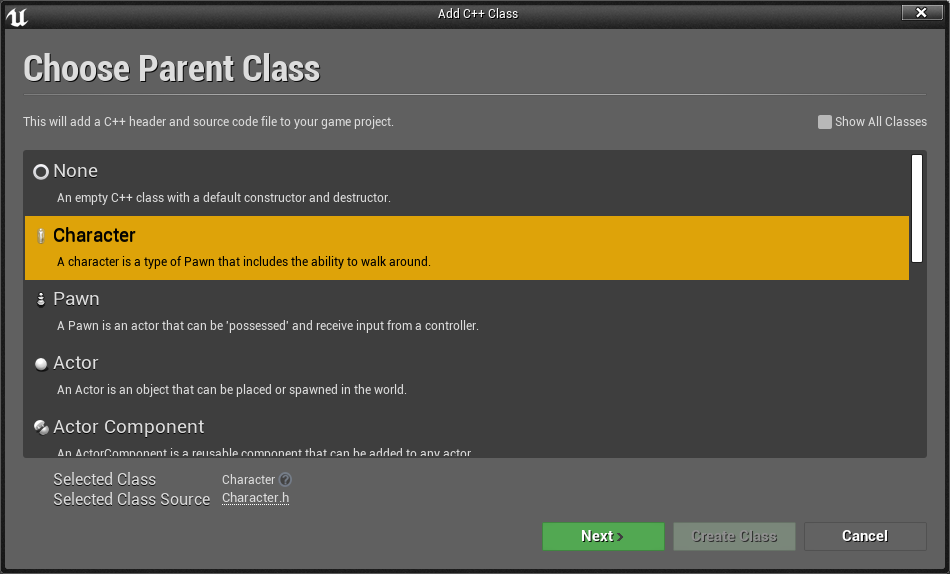
- From the next screen, Name the class EnemyCharacter and click on the Create Class button.
- Open Visual Studio. Under the EnemyCharacter.h file, add the following property:
#pragma once

#include "CoreMinimal.h"
#include "GameFramework/Character.h"
#include "EnemyCharacter.generated.h"

UCLASS()
class CHAPTER_13_API AEnemyCharacter : public ACharacter
{
    GENERATED_BODY()

public:
    // Sets default values for this character's properties
    AEnemyCharacter();

    UPROPERTY(EditAnywhere, Category = Behavior)
    class UBehaviorTree *EnemyBehaviorTree;

protected:
    // Called when the game starts or when spawned
    virtual void BeginPlay() override;

public:
    // Called every frame
    virtual void Tick(float DeltaTime) override;

    // Called to bind functionality to input
    virtual void SetupPlayerInputComponent(class UInputComponent* PlayerInputComponent) override;

};
- Then, we can go back into the EnemyAIController.cpp file and update the Possess function since our Character class exists:
#include "EnemyAIController.h"
#include "EnemyCharacter.h"
#include "BehaviorTree/BehaviorTree.h"


AEnemyAIController::AEnemyAIController()
{
    // Initialize components
    BehaviorComp = CreateDefaultSubobject<UBehaviorTreeComponent>(TEXT("BehaviorComp"));
    BlackboardComp = CreateDefaultSubobject<UBlackboardComponent>(TEXT("BlackboardComp"));
}

// Called when the controller possesses a Pawn/Character
void AEnemyAIController::Possess(APawn* InPawn)
{
    Super::Possess(InPawn);

    // Convert InPawn to EnemyCharacter
    auto Character = Cast<AEnemyCharacter>(InPawn);

    // Check if pointers are valid
    if(Character && Character->EnemyBehaviorTree)
    {
        BlackboardComp->InitializeBlackboard(*Character->EnemyBehaviorTree->BlackboardAsset);

        TargetKeyID = BlackboardComp->GetKeyID("Target");

        BehaviorComp->StartTree(*Character->EnemyBehaviorTree);
    }
}
- Save your scripts and compile your code.
Now, we will create a Blueprint version of the two classes we just created and assign our variables.
- From the Content Browser under the C++ Classes/Chapter_13 folder, right-click on the EnemyAIController object and select the Create Blueprint class based on EnemyAIController option. Give it a name and click on the Create Blueprint Class button.
- Likewise, do the same thing for the EnemyCharacter object.
- Double-click on your MyEnemyCharacter Blueprint and, under the Details tab, set the Enemy Behavior Tree property to EnemyBehaviorTree. Then, set the AI Controller Class property to MyEnemyAIController:
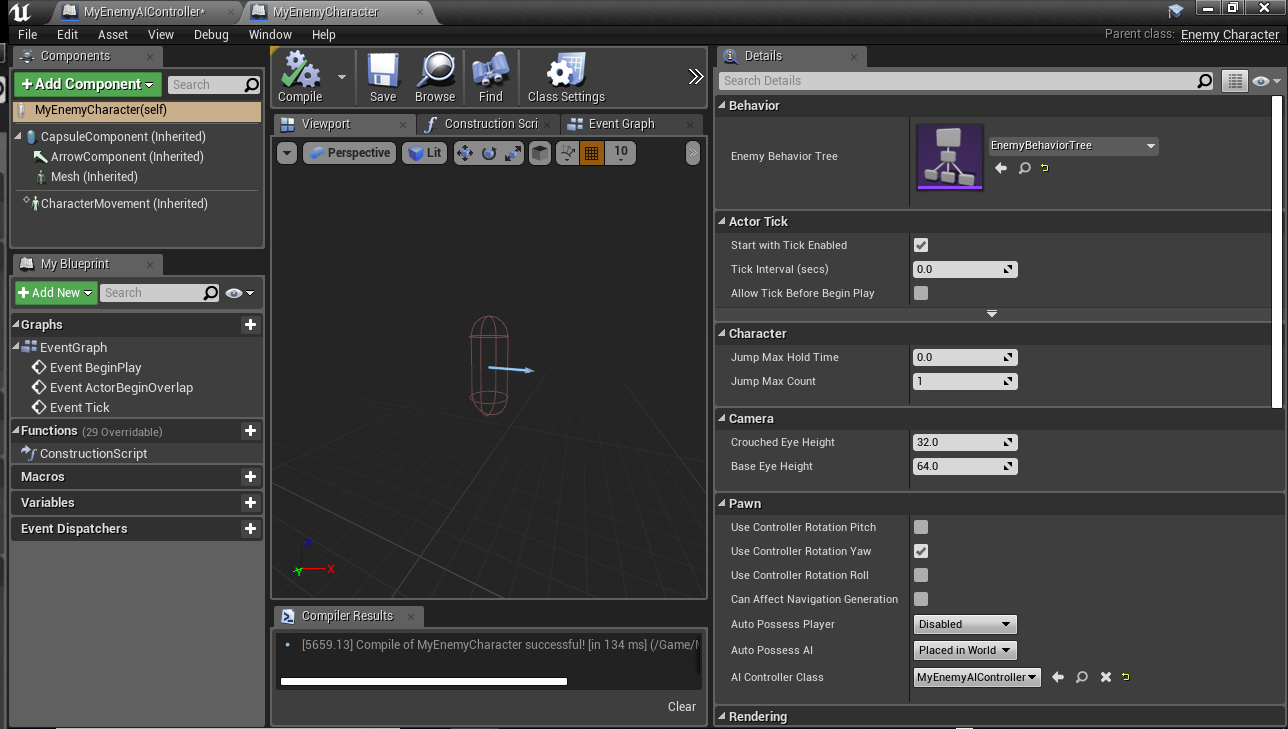
Assigning the Enemy Behavior Tree and AI Controller Class properties
- You’ll likely want a visual component for the character as well, so from the Components tab, click on the Add Component button and select Cube. Afterward, modify the Scale to (0.5, 0.5, 1.5).
As we discussed previously, you may need to click on the Open Full Blueprint Editor text to see all of the available options.
16. Then, hit Compile and save all of your assets:
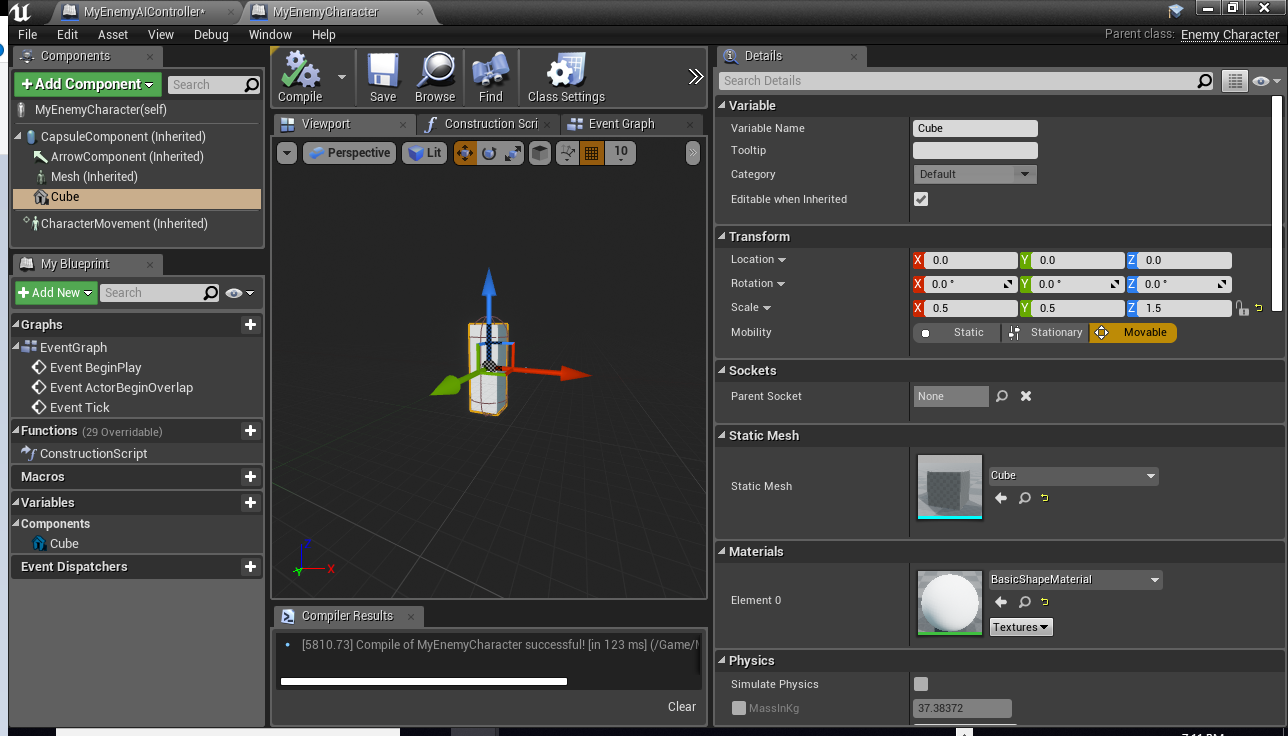
The completed enemy character
And with that, we’ve set up a connection between an AI Character, an AI Controller, and a Behavior Tree!
How it works…
The AI Controller class we created will add both the Behavior Tree and the Blackboard that we created in the previous two recipes.
A Behavior Tree is connected to an AI Controller, which in turn is connected to a Character. We will control the behavior of Character through the Behavior Tree by entering Task and Service nodes in the diagram.
A Behavior Tree hosts six different types of node, as follows:
- Task: Task nodes are the purple nodes in the Behavior Tree that contain Blueprint code to run. It’s something that the AI-controlled unit has to do (code-wise). Tasks must return either true or false, depending on whether the task succeeded or not (by providing a FinishExecution() node at the end).
- Decorator: A decorator is just a Boolean condition for the execution of a node. It checks a condition, and is typically used within a Selector or Sequence block.
- Service: This runs some Blueprint code when it ticks. The tick interval for these nodes is adjustable (it can run slower than a per-frame tick, for example, every 10 seconds). You can use these to query the scene for updates, a new opponent to chase, and so on. The Blackboard can be used to store queried information. Service nodes do not have a FinishExecute() call at the end of them.
- Selector: This runs all subtrees from left to right until it encounters a success. When it encounters a success, the execution goes back up the tree.
- Sequence: This runs all subtrees from left to right until it encounters a failure. When a failure is encountered, the execution goes back up the tree.
- Simple Parallel: This runs a single task (purple) in parallel with a subtree (gray).
Creating a BTService
Services attach to nodes in Behavior Trees and will execute at their defined frequency; that is, as long as their branch is being executed. Similar to Parallel nodes in other Behavior Tree systems, these are often used to make checks and to update the Blackboard, which we will use in this recipe to find our player object and assign it to our Blackboard.
Getting ready…
Finish the previous recipe, Connecting a Behavior Tree to a Character.
How to do it…
- From the Content Browser, select Add New | New C++ Class. From the Choose Parent Class menu, check the Show All Classes option and look for the BTService class. Select it and then hit the Next button:
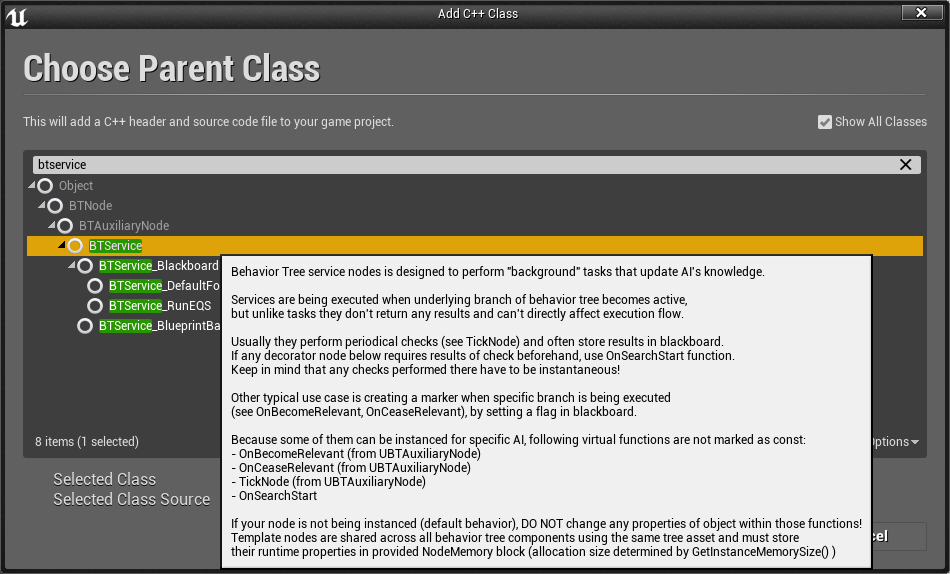
- At the next menu, set its name to BTService_FindPlayer and then click on the Create Class option.
- From the BTService_FindPlayer.h file, use the following code:
#pragma once

#include "CoreMinimal.h"
#include "BehaviorTree/BTService.h"
#include "BehaviorTree/BehaviorTreeComponent.h"
#include "BTService_FindPlayer.generated.h"

/**
 *
 */
UCLASS()
class CHAPTER_13_API UBTService_FindPlayer : public UBTService
{
    GENERATED_BODY()

public:
    UBTService_FindPlayer();

    /** update next tick interval
    * this function should be considered as const (don't modify state of object) if node is not instanced! */
    virtual void TickNode(UBehaviorTreeComponent& OwnerComp, uint8* NodeMemory, float DeltaSeconds) override;

};
- From the BTService_FindPlayer.cpp file, use the following code:
#include "BTService_FindPlayer.h"
#include "EnemyAIController.h"
#include "BehaviorTree/Blackboard/BlackboardKeyType_Object.h"

UBTService_FindPlayer::UBTService_FindPlayer()
{
    bCreateNodeInstance = true;
}

void UBTService_FindPlayer::TickNode(UBehaviorTreeComponent& OwnerComp, uint8* NodeMemory, float DeltaSeconds)
{
    Super::TickNode(OwnerComp, NodeMemory, DeltaSeconds);

    auto EnemyAIController = Cast<AEnemyAIController>(OwnerComp.GetAIOwner());

    if(EnemyAIController)
    {
        auto PlayerPawn = GetWorld()->GetFirstPlayerController()->GetPawn();
        OwnerComp.GetBlackboardComponent()->SetValue<UBlackboardKeyType_Object>(EnemyAIController->TargetKeyID, PlayerPawn);
        UE_LOG(LogTemp, Warning, TEXT("Target has been set!"));

    }

}
- Save your scripts and compile them.
- In the Content Browser, go to the Content folder where the EnemyBehaviorTree we created previously is located and double-click on it to open the Behavior Tree editor.
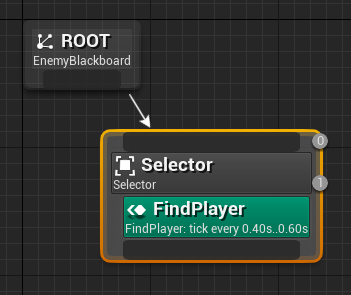
- From there, drag a line from ROOT down and select Selector:
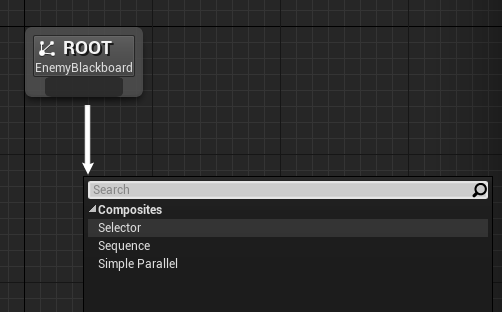
It’s important to note that you need to drag from the darker gray rectangle on the bottom. If you try to drag from the middle of ROOT, you’ll just move the node.
- Right-click on the Selector node and select Add Service | FindPlayer:
- Now, drag and drop an instance of your MyEnemyCharacter object into your scene and run the game:

As you can see, the value has been set!
How it works…
Our Behavior Tree will continue to call the Selector as there are no other nodes for it to transition to.
Creating a BTTask
In addition to Services, we also have Tasks, which are leaf nodes of Behavior Trees. These are the things that actually perform actions. In our example, we are going to have our AI follow our target, the player.
Getting ready…
Finish the previous recipe, Creating a BTService.
How to do it…
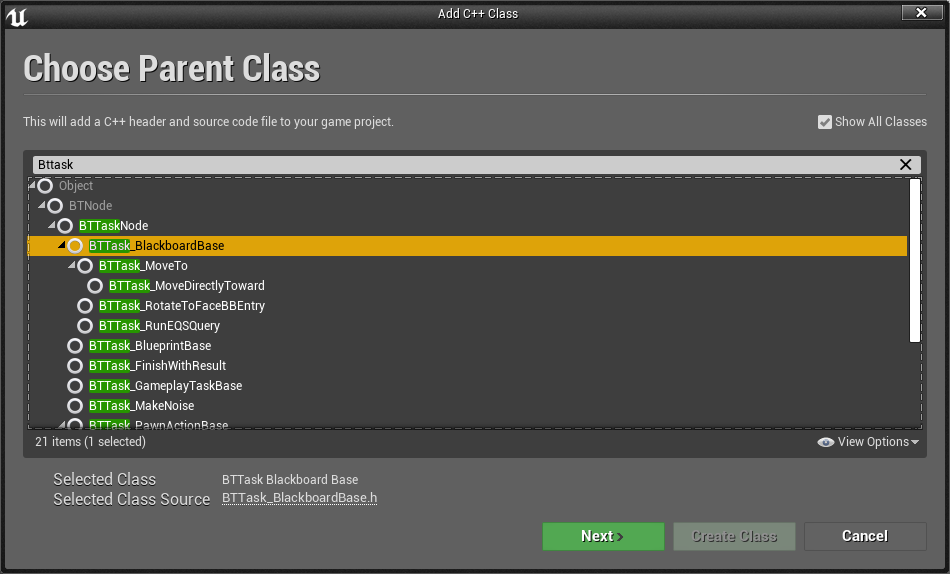
- From the Content Browser, select Add New | New C++ Class. From the Choose Parent Class menu, check the Show All Classes option and look for the BTTask_BlackboardBase class. Select it and then hit the Next button:
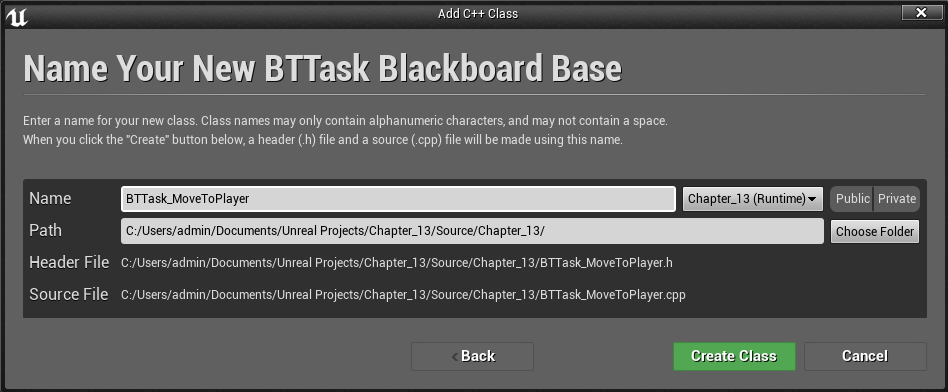
- At the next menu, set its name to BTTask_MoveToPlayer and then click on the Create Class option:
- Open Visual Studio and add the following function to BTTask_MoveToPlayer.h:
#pragma once

#include "CoreMinimal.h"
#include "BehaviorTree/Tasks/BTTask_BlackboardBase.h"
#include "BTTask_MoveToPlayer.generated.h"

/**
 *
 */
UCLASS()
class CHAPTER_13_API UBTTask_MoveToPlayer : public UBTTask_BlackboardBase
{
    GENERATED_BODY()

public:
    /** starts this task, should return Succeeded, Failed or InProgress
     * (use FinishLatentTask() when returning InProgress)
     * this function should be considered as const (don't modify state of object) if node is not instanced! */
    virtual EBTNodeResult::Type ExecuteTask(UBehaviorTreeComponent& OwnerComp, uint8* NodeMemory) override;

};
- Then, open the BTTask_MoveToPlayer.cpp file and update it to the following:
#include "BTTask_MoveToPlayer.h"
#include "EnemyAIController.h"
#include "GameFramework/Character.h"
#include "BehaviorTree/Blackboard/BlackboardKeyType_Object.h"

EBTNodeResult::Type UBTTask_MoveToPlayer::ExecuteTask(UBehaviorTreeComponent& OwnerComp, uint8* NodeMemory)
{
    auto EnemyController = Cast<AEnemyAIController>(OwnerComp.GetAIOwner());
    auto Blackboard = OwnerComp.GetBlackboardComponent();

    ACharacter * Target = Cast<ACharacter>(Blackboard->GetValue<UBlackboardKeyType_Object>(EnemyController->TargetKeyID));

    if(Target)
    {
        EnemyController->MoveToActor(Target, 50.0f);
        return EBTNodeResult::Succeeded;
    }

    return EBTNodeResult::Failed;
}
- Save your files and return to the Unreal Editor. Compile your code.
- In the Content Browser, go to the Content folder where the EnemyBehaviorTree we created previously is located and double-click on it to open the Behavior Tree editor.
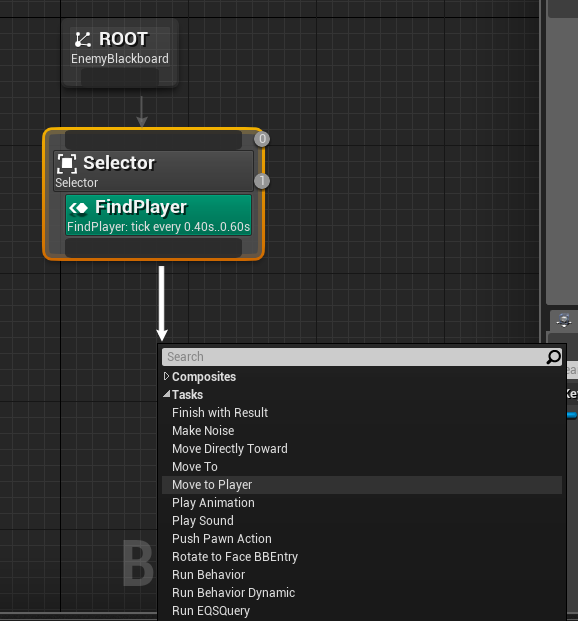
- Drag this below the Selector node and select Tasks | Move to Player:
- Save the Behavior Tree and return to the Unreal Editor. Drag and drop a MyEnemyCharacter object into the scene if you haven’t done so already and play the game:
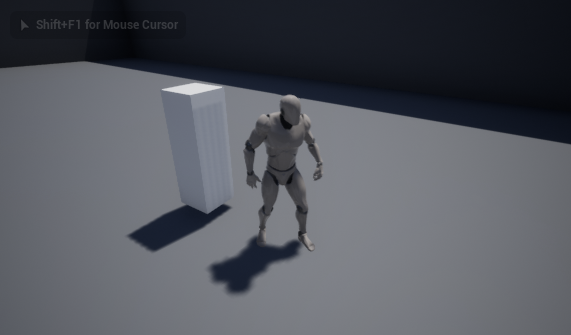
As you can see, our enemy is now following our player, which will happen for as long as the NavMesh covers the area!
How it works…
This recipe takes all of the materials we’ve covered so far and compiles them all together. The ExecuteTask method will be called as long as the BehaviorTree is inside this state. This function requires us to return an EBTNodeResult, which should return Succeeded, Failed, or InProgress to let the BehaviorTree know whether we can change states or not.
In our case, we first obtain the EnemyController and the Target objects so that we can figure out who we want to move and where we want to move to. As long as those properties are valid, we can call the MoveToActor function.There are a lot of other properties that the MoveToActor function offers that may be useful so that you can customize your movement. For more information, check out the following link: https://api.unrealengine.com/INT/API/Runtime/AIModule/AAIController/MoveToActor/index.html.
For those of you who are interested in exploring additional AI concepts with UE4, I highly suggest checking out Orfeas Eleftheriou’s UE4 AI Tutorials: https://orfeasel.com/category/ue_tuts/ai-programming/.
Post Link: AI for Controlling NPCs
