
1. Introduction to Unreal Engine 4
(Beginning Unreal Engine 4 Blueprints Visual Scripting: Using C++: From Beginner to Pro)
Satheesh Pv1 (1)Mumbai, India
Hello there, and welcome to this beginner’s guide to Unreal Engine 4. Throughout this book, you learn about different aspects of Unreal Engine 4, and you learn to create a sample game with the knowledge you gain. In this chapter, you learn how to download Unreal Engine through Epic Games Launcher and GitHub. After that, you learn how a project is structured and become familiar with the Unreal Editor interface.
Getting Unreal Engine
This chapter looks at how you acquire Unreal Engine. You can download it through either Epic Games Launcher or GitHub. Either way, you need to create an account at www.unrealengine.com, which is free.First, let’s look at the differences between Epic Games Launcher and GitHub.
- The Epic Games Launcher version (a.k.a. the binary version or vanilla version) of Unreal Engine 4 comes with the engine prebuilt, and you can select the platforms you need. You can also select the engine source, starter template, feature packs, and so forth, if you need them. The binary version does not support creating dedicated servers for your game, so if you are planning to develop a multiplayer game with a dedicated server, you must use the source version.
- The GitHub version (a.k.a. the source version) gives you the entire source code of the engine without any binaries, so you need to compile it manually. The source code version of the engine is typically used by developers who want to fix the engine’s bugs or add new features. This version is also required if your game relies on a dedicated server. The prerequisites for the source code version of the engine are Visual Studio 2019 (or higher) on Windows or Xcode on macOS.
DOWNLOAD FROM EPIC GAMES LAUNCHER
If you don’t have an Epic Games account, you need to create one at www.unrealengine.com/id/register.If you do have an Epic Games account, then head over to www.unrealengine.com/en-US/get-now and select your license to download and install Epic Games Launcher for your platform. After installation, open the launcher, and log in using your credentials. You should see the screenshot shown Figure 1-1.
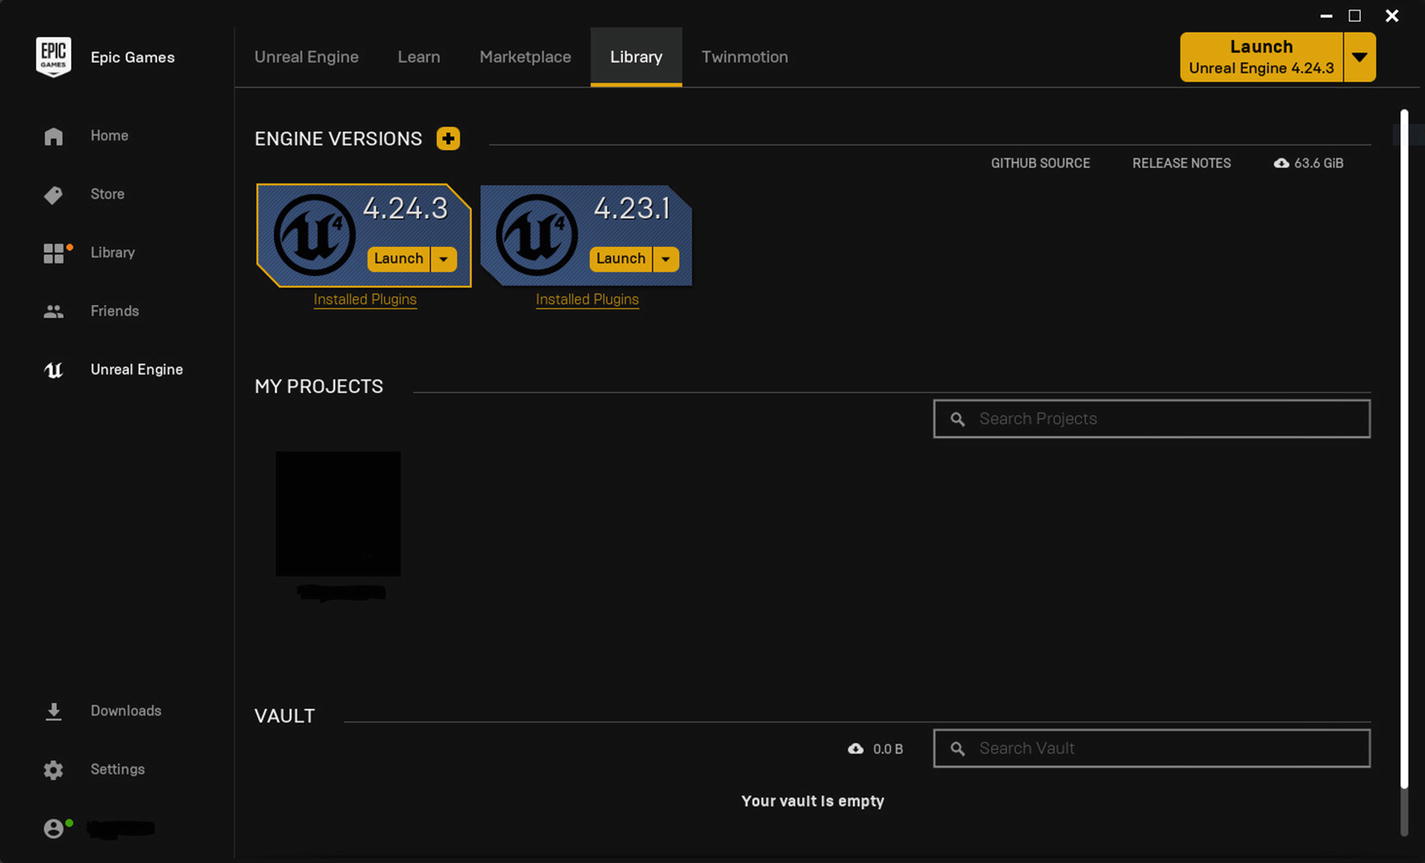
Near the ENGINE VERSIONS tab, you can see a + button, which allows you to download and install any engine version you want.
DOWNLOAD FROM GITHUB
If you prefer to work with the source version of the engine, you can do so by downloading the engine source code and compiling it yourself, but you must have Visual Studio 2019 (with C++ support enabled) installed if you use Windows or Xcode if you are on macOS.
First, you must create a GitHub account (it’s free) and log in to your Epic Games account. Once logged in, go to your account dashboard in Epic Games and link your GitHub account. After this, you are ready to download the full source code for Unreal Engine 4.
Downloading Source Code
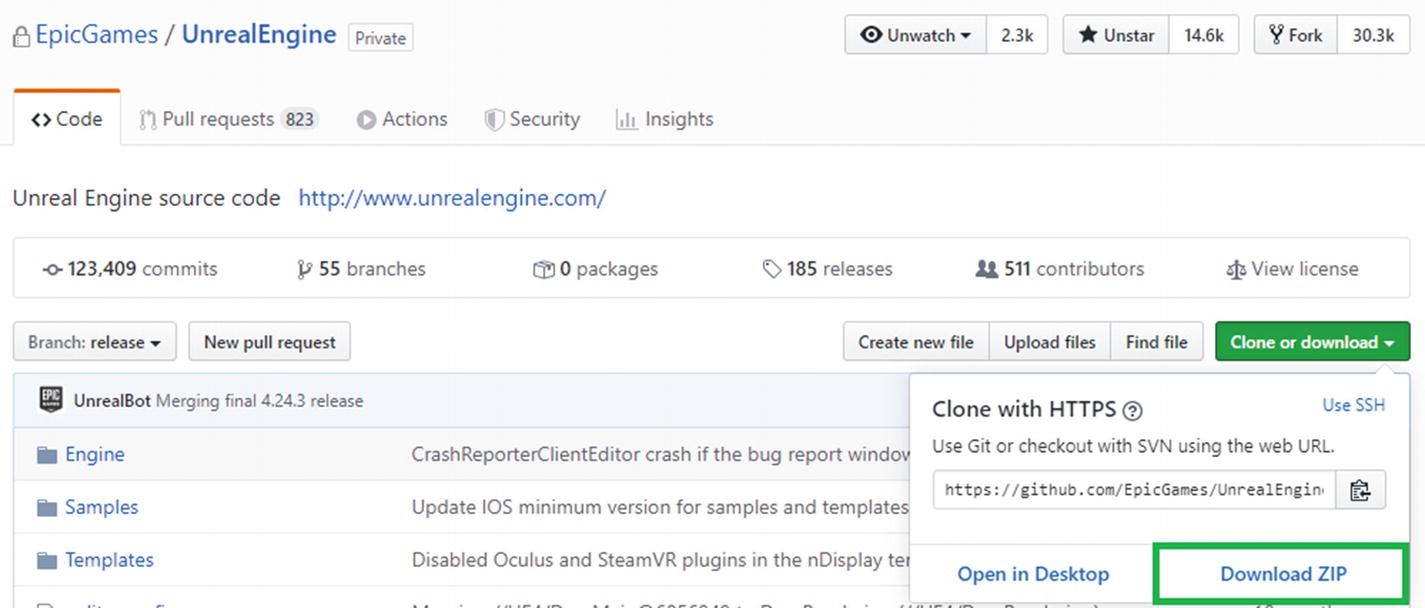
Once you have access to the Unreal Engine repository, you can click the Clone or download button and select the Download ZIP button (as seen in Figure 1-2).
Cloning the Unreal Engine Repository
To clone a repository, you need to have a Git client installed. Cloning is the process of downloading or copying a repository into an empty folder in your working machine, including the full Git history, so you can use Git commands. You only download the source code without any Git files, so you won’t track changes or have any information about previous commits.
I use SourceTree from Atlassian.Note
If you prefer other tools, please visit https://git-scm.com/download/gui/windows for Windows or https://git-scm.com/download/gui/mac for macOS.
After installing SourceTree, open the application. In the new tab, select Add an account. In the new window, switch the hosting service to GitHub and select the Refresh OAuth Token button. Once SourceTree has access to your repos, you can select Unreal Engine repo from your repositories list and then select Clone. This lets you choose a path to save the files. Under Advanced Options, select the release branch and click the Clone button.Once cloning is done or after downloading the ZIP file, go to the directory and double-click the Setup.bat file. (If you downloaded the ZIP file, extract it first). You can include or exclude specific platforms by passing the necessary flags in the Setup.bat file. For example, to exclude Mac and iOS platforms on a Windows machine, you can run Setup.bat like this:Setup.bat –exclude=Mac –exclude=iOS
This ensures that any dependencies and files required for the Mac and iOS platforms are skipped. Once Setup.bat finishes, run GenerateProjectFiles.bat, which generates the UE4 solution file that you can open in Visual Studio. After opening the solution file, you can see UE4 under the Engine folder in Solution Explorer. Right-click UE4 and select Build. This starts the build process, which might take an hour or more to compile, depending on your hardware.
Getting to Know Unreal Editor
Now that you have installed (or compiled) your engine, let’s start it up. Throughout this book, we only work with the binary version of the engine, which is 4.24. You create a blank project and learn about the aspects of the engine. To start the engine, click the Launch button for 4.24.3. This opens the Unreal Project Browser window, where you can select an existing project or create a new one from scratch or a template (see Figure 1-3).
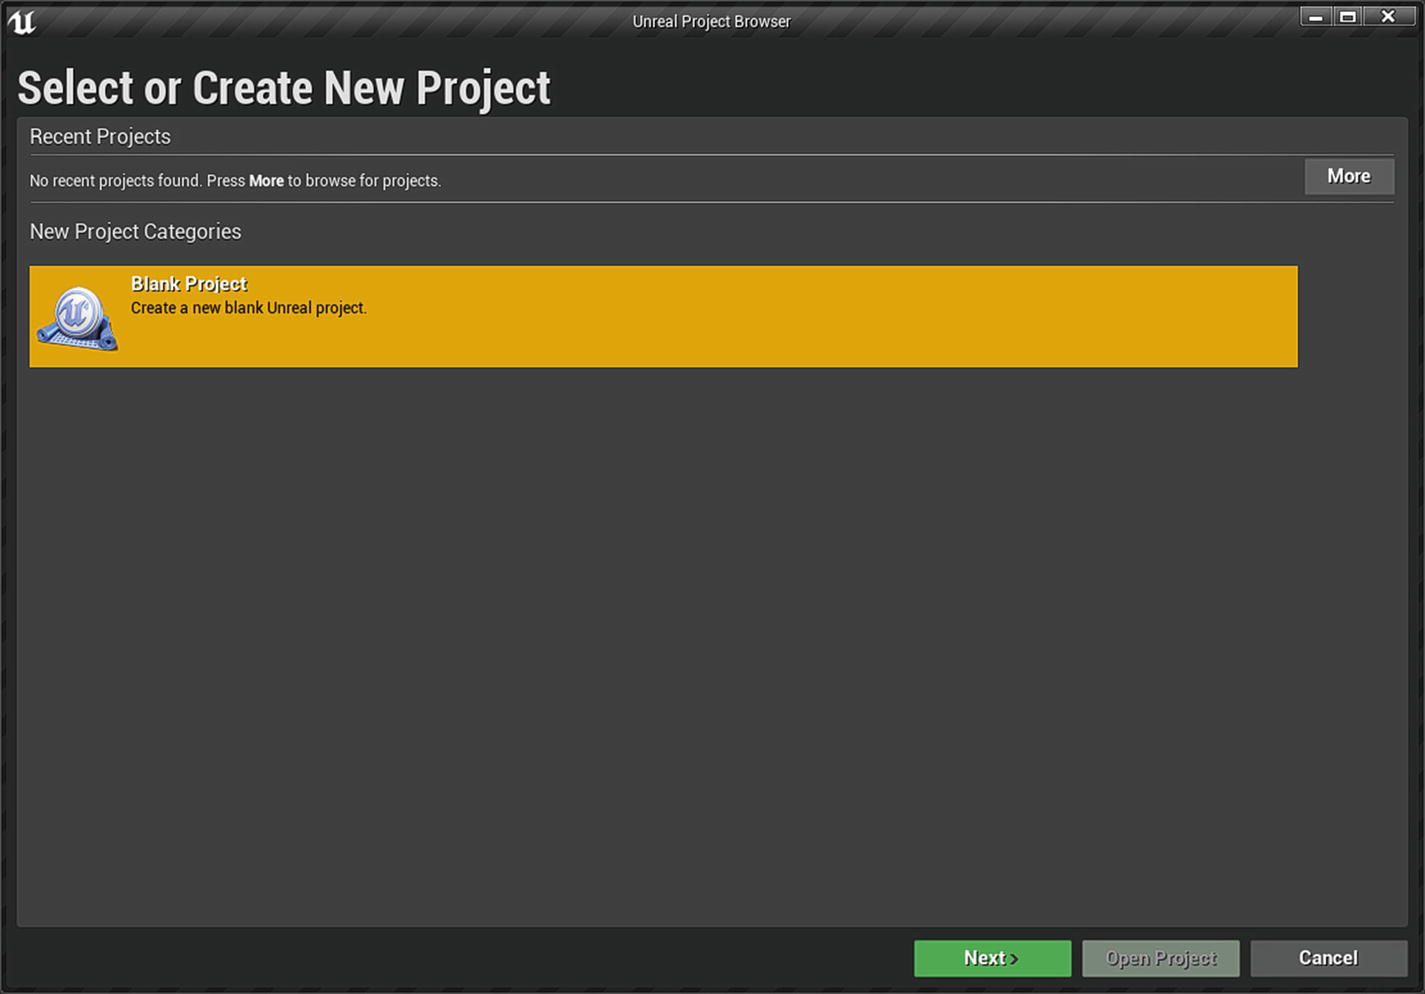
Let’s select Blank Project and click Next. On the next page, you are prompted to either start a blank project or create one based on a template. For our purposes, let’s select a blank template and click Next. This gives you a project with no code or content and with the default settings. Finally, the last page allows you to do basic configuration and name your project.Let’s go through the Project Settings page shown in Figure 1-4.
- Blueprint (labeled 1 in the screenshot) lets you choose whether your project is based on Blueprints or C++. If you start in Blueprints, you can later add C++ code to your project.
- Depending on your project, you can change Maximum Quality (labeled 2 in the screenshot) to Scalable 3D/2D. The first option is suitable for PCs/consoles, and the second option is suitable for mobile.
- If you target high-end PC games and own an Nvidia RTX graphics card, you can enable raytracing features (labeled 3 in the screenshot) for your game.
- Desktop/Console (labeled 4 in the screenshot) lets you select the closest equivalent target platform.
- With Starter Content (labeled 5 in the screenshot) lets you choose if you want to copy starter content to your project. It contains simple meshes with basic materials.
- Folder (labeled 6 in the screenshot) is where you enter the location of the project’s folder.
- Name (labeled 7 in the screenshot) is where you enter the name of your newly created project.
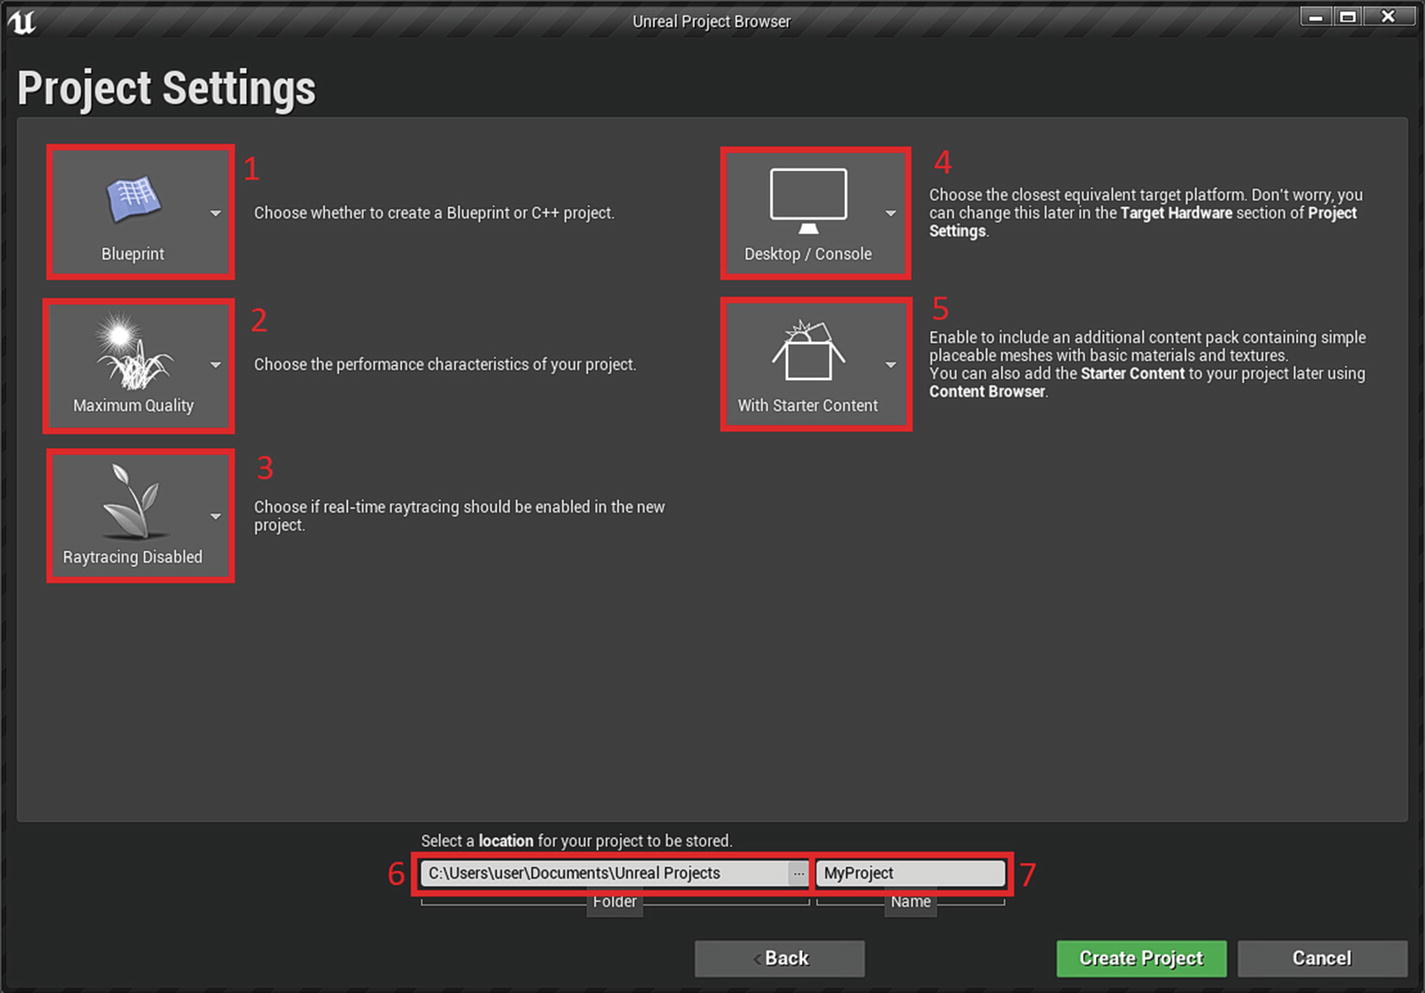
To create the project, click the Create Project button. This starts the engine with an empty project ready for you to create.
PROJECT STRUCTURE
Next, let’s look at the project folder you just created to see how a project is structured. If you navigate to the project folder, you should see a structure similar to the screenshot shown in Figure 1-5.

- Config: This folder is where the settings are saved when you change editor preferences or project settings. You can also create your config files to save data.
- Content: This folder is where all your game assets are saved.
- Intermediate: Editor and game temporary files are generated here. It is safe to delete this folder, and it is automatically regenerated when the editor is started next.
- Saved: This folder contains all the autogenerated config files, log files, and autosaves.
The following are other folders that you might see.
- Binaries: This folder contains the DLL files for your project. It only appears if your project contains C++ source code.
- DerivedDataCache: This folder contains versions of your assets on its target platforms. You can safely delete this folder, and the editor regenerates it next time.
- Source: This folder contains header (.h) and source (.cpp) files. It only appears if your project contains C++ source code.
- Plugins: This folder contains all the plugins for your project. To create a new plugin, your project must contain C++.
AN UNREAL EDITOR TOUR
Once the engine starts, your screen should look similar to Figure 1-6.
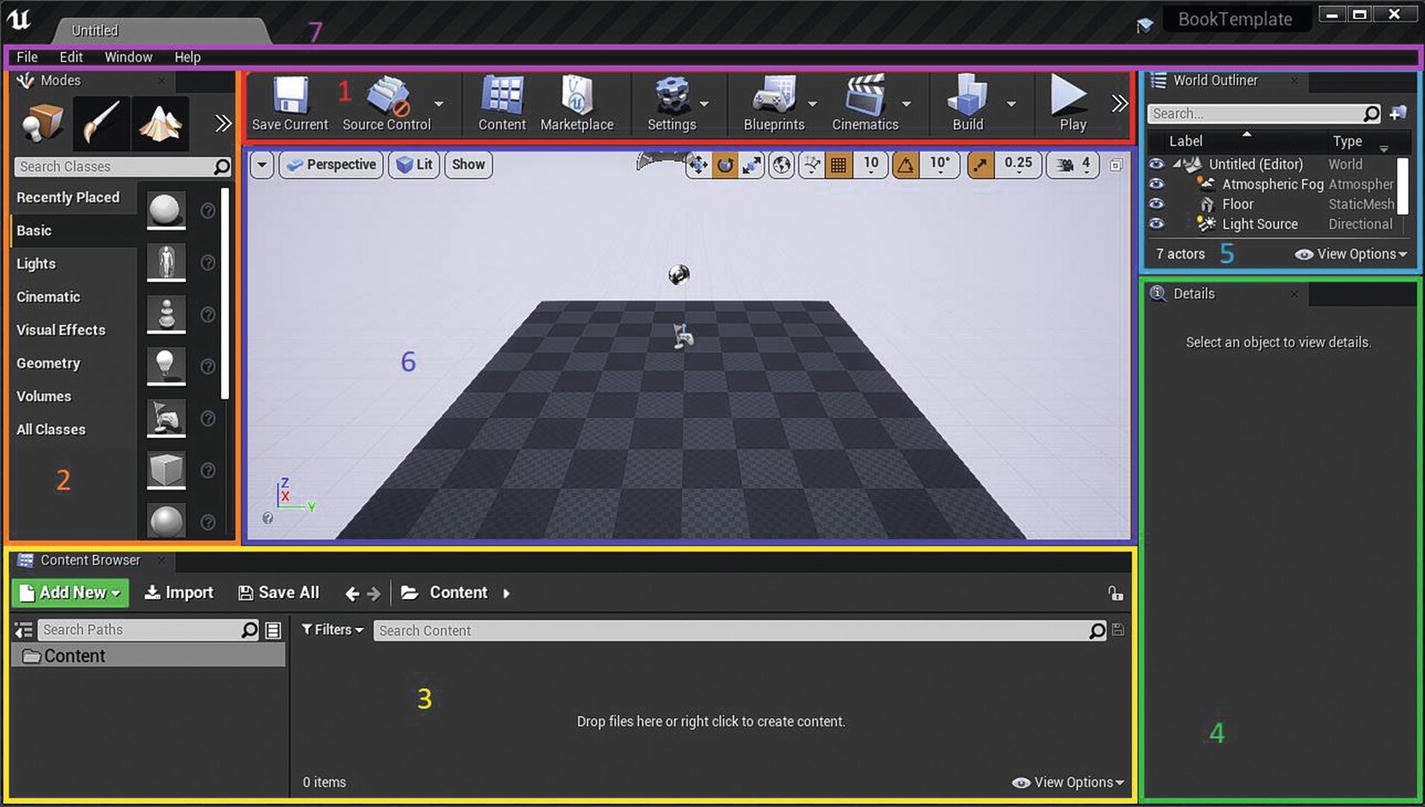
Let’s go through the layout of the Unreal Editor as seen in Figure 1-6.
- The area labeled 1 is the toolbar. Here you can save the current scene, open the Content Browser, access quick settings, build lighting, Play In Editor, and so forth.
- The area labeled 2 is the Modes panel. Here you can switch between different modes, such as Placing Actors mode (default), Mesh Paint mode, Landscape mode, Foliage mode, and Brush mode.
- The area labeled 3 is the Content Browser where you import or create all the assets.
- The area labeled 4 is the Details panel, where you modify the properties of the selected actor that is placed inside a level.
- The area labeled 5 is World Outliner. It shows all actors currently present inside the level. Using the eye icon, you can quickly hide/unhide actors.
- The area labeled the menu bar. It allows you to add a new C++ class, access editor and project settings, reopen closed tabs, and so forth.
The Toolbar
The toolbar is displayed right above the viewport. It provides easy access to various editor commands.
- Save: Saves the current scene. If the current scene is not saved, it prompts the user to select a location to save the map.
- Source Control: Provides access to different source controls, like Perforce, Git, Subversion, and so forth. You can install other source control plugins too. Source control is the practice of tracking and managing changes to code or assets. You can read more about source control at https://en.wikipedia.org/wiki/Version_control.
- Content: Opens the Content Browser.
- Marketplace: Opens the UE4 marketplace in your default browser.
- Settings: Gives quick access to some editor settings, as well as Project Settings and World Settings.
- Blueprints: Creates a new Blueprint class or opens a Level Blueprint. You learn more about Blueprints in the next chapter.
- Cinematics: Adds level or master sequences.
- Build: Builds lighting, navigation, geometry, and so forth. This button is disabled when Play In Session is active, or the current level is previewing in less than Shader Model 5.
- Play: Plays the current level in the active viewport. The arrow next to the Play button shows a drop-down with options that let the developer play the game in a new window, mobile preview, as a stand-alone game, and so forth. You can also set the game to start a dedicated server for testing multiplayer games.
- Launch: Launches the current level in a given device.
Modes
The Modes panel switches between various tool modes for the editor. Each mode panel can be switched by pressing Shift +1 to 5.
- Place mode (Shift+1): Places actors in a scene.
- Paint mode (Shift+2): Allows you to vertex paint a Static Mesh Actor directly on the viewport. This means you can paint color data onto the vertices of the Static Mesh Actor that is placed on the level and use that information in the material assigned to that Static Mesh.
- Landscape mode (Shift+3): Creates new landscapes or edits existing ones.
- Foliage mode (Shift+4): Paints foliage.
- Brush mode (Shift+5): Modifies BSP (binary space partitioning) brushes. It is a geometry tool to quickly prototype or block-out levels.
Content Browser
The Content Browser is the heart of your project. All the assets that make up your blockbuster game reside here. You can import supported file types and create new assets like Blueprint, Materials, and Sequences. The Content Browser allows you to favorite your assets and arrange them in your own collections for quick access, which improves your workflow significantly. So let’s look at them.
Favorites
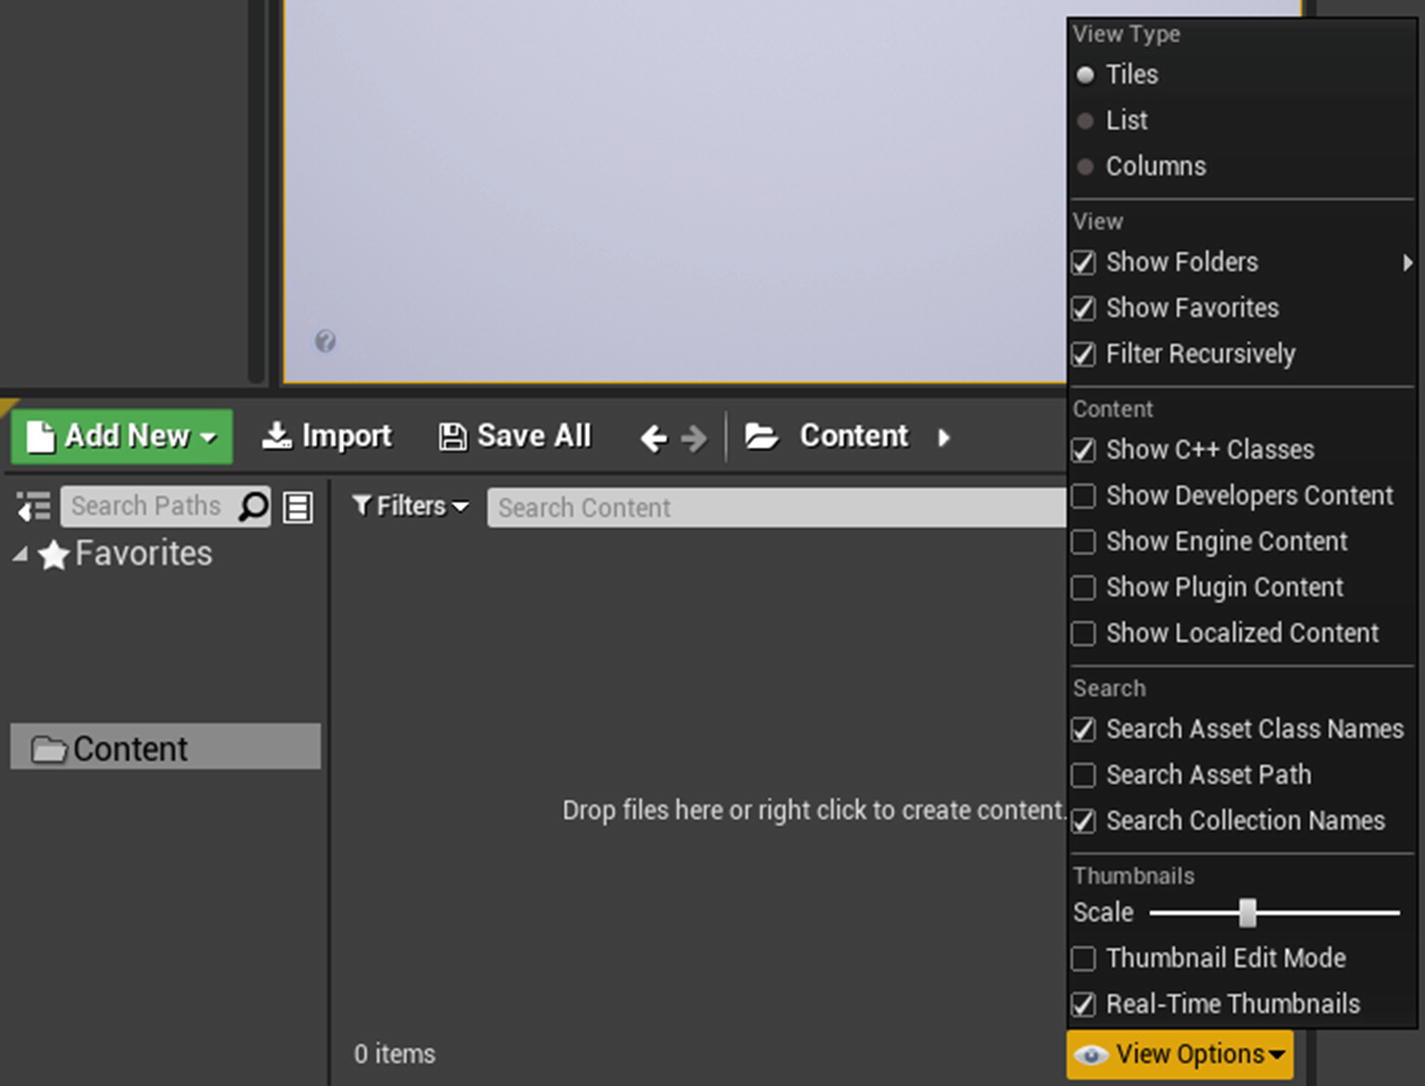
You can assign any folder as favorites for quick access. Favorites is not enabled by default. You can enable it by clicking View Options in the bottom-right corner of the Content Browser and selecting Show Favorites. The Favorites section is visible above the main Content folder.Note
Only folders can be assigned as favorites, not assets.
Collections
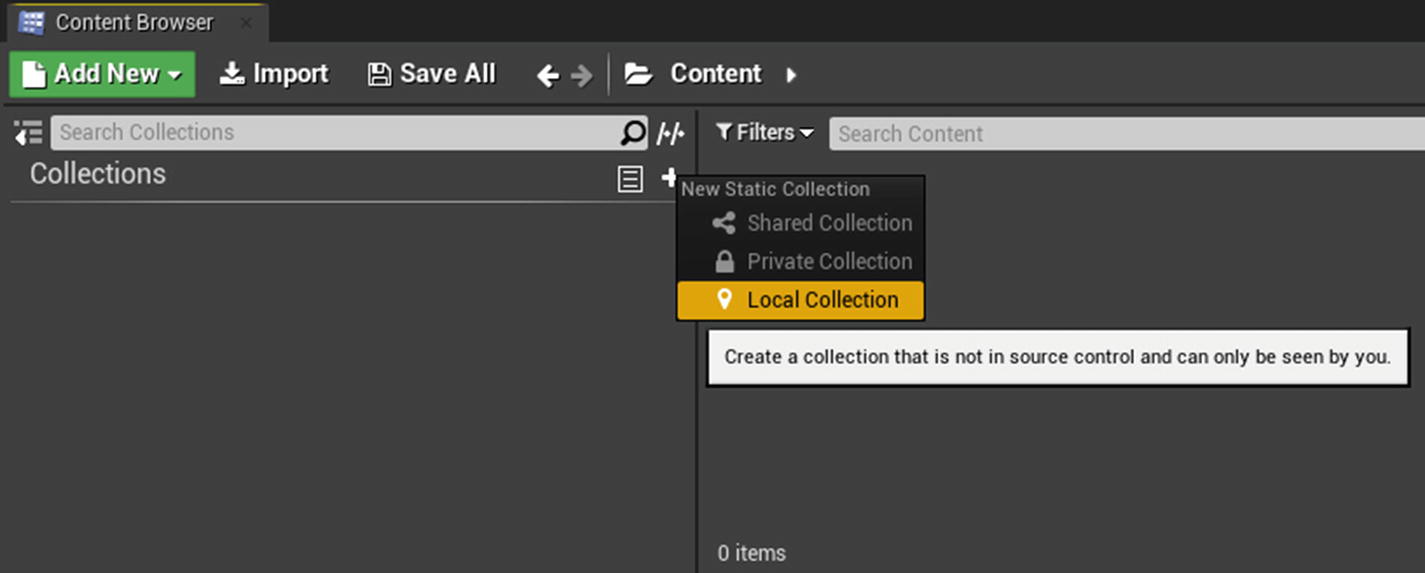
Collections allow you to organize your assets into separate collections. For example, if you are making an open-world game, you can make different collections for player buildings, urban buildings, objective buildings, quest props, and so on. Each collection can have child collections, and assets can be added or removed anytime. Removing an item from a collection does not remove the actual asset because it is simply holding a reference inside a collection. You can have the same asset in multiple collections and create as many collections as you wish.
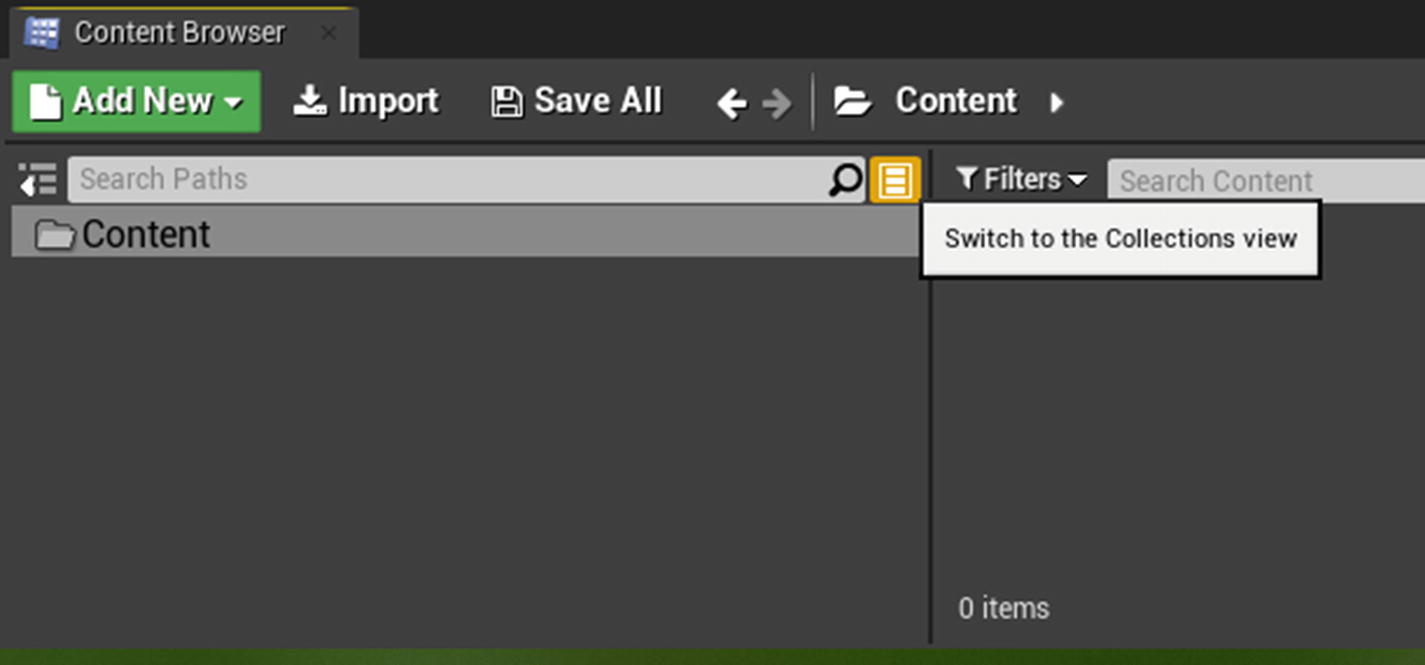
You can switch to Collections view by clicking the Switch to the Collections view button in the Content Browser.There are three types of collections—Shared, Private, and Local.
- A Shared Collection can be shared with other team members. You must have source control enabled for this option to work.
- A Private Collection can be shared with anyone invited to view the collection. You must have source control enabled for this option to work.
- A Local Collection is only available to you. It is not shared via the network. This option is always available regardless of your source control settings.
After creating a collection, you can drag and drop your assets into it. You can view the number of items available inside a collection.As you can see in Figure 1-10, to remove an asset from a collection, you must first select the collection, right-click the asset, and select Remove FromYourCollectionName. This removes the asset from the collection, but it does not delete the asset.


Details
The Details panel contains the selected actor’s information and functions. It displays all the transform controls and all the editable properties of the specific actor. All the thumbnails in the Details panel can be double-clicked to open in respective editors. For example, double-clicking a Static Mesh thumbnail opens that mesh. Likewise, if you double-click a material thumbnail, it opens that material in the Material Editor.
The Details panel also offers a search panel that filters properties based on the text. When properties are modified, a small yellow arrow is displayed next to it. This resets the property to its default value.
World Outliner
The World Outliner displays all the actors in the current level. When a Play In Editor session is active, it shows all the actors spawned for the current game in yellow color. You can select any actor in the outliner, and the details panel shows all properties related to that actor. Drag and drop is also supported so you can drag an actor to another to attach it. Searching is also supported with advanced options such as exact match and exclusion.
To exclude an item from search, append – to the search term; for example, -table shows everything except for any actor containing the term table.
To search for an exact item, append + to the search term; for example, +table shows everything with the exact term table.
To search for an exact item using the full term, put the term inside double quotes (“”); for example, “lunch table” shows everything with the exact term lunch table.
Viewport
The viewport is where you spend most of your time developing your game. It is where you see the actual game, so understanding the viewport is crucial for your development. Pressing the G key toggles the viewport between game mode and editor mode. Game mode displays the scene as it appears in the game by hiding all editor-related elements.
In addition to the maximized state of the viewport, Unreal Editor provides an additional state called Immersive mode , which is activated by pressing the F11 shortcut key or accessing the viewport options. When activated, the viewport is maximized to the full extent of the window containing the viewport panel.The following explains how to navigate the viewport.
- Right-click and hold the mouse. Use W, A, S, D to move around.
- Left-click and hold the mouse. Move your mouse forward, backward, and sideways.
- Hold the middle button on your mouse and move it to pan.
- Right-click and hold your mouse. Move it to look around.
Knowing these shortcuts can improve your development workflow.On top of the viewport, you can see the viewport toolbar. It switches to different viewport layouts and view modes, moving/rotating/scaling assets, camera speed, and so forth. You can switch translation modes using the following shortcuts.
- W to move the actor
- E to rotate the actor
- R to scale the actor
Use the spacebar to toggle between all three selections.Note
You can toggle the visibility of this toolbar by pressing Ctrl+Shift+T.
At the very end of the toolbar, you see a number icon. This is the camera movement speed inside the editor. You can click it and adjust the slider to the right for faster camera movement or slide it to the left for slower camera movement. To quickly change it, press and hold the right mouse button inside the viewport, and use your mouse wheel to adjust the camera speed. Scroll up for higher speed and scroll down for lower speed.
Post Link: 1. Introduction to Unreal Engine 4