
4. Gameplay Classes-2
Next, select Third Person from the Blueprint Feature tab and click Add To Project. Now you have the Mannequin. Assign the Mannequin to the previously created Character Blueprint class.You may notice that the mesh is not aligned properly. The character mesh is at the center of the Capsule Component, and the rotation of the character is facing in the wrong direction. To fix this, adjust the location and rotation of the Mesh Component to the proper values.
- Location: X: 0, Y: 0, Z: –97
- Rotation: Roll: 0, Pitch: 0, Yaw: 270
You also need to add a camera to the player to have a proper view. First, you add a Spring Arm Component, which maintains its children at a fixed distance from its parent. To do this, click the Add Component button in the Components tab and select Spring Arm under the Camera section (see Figure 4-5).

Using the same method, add a Camera to the Spring Arm Component. The result should look like Figure 4-6.

If you drag and drop the character into the Level Editor, you can preview how the player sees the character from this camera angle. There are few settings to change in the Character class. Click the Class Defaults button in the Blueprint Editor toolbar. In the Details panel, disable Use Controller Rotation Yaw under the Pawn section. After that, select the Spring Arm Component that you added and enable Use Pawn Control Rotation under Camera Settings. Finally, select the Character Movement Component and enable Orient Rotation to Movement.
Now that our character is almost ready, let’s implement a basic function that moves it around.
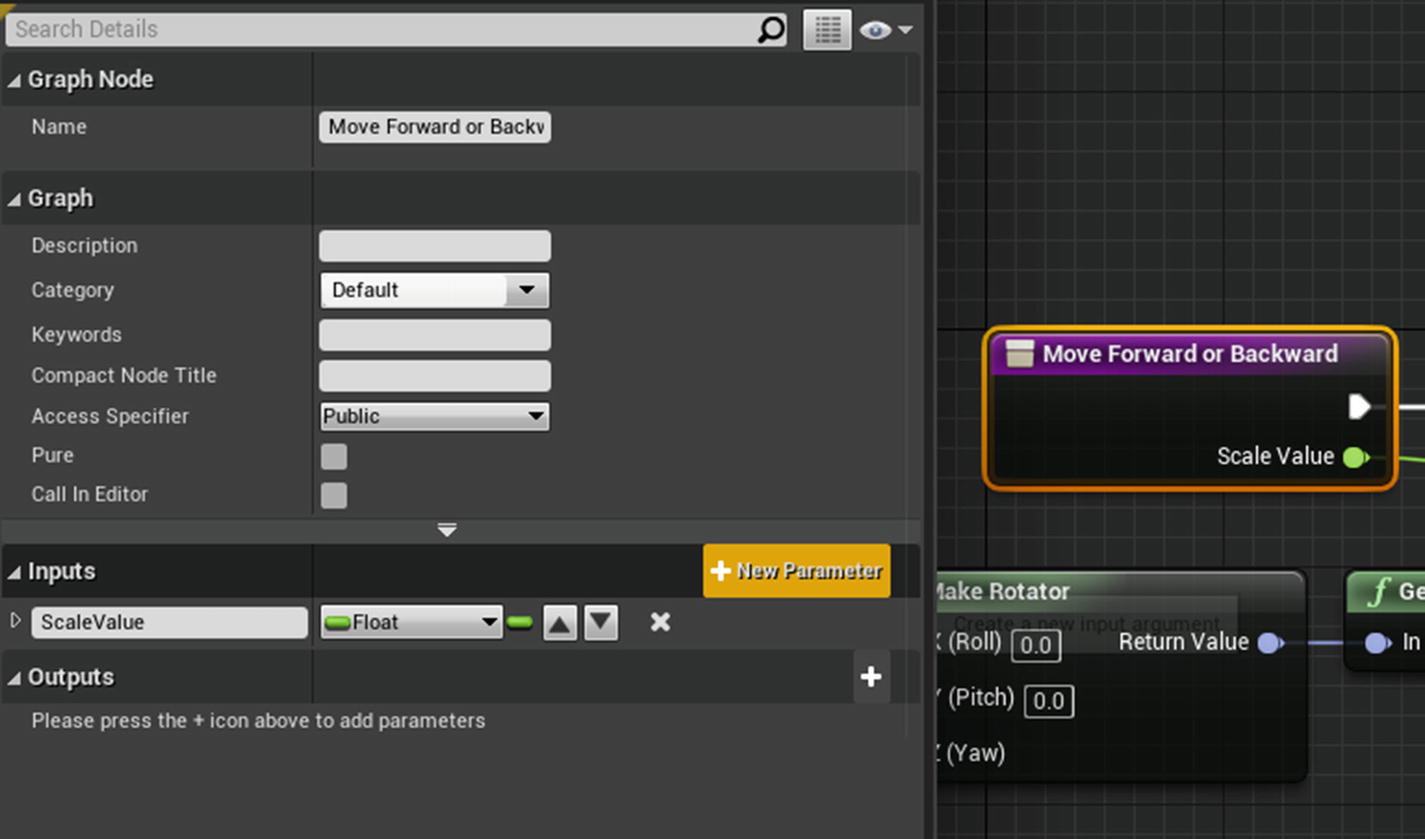
First, you need to add two functions that make the character move forward/backward and left/right. To create a new function, click the Function button under the Functions section in the My Blueprint tab in your Character class. After you click the button, you can rename the function; let’s call it Move Forward or Backward .You also add a float parameter called ScaleValue, which scales the input. To add a parameter to the function, select the purple node, and in the Details panel, add a new input parameter and select Float from the drop-down list (see Figure 4-7).
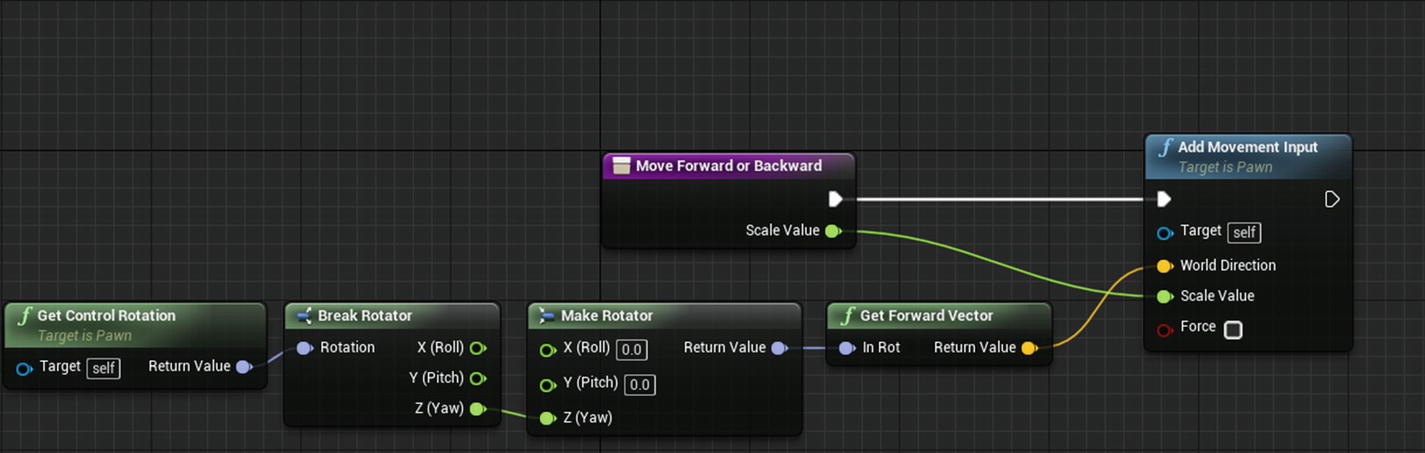
Inside this function, you get the character’s control rotation. You use its yaw rotation to find the forward vector, which you use as the direction to move the character. The forward vector is a normalized vector that points in the direction that the actor is facing. The final function should look like what’s shown in Figure 4-8.
The same function can be duplicated; call it Move Left or Right. Rather than the Get Forward Vector, use the Get Right Vector. The final function should look like Figure 4-9.
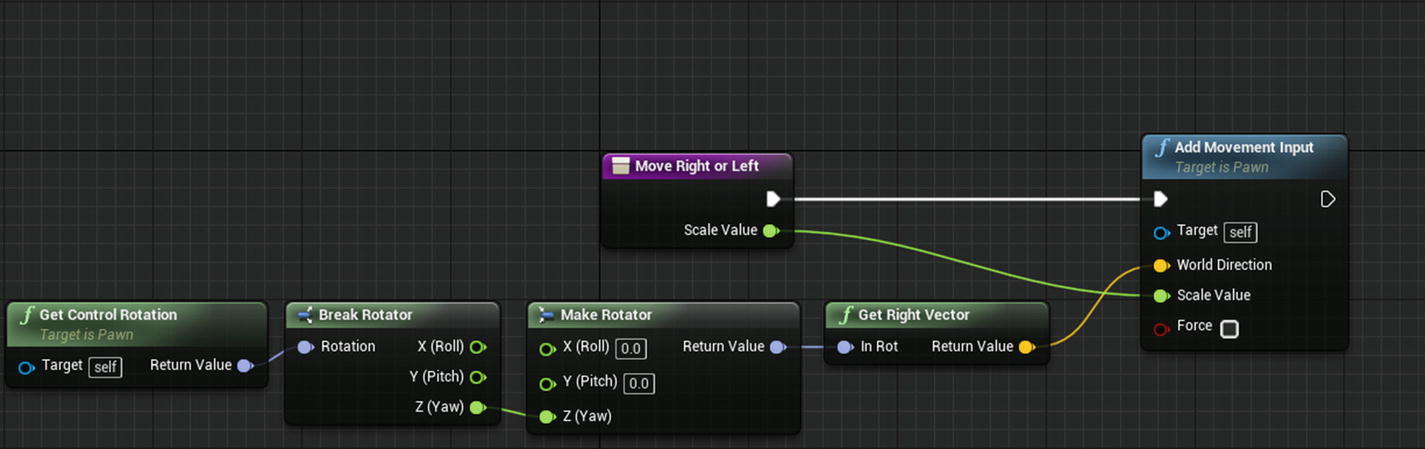
Note that the two functions look the same except for Get Forward Vector and Get Right Vector.Before continuing with input, you need to define these functions in Input Settings under the Engine section, which is accessed from Project Settings. In Figure 4-10, you see the basic input settings that I defined.

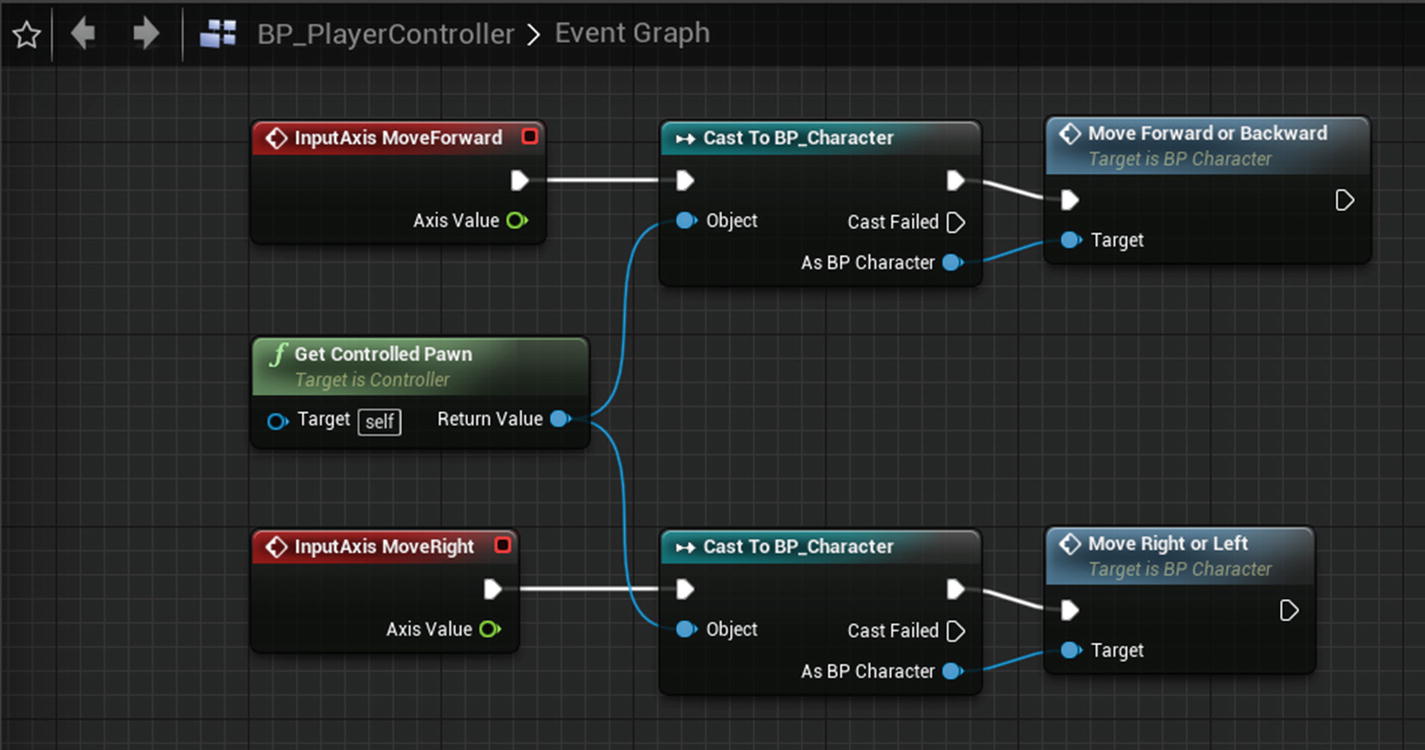
The axis values can be accessed from a Pawn class or Controller class. We will use the latter option.To create a new player controller, right-click Content Browser, and select Blueprint Class. In the next window, select Player Controller and open the asset to add nodes. Inside the Player Controller graph, right-click the graph and search for MoveForward, which is the same name you defined in Input settings. Once you select the node, right-click the graph again and search for Get Controlled Pawn. The return value of the Get Controlled Pawn node points to the current character or pawn the player is controlling. So from the return value, drag a pin and cast it to the Character class that you created. From the Casted Character class, drag another pin and call the Move Forward or Backward function you created. Connect this set of nodes to the InputAxis MoveForward event. The same set of nodes connect to the InputAxis MoveRight event, but instead of using the Move Forward or Backward function, you call the Move Right or Left function. The final graph should look like Figure 4-11.
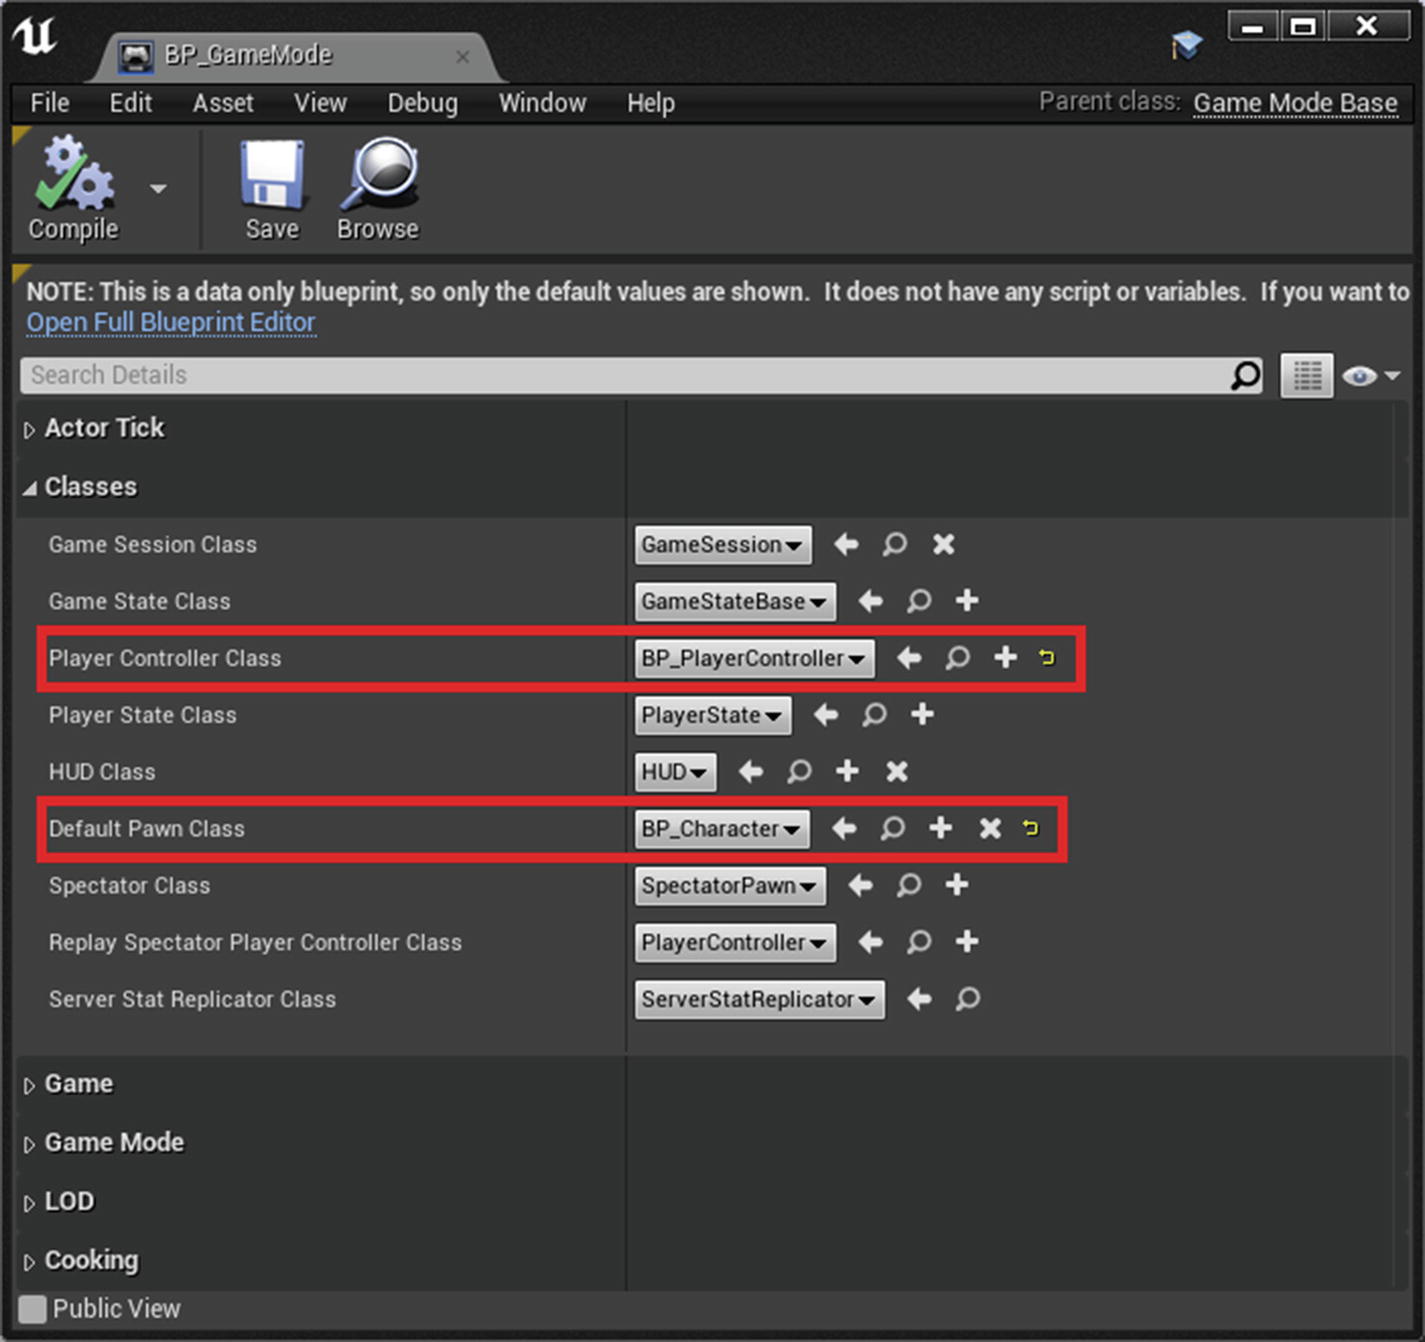
The last step uses the Character and Controller classes in our game. To do so, create a new Game Mode Blueprint and assign our character as the default pawn and the controller as our Player Controller class in Game Mode. In Figure 4-12, you can see I assigned our Blueprint-created character and controller to the Game Mode class.
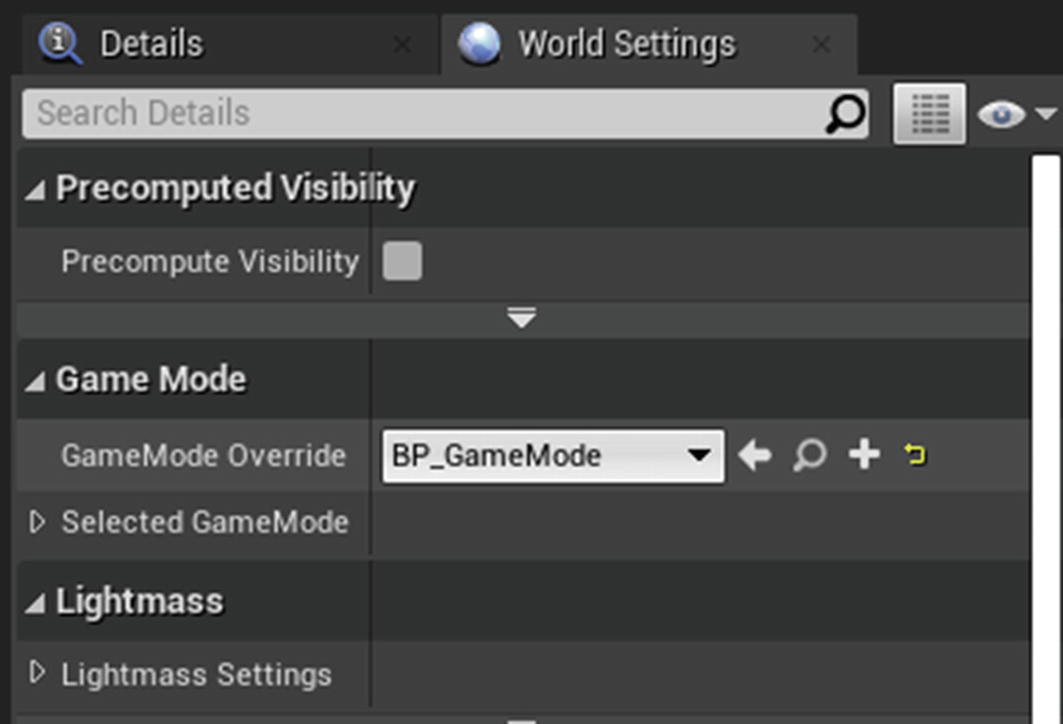
To use BP_GameMode we created , you need to assign this to your level’s World Settings. In your Level Editor’s main toolbar, click Settings and select World Settings (see Figure 4-13).

In the World Settings tab, assign the game mode (see Figure 4-14).
If you press Play, you can move the character around using the W, A, S, D keys, or any keys you assigned in Input Settings.
Creating and Showing Data on HUD
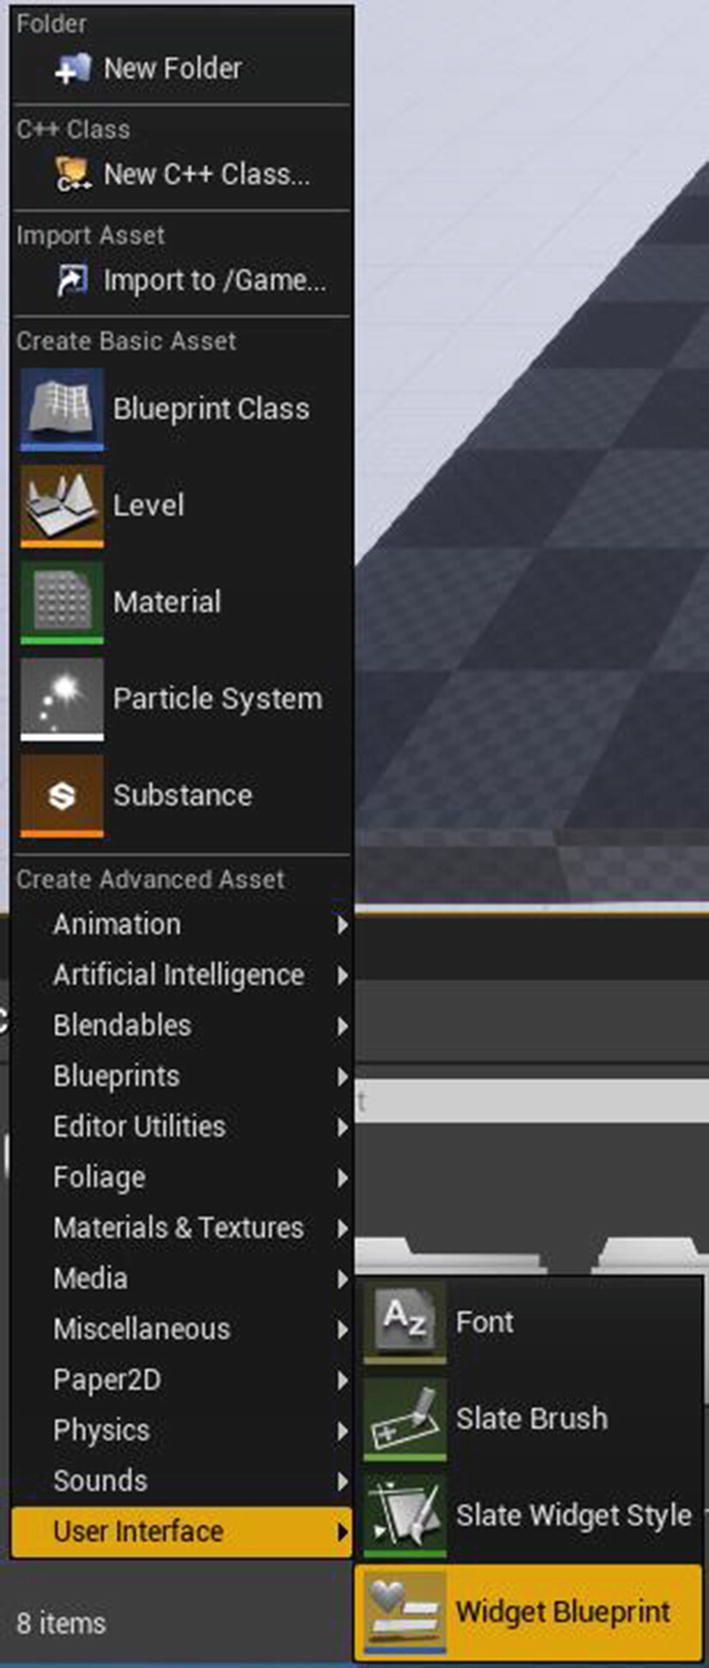
In this section, you add a basic HUD to the player character, create a health variable that changes when the player takes damage, and create a welcome text that automatically disappears after 3 seconds. Note that the implementation shown here only works in single-player games; it does not work in multiplayer games.First, let’s create a UMG widget Blueprint by right-clicking the Content Browser and selecting User Interface ➤ Widget Blueprint (see Figure 4-15).
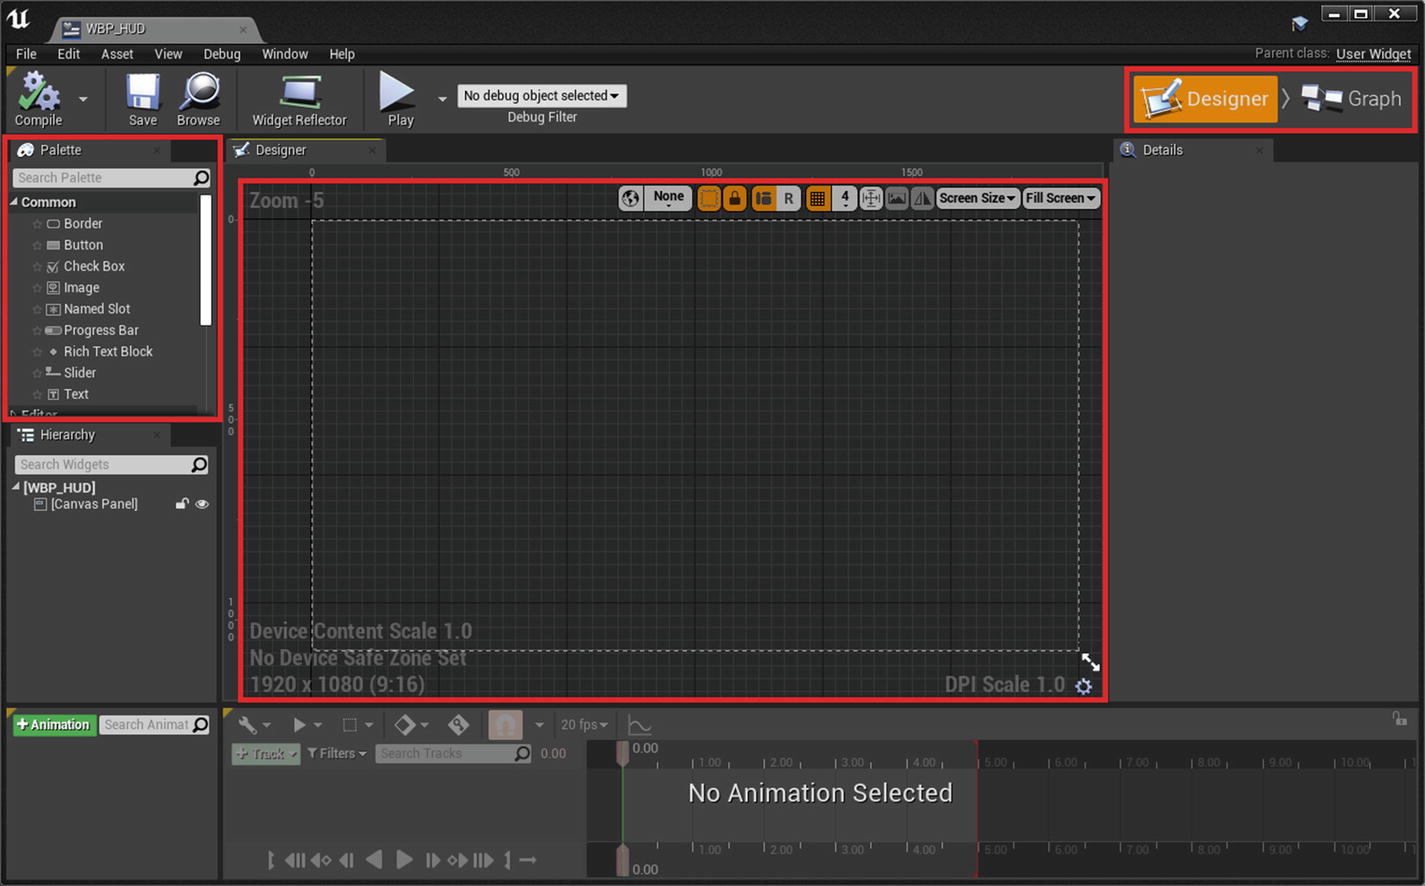
Open the Widget Blueprint. You see the main Designer section, where you drag and drop different widgets from the Palette panel. In the top-right corner, you can switch between Designer view and Graph view (see Figure 4-16). Graph view is used to create all the Blueprint logic.
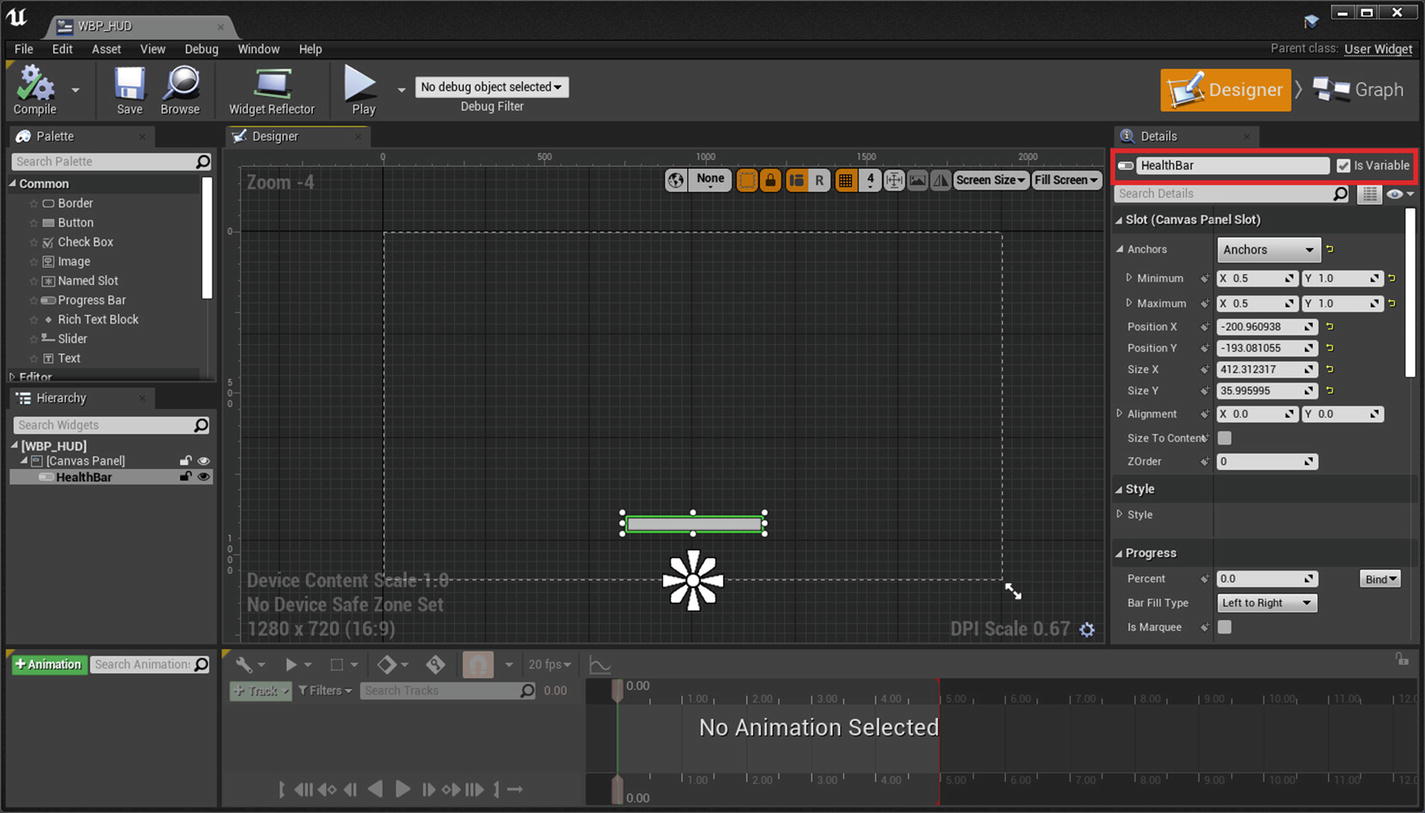
Let’s drag and drop a progress bar widget from the palette to the Designer tab. Select the progress bar widget. In the Details panel, enter a name for the progress bar (e.g., HealthBar)(see Figure 4-17).
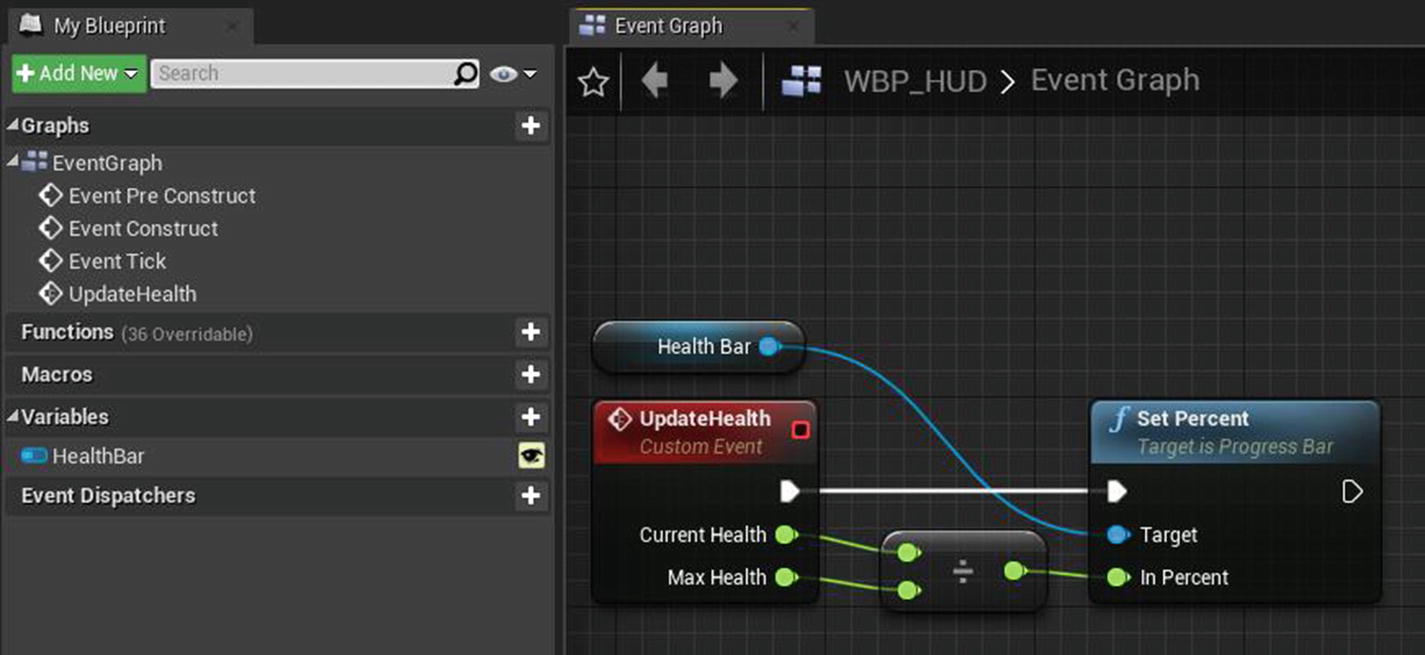
To implement the logic, let’s first switch to the Graph view and create a new event. Right-click inside the graph and select Add New Event from the Add Event category. Rename this event to UpdateHealth and add two float parameters called CurrentHealth and MaxHealth. Drag from the CurrentHealth float pin, search for the Divide operator, and select it. Then connect MaxHealth to the B input of Divide. This is the result that you use in ProgressBar. It is done because ProgressBar works in the 0–1 range, and since you are dividing CurrentHealth by MaxHealth, you get the result in this range.To set the value of ProgressBar, drag and drop ProgressBar from the Variables category to the Graph view, drag from the pin, and search for Set Percent. Connect the result of the Divide node to the In Percent of Set Percent node. Your node setup should look similar to Figure 4-18.
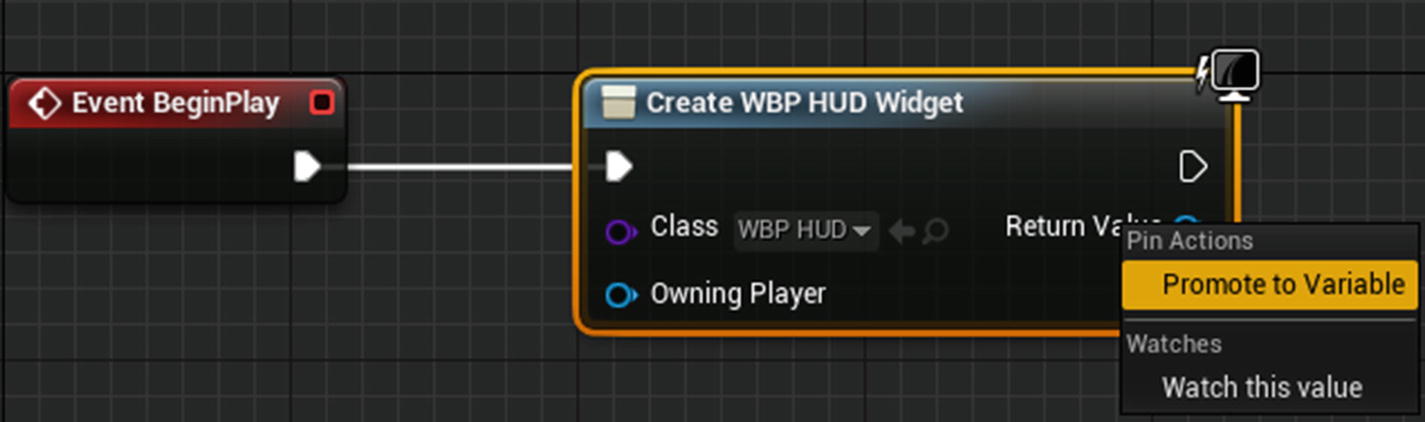
To use of widget, you need to add it to the screen. Let’s open the Character Blueprint and switch to Event Graph. Right-click inside the graph and search for the Create Widget node. Inside the Class input, set the newly created UMG HUD. Then right-click Return Value and choose Promote To Variable (see Figure 4-19). Name it PlayerHUD. This caches the result to a variable so that you can access it anytime you want.
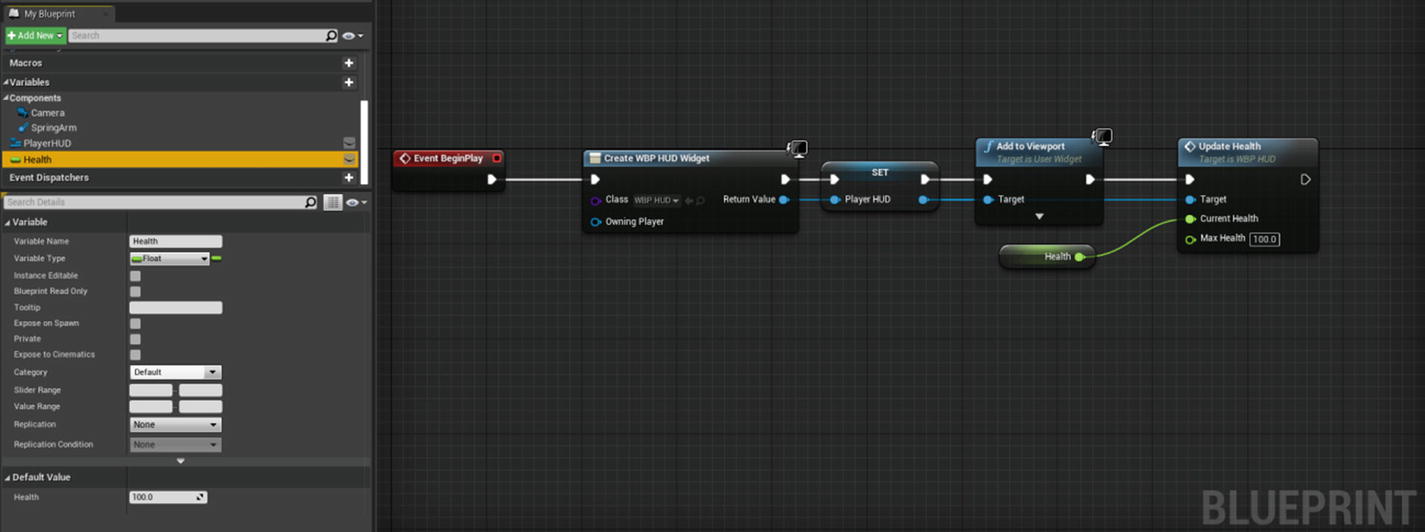
From the PlayerHUD variable, drag a pin, search for Add To Viewport, and select it (see Figure 4-20).

If you play now, you can see the newly added HUD on your screen, but it does nothing yet because we have not called the Update Health event. To quickly fix this, drag a pin from the PlayerHUD variable and search for UpdateHealth. Now create a float variable called Health, and set its default value to 100. Drag this variable from the My Blueprint tab, connect it to the Current Health of Update Health function, and set Max Health to 100 (see Figure 4-21).
Once you have set up everything, add the welcome text. Drag and drop the Text widget from the Palette tab to the designer. To align this text in the center of the screen, set the Anchor to center by expanding it and setting both Minimum and Maximum to 0.5. You need to set the alignment to 0.5 also. After that, set Position X and Position Y to 0. The text is now centered on the screen. Next, enable Size To Content to automatically size the widget according to the text.Under the Content category, change the text to your liking. For this example, let’s write something like Welcome to UMG. Expand the font under Appearance and set Size to 48. You need the text to disappear after 3 seconds. To do so, make sure that the Is Variable in the Details tab is set to True and enter a name for your Widget (e.g., WelcomeText) (see Figure 4-22).

Switch to Graph view, and you now can drag and drop the WelcomeText widget from the MyBlueprint tab (under the Variables section) to the graph. Right-click the graph, search for Delay, and select it. Connect the Delay node to Event Construct. Then drag a wire from the output pin of Widget Text, search for Set Visibility, and select it. Change In Visibility from Visible to Collapsed, and connect the output Completed of Delay node to the Set Visibility node. Finally, change the duration of the Delay node to 3 seconds (see Figure 4-23).

Click the Play button. You see that the welcome text and progress bar are showing (see Figure 4-24).

Whenever your player is taking damage, you can reduce your health and call Update Health with Health connected to Current Health, which properly updates the progress bar in UMG.
Post Link: 4. Gameplay Classes-2